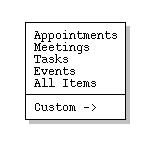
The calendar views described in
Section 2.3.1
are organized in standard calendar units of days through years. The user may
also view scheduled items in the alternate form of ordered lists. To view a
list of scheduled items, the user chooses the `View Lists' menu
command. In response, the system displays the submenu shown in Figure 30.

Figure 30: View lists submenu.
The first four commands are used to list the four different types of scheduled item. The fifth `All Items' command displays a list of all four types of scheduled item. The last command displays a menu of custom views created by the user.
By default, one separate window is used for each of the six subcommands. For example, if the user executes `View Lists Appointments' followed by `View Lists Meetings', both an appointments list and meetings list window are displayed on the screen. Hence, there are up to six list windows, each holding the result of the most recently executed listing command. When the user re-executes a particular `View Lists' command, that command's display is changed (if necessary) and brought to the front, without a new window being created. For example, if the user executes `View Lists Appointments', then adds two new appointments, and re-executes `View Lists Appointments', the appointments-list display window is changed, with no new window created.
As for the view-level commands of Section 2.3.1, the user may change the default display style by enabling two-window or multi-window viewing mode. In two-window mode, the results of view commands are shown in just two windows, one for calendars and the other for lists. In multi-window mode, the results of each and every viewing command are shown in a separate new window, even for lists of the same type. For example, if the user executes two successive `View Lists Meetings' commands in multi-window mode, the results are shown in two separate meeting list windows. Complete details of multi-window viewing are described in Section .
Multi-window lists are particularly useful when applied in conjunction with
filtered viewing. For example, the user can display a list of two different
categories of appointments in two separate side-by-side windows. Complete
details of filtered viewing are presented in
Section 2.3.4.
2.3.3.1. Appointment Lists
Figure 31 shows the response to the user's selection of the `View Lists
Appointments' command.
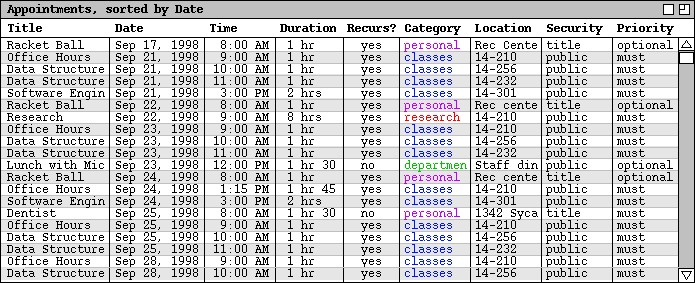
Figure 31: Basic Appointments List.
The figure shows a list of appointments created by the user in the scenarios presented thus far. By default, the list is sorted primarily by date, secondarily by time, thirdly by duration, and fourthly by title. The default date range of the list is the three-week period starting one week prior to today's date. The default physical height of the list display window is twenty items. These default settings can be changed using the options commands described in Section 2.7.4.1.
For the ongoing scenario, the current date is September 23. This means that the three-week period covers the dates September 16 through October 6, inclusive. Since there are more than twenty appointments scheduled in this period, the list window can be scrolled or resized to view the additional items.
The items in an appointments list are a somewhat abbreviated version of the information for a scheduled appointment. The precise extent of the abbreviations is as follows:
The user can change the default order of the list by clicking on any of the
column labels that appear in the display. For example, if the user clicks on
the Title column label in
Figure 31
the system updates the display to that shown in Figure 32, where the list items
are sorted alphabetically by title.
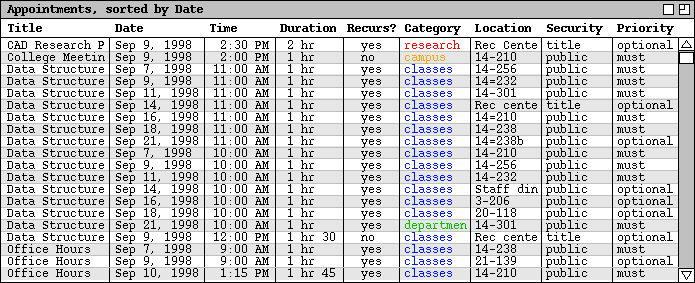
Figure 32: Appointments list sorted by title.
Since no single field value in an appointment is necessarily unique, the
primary sorting order must be augmented with secondary, tertiary, quaternary
and in some cases quintinary orders. Table 1 specifies the precise subordering
for each of the column labels used as the primary sorting key.
| Primary | Secondary | Tertiary | Quaternary | Quintinary |
| Title | Date | Time | Duration | |
| Date | Time | Duration | Title | |
| Time | Date | Duration | Title | |
| Duration | Date | Time | Title | |
| Recurs | Date | Time | Duration | Title |
| Category | Date | Time | Duration | Title |
| Location | Date | Time | Duration | Title |
| Security | Date | Time | Duration | Title |
| Priority | Date | Time | Duration | Title |
Table 1: Sorting suborders for appointment and meeting lists.
Figure 32 shows how the banner of a list window is altered to indicate that a sorting order other than the default is in use. The format of the banner for all list displays is the following:
type-of-list, sorted by field-namewhere type-of-list is one of Appointments, Meetings, Tasks, Events, or All Items; field-name is the name of item field used as the primary sorting key.
To view a list of scheduled meetings, the user selects the `View Lists
Meetings' menu command. Figure 33 shows the result of the user so doing.
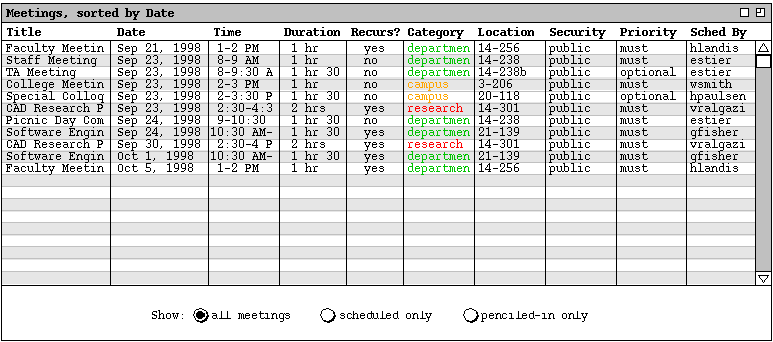
Figure 33: Meetings List.
The default sorting order for meeting lists is the same as for appointments. The `Sched By' column is sorted lexically in the same manner as `Title'. When `Sched By' is used as the primary sorting key, the secondary through quintinary sorting keys are, respectively: Date, Time, Duration, and Title.
Three radio buttons at the bottom of the display control the visibility of
meetings based on whether a meeting is scheduled or penciled-in. As described
in
Section 2.4.1,
a scheduled meeting is one that the user has scheduled herself, or accepted
from another user. A penciled-in meeting is one scheduled by another user but
not yet accepted by a receiving user. Specific details of accepting
externally-scheduled meetings are covered in
Section 2.4.1.5.
2.3.3.3. Task Lists
When the user selects the `Tasks' command from the `View
Lists' menu, the system displays a window of the form shown in Figure 34.
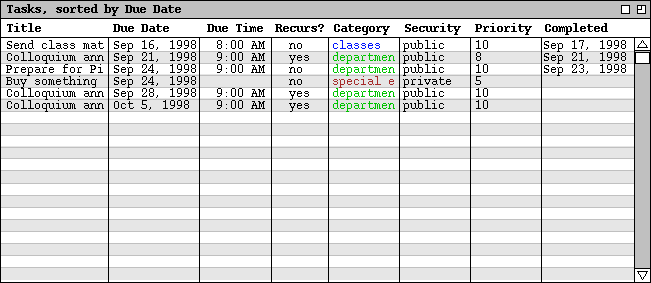
Figure 34: Tasks list.
By default, the task list is sorted primarily by due date, secondarily by due time, thirdly by title. Tasks without a user-specified due time are considered to have a time after those with user-specified due times.
As for the appointments list, the task list is an abbreviation of the full information for scheduled tasks. Specifically,
Also as with appointments lists, the user can change the default order of the list by clicking on any of the column labels that appear in the display. For list columns that are common to both appointments and tasks, the precise sorting rules for tasks lists are the same as those given above for appointment lists. Sorting rules for the other task list columns are as follows:
| Primary | Secondary | Tertiary | Quaternary |
| Title | Date | Time | |
| Due Date | Time | Title | |
| Due Time | Date | Title | |
| Recurs | Date | Time | Title |
| Category | Date | Time | Title |
| Security | Date | Time | Title |
| Priority | Date | Time | Title |
| Completed | Date | Time | Title |
Table 2: Sorting suborders for task lists.
These are the same subordering rules as for appointments, without the
Duration field.
2.3.3.4. Event Lists
Figure 35 shows the result of the user selecting the `View Lists
Events' command.
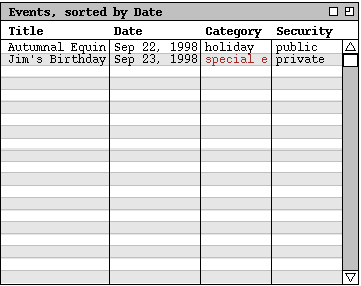
Figure 35: Events list.
Events do not recur, but multi-day events can be defined with a start and end date. There is a separate list item for each day of a multi-day event. For example, there are three separate list items for an event with start date September 21 and end date September 23.
The events-list columns are a subset of the appointments list. For those columns that are present in the events list, the precise sorting rules are the same as given above for appointment lists.
The subordering for each of the primary sorting keys is given in Table 3.
| Primary | Secondary | Tertiary |
| Title | Date | |
| Date | Title | |
| Category | Date | Title |
| Security | Date | Title |
Table 3: Sorting suborders for event lists.
The final listing form contains all four types of scheduled item together in
one list. To select this form, the user executes the `View Lists All
Items' command, in response to which the system displays a window of the
form shown in Figure 36.

Figure 36: All items list.
By default, the list is sorted primarily by date. Among items of the same type, the precise sorting rules for each list column are as stated above in Sections 2.3.3.1, 2.3.3.2, 2.3.3.3, and 2.3.3.4 above.
Table 4 gives the subordering for all possible primary keys, of which there are
eleven in the all-items list.
| Primary | Secondary | Tertiary | Quaternary | Quintinary |
| Title | Date | Time | Duration | |
| Date | Time | Duration | Title | |
| Time | Date | Duration | Title | |
| Duration | Date | Time | Title | |
| Recurs | Date | Time | Duration | Title |
| Category | Date | Time | Duration | Title |
| Location | Date | Time | Duration | Title |
| Security | Date | Time | Duration | Title |
| Priority | Date | Time | Duration | Title |
| Sched By | Date | Time | Duration | Title |
| Completed | Date | Time | Duration | Title |
Table 4: Sorting suborders for all-item lists.
The `Time' field for appointments and meetings represents the start time of the item. The `Time' for tasks represents the time the task is due. The single `Time' column in the all items list is used for both the start time and due time values, depending on the type of item listed in a particular row. The sorting rules for the `Time' column are defined so that the order among appointments, meetings, and tasks is consistent with the order among these items in calendar views.
The following assumptions are made for sorting lists with different types of items, in which one or more of the suborder keys are missing:
The custom lists feature of the Calendar Tool allows the user to define specialized forms of lists. In particular, the user can specify which types of items appear in a list, which item fields appear as list columns, and what range of dates the list covers. For example, the user can define a list that shows only the title and date of appointments and meetings for the next six months.
By default, there are no pre-defined custom lists. Hence, when the user
initially selects the `View Lists Custom' menu command, the system
displays the submenu as shown in Figure 37.
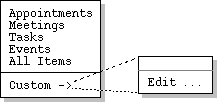
Figure 37: Initial custom lists menu.
To create a new custom list, the user selects the `Edit ...' command,
whereupon the system displays the custom list dialog shown in Figure 38.
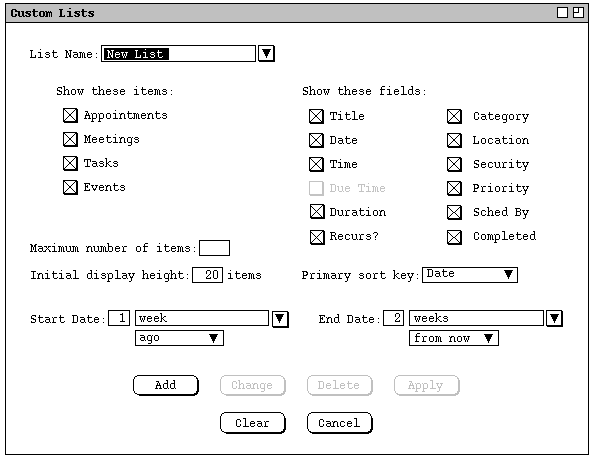
Figure 38: Custom list dialog.
The check boxes under the heading `Show these items' specify which types of item appear in a custom list. At least one of the boxes must be checked. The check boxes under the heading `Show these fields' specify which item fields appear as column headings in the list. At least one of the field boxes must be checked.
The field check boxes are selectively disabled depending on which check boxes are on under `Show these items'. When all four item check boxes are on, the `Due Time' check box is disabled. This is the case since in an all-items list, the `Time' field covers the due time for tasks, as well as the start time for appointments and meetings. Further explanation of selective check box disabling is given below, following Figure 40.
The `Primary sort key' is a menu containing each of the fields listed under `Show these fields'. The default primary sort key for custom lists is the `Date' field.
The `Start Date' and `End Date' data entry fields specify the
starting and ending dates of the custom list. As shown in the figure, the
default start date is 1 week ago, the default end date 2 weeks from now. The
small data-entry box immediately to the right of the label is a typeable
numeric field in which the user can enter a value between 1 and 99.
Immediately to the right of the numeric field is a menu-augmented text box
containing the date range information. Immediately below the range information
is a two-element menu containing the selections `ago' and `from
now'. Figure 39 shows an expansion of both the pulldown menus.
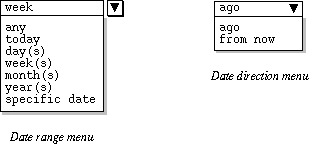
Figure 39: Custom list date menus.
Figure 40 shows the result of the user having defined a new list named "Year's
events".
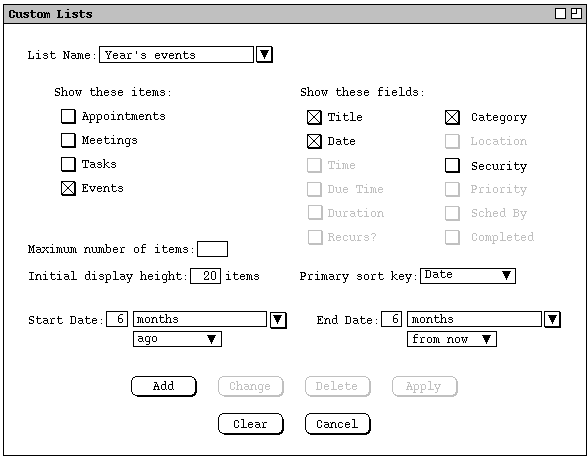
Figure 40: Year`s events custom list.
| Data field | Applicable to these types of item |
| Title | all |
| Date | all |
| Time | appointments, meetings |
| Due Time | tasks |
| Duration | appointments, meetings |
| Recurs? | appointments, meetings, tasks |
| Category | all |
| Location | appointments, meetings, events |
| Security | all |
| Priority |
appointments, meetings, tasks
(`must' or `optional' for appointments and meetings; number between 0 and 10 for tasks) |
| Sched By | meetings |
| Completed | tasks |
Table 5: Fields applicable to each type of scheduled item.
A check box under the `Show these fields' heading is enabled
(physically solid type) when one or more of the types to which it applies is
checked under the `Show these items' heading. The state of the check
boxes is reflected in the `Primary sort key' pulldown menu.
Specifically, the active menu items correspond to the check-box selected
fields. For example, Figure 41 shows the state of the `Primary sort
key' menu in the context of
Figure 40
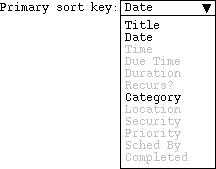
Figure 41: Primary sort key menu in Year's events custom list.
Sorting suborder for custom lists is based on Table 4 with the following additional provisions. When a field that would otherwise be used as a suborder key is missing from the custom list, the next field in the subordering takes the place of the missing key. When one or more of the subordering keys in Table is missing, additional subordering is defined by the following order among the remaining keys: `Due Time', `Recurs', `Category', `Location', `Security', `Priority', `Sched By', and `Completed'. For example, if the user defines a custom list that contains only `Location', `Priority', and `Sched By', those keys are used as the primary, secondary, and tertiary sorting keys, respectively.
To complete the definition of a new list, the user presses the `Add' button at the bottom of the custom lists dialog. In response, the system adds the list to those that are available for use. To define additional new lists, the user types the new names into the `List Name' text box, selects the desired settings, and presses the `Add' button for each new list to be defined.
The names of available lists appear in two contexts:

Figure 42: Menu contexts in which list names appear.
Figure 43 shows the result of the user selecting the `Year's events'
list in the `View Lists Custom' submenu.
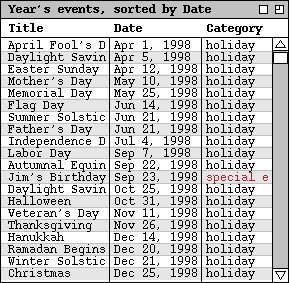
Figure 43: Year`s events list display.
In the context of the scenarios thus far, "Jim's Birthday" is the only user- scheduled event. The other events in the `Year's Events' list are all pre-defined holidays, as discussed further in Section .
The user can change or delete defined lists in the custom list dialog. To
change an existing list, the user selects the desired list in the `List
Name' menu, or types its name in the text box and presses the
Enter key. The user then performs the desired changes and presses the
Change button. For example, Figure 44 shows the user having edited
the previously defined `Year's events' list.
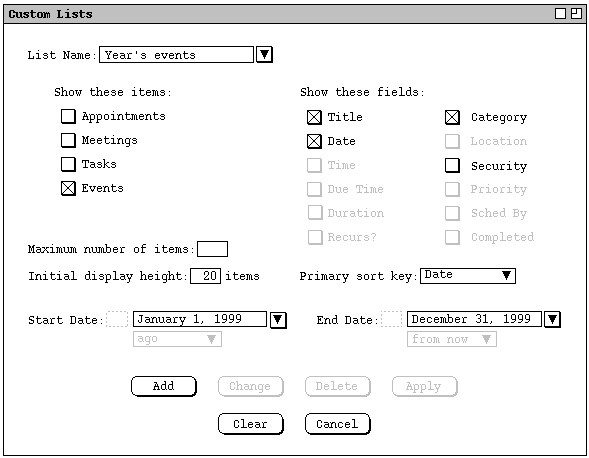
Figure 44: Changed years-events list.
To delete an existing list, the user selects its name from the `List Name' menu and presses the `Delete' button. In response, the system removes the list from those that are defined, removes it from the `List Name' menu, and clears the `List Name' text box. The `Apply' button is used to apply the currently selected list, as if its name had been chosen from `View Lists Custom' submenu.
To clear all entered information in the custom list dialog, the user presses
the `Clear' button. In response, the system restores the dialog to
the state it was in when it was most recently displayed on the screen. The
`Cancel' button removes the custom lists dialog from the screen. Only
the explicit selection of `Cancel' (or an environment-specific window
closing button) removes the dialog from the screen. Execution of any of the
other commands (`Add' through `Clear') leaves the dialog on
the screen.