-
Milestone 2
writeup
and
example.
-
Requirements document HTML standards.
-
Conventions for standardized GUIs.
-
These lecture notes.
- Week 3 lab notes, with more on SVN.
-
Clearly label all paper materials so they can be referenced from the online
requirements document.
-
Figure number and caption for screen pictures.
- Title for other notes.
-
Figure number and caption for screen pictures.
-
Make copies if you want to keep the originals.
- Deliver to lab or Fisher's office by 5 PM Friday.
-
Present scenarios in a tutorial style.
-
Tell an interesting, engaging, and ultimately complete story of system
functionality.
- Organize scenarios to give the reader a step-by-step presentation of what the system will be like to use.
-
Tell an interesting, engaging, and ultimately complete story of system
functionality.
-
Start with scenarios showing common activities, without necessarily covering
all low-level details.
-
Separate scenarios based on different categories of end user.
-
Stylistic recommendations:
-
Leave mundane details until later, e.g., File, Edit, data entry.
- Leave details of error handling until later.
-
Leave mundane details until later, e.g., File, Edit, data entry.
-
Describe a user action that executes a command.
-
In the graphical user interfaces (GUIs) with which we are dealing, a user
action is performed by some user gesture on the screen.
-
Physically, a gesture is performed by some combination of mouse and/or keyboard
actions.
- Most typically, command execution is performed by selecting a menu item, pressing a command button, or typing a keyboard action of one or more keystrokes.
-
In the graphical user interfaces (GUIs) with which we are dealing, a user
action is performed by some user gesture on the screen.
-
Show the system response to the user action.
-
In a GUI, the system response typically appears on the screen.
-
The response can also be shown on some other form of output medium.
- In some cases, the system response is not displayed directly to the user, such as the case when a change is made to a an underlying system database that is not visible in any display.
-
In a GUI, the system response typically appears on the screen.
-
Fully describe the details of the response.
-
The description is a prose narrative that explains all details of display
screens and underlying data.
-
All display screen components are described.
- All output effects to underlying data are described.
-
The description is a prose narrative that explains all details of display
screens and underlying data.
-
If the the system response is an input dialog of some form:
-
Show another picture of it, with representative data values filled in by the
user.
-
Fully describe entered values and what they mean.
-
Within an input dialog, if there are non-atomic interactions, cover each using
additional screen examples and narrative.
-
Sufficiently simple cases can be covered in the narrative only, without
additional screen examples.
- These include toggles or short lists of alternative selections.
-
Sufficiently simple cases can be covered in the narrative only, without
additional screen examples.
- If there are input alternatives or options that effect what the system does, show additional versions of filled-in dialog screens to cover all cases.
-
Show another picture of it, with representative data values filled in by the
user.
-
If the system response is output data not requiring user input:
-
One output example is sufficient if it is adequately representative of all
functionality.
- As with input dialogs, if there are output alternatives or options that fundamentally affect the content or format of the presented information, show additional examples and narrative
-
One output example is sufficient if it is adequately representative of all
functionality.
-
The
accompanying handout
illustrates two completed scenarios, circa Milestone 6.
-
Note in particular that this level of completion is not expected for earlier
Milestones, but it definitely is for at least some of the Milestone 6
delieverable.
-
These scenarios show what you are working towards in terms of fully completed
details.
-
The Calendar Tool may be more complicated in terms of display details and
options than your projects.
- The excerpts were chosen to illustrate some particularly detailed scenarios.
-
The Calendar Tool may be more complicated in terms of display details and
options than your projects.
-
Describe a user action -- see
Section 2.2, paragraph 2
on page 9 of the excerpt (starting with "To schedule an appointment,
...").
-
Show system response -- see
Figure 6,
page 9.
-
Fully describe details of response -- see narrative in
paragraphs 2 through 6
on pages 9 and 10 (through to and including the paragraph starting "The
bottommost ...").
- If response is an input dialog:
-
Show another picture of it -- see
Figure 7
on page 11.
-
Fully describe entered values -- see the narrative in
paragraph 5,
page 10 (starting with "After the dialog appears ...").
-
If non-atomic interactions, cover them -- see
Figures 8
-11 on pages 11 and 12 and the narrative in
paragraph 6,
page 10 (starting "To create a new appointment category ...").
-
Sufficiently simple cases in narrative only.
- E.g., toggles or short lists -- see the descriptions of Security, Priority, and Remind? in paragraphs 1-3 on page 10.
-
Sufficiently simple cases in narrative only.
- If input alternatives, show additional filled-in dialogs -- see Figure 12 on page 13, narrative in paragraphs 8 through 10 on the bottom of page 10 (starting with "The user now proceeds ... ").
-
If response is output:
-
One screen sufficient if adequately representative -- see
the weekly and yearly views in Figures
20
and
23
, on pages 22 and 24, respectively.
-
If alternatives, provide additional examples and narrative --
see
-
Figures 13
-17 for the daily view, pages 15-19
-
Figures 18
and 19 for the weekly table view, pages 20-21
- Figures 21 and 22 for the monthly view, page 23.
-
Figures 13
-17 for the daily view, pages 15-19
-
One screen sufficient if adequately representative -- see
the weekly and yearly views in Figures
20
and
23
, on pages 22 and 24, respectively.
-
Ensure complete coverage of functional hierarchy.
-
Cover all commands and interactions, at all levels of the hierarchy, at least
once.
-
Provide at least two examples of all input dialogs -- one initial version and
one filled in by the user; provide additional examples to ensure adequately
representative coverage.
- Provide at least one example of all outputs, with enough additional examples to ensure adequately representative coverage.
-
Cover all commands and interactions, at all levels of the hierarchy, at least
once.
-
Describe specific interface layout details only as they relate to the
fundamental display of information.
-
Do not address purely aesthetic look and feel issues.
- E.g., on the bottom of page 14, the details of display layout are described for the daily view based on information content, not anything purely aesthetic (starting with "The day view shows ...").
-
Do not address purely aesthetic look and feel issues.
-
Avoid unnecessarily repetitive presentation.
-
Refer to pictures or narrative that describe common functionality.
- E.g., in the description of weekly view options in the last paragraph at the bottom of page 20, reference is made to the daily view options that are the same for the weekly view, without repeating the daily view narrative. (The paragraph starts "All of the display options available for the day view ...".)
-
Refer to pictures or narrative that describe common functionality.
-
Have the scenarios flow by building on information presented earlier.
-
Refer to examples presented in preceding sections.
-
Where appropriate, state assumptions about what actions the user has already
taken.
- E.g., Section 2.3.1.1 paragraph 2 on page 14, and all the figures in Section 2.3.
-
Refer to examples presented in preceding sections.
-
Where necessary, get down to nitty gritty details.
-
When system functionality is complicated or non-obvious, provide detailed and
careful descriptions.
-
This is the case for the Calendar tool in the discussion of overlapping items
for the daily and weekly views,
Figures 16-19,
pages 18-21.
-
Use good judgment (and the 7+/-2 rule) to defer very detailed discussions to
later sections.
-
E.g.,
in paragraph 3
in the middle of page 18, the most complicated details of overlapping items are
deferred to Section 2.12.1.2.
-
In the
last paragraph
on page 25, important details of changing and deleting scheduled items are
deferred to another section, namely 2.4.6.
- Without explicit comment in Section 2.2, details of scheduling recurring items are deferred to Section 2.4, entitled "More Individual User Scheduling".
-
E.g.,
in paragraph 3
in the middle of page 18, the most complicated details of overlapping items are
deferred to Section 2.12.1.2.
-
When system functionality is complicated or non-obvious, provide detailed and
careful descriptions.
-
Be simple and consistent.
-
In some cases, a complex interface may be necessary.
-
In general, however, the interface should be as simple as possible in keeping
with the functionality that it provides.
-
Consistency is always important.
-
The interface should not provide two or more conflicting or redundant ways to
perform the same function.
-
When different interfaces are provided for the same function, each interface
should provide added value or convenience for the user.
-
For example, a menu and toolbar interface are frequently provided for access to
the same function.
- In this case, the value-added of the toolbar is its iconic form and quicker access than through the menu.
-
For example, a menu and toolbar interface are frequently provided for access to
the same function.
-
The interface should not provide two or more conflicting or redundant ways to
perform the same function.
-
In some cases, a complex interface may be necessary.
-
Use interface forms that end users can easily understand.
-
If a user has paper forms or other existing conventions for information
display, duplicate the existing forms when they work well for the user.
- Try out various styles of interface for the user to see what works best.
-
If a user has paper forms or other existing conventions for information
display, duplicate the existing forms when they work well for the user.
-
Provide interface options to allow the user to select among alternate UI forms
or display styles.
-
When two are more interface forms are deemed valuable, provide an option for
the user to select which forms are visible at any given time.
- For example, an option to show or hide a toolbar in addition to the menubar allows the user to select which form to use.
-
When two are more interface forms are deemed valuable, provide an option for
the user to select which forms are visible at any given time.
-
The purpose of telling an overall story throughout the requirements scenarios
is two-fold:
-
to maintain the reader's interest, so that the reader will stay sufficiently
engaged to understand the details of the requirements, and how those details
affect the way the software actually will be used;
- to provide overall context and continuity, so that examples presented early in the scenarios can be refined in later scenarios.
-
to maintain the reader's interest, so that the reader will stay sufficiently
engaged to understand the details of the requirements, and how those details
affect the way the software actually will be used;
-
The point is not to entertain the reader in the way a novel or short story
does.
-
Humor should be used sparingly, if at all.
- The story should stick to the facts, without flowery prose.
-
Humor should be used sparingly, if at all.
-
The story outline for the Calendar Tool scenarios goes like this:
-
The user schedules a couple appointments.
-
The user views her calendar in various ways.
-
The user schedules some other kinds of items.
-
The user deals with finer points of scheduling.
-
An administrative user performs specialized administrative functions.
- The user sets calendar options.
-
The user schedules a couple appointments.
-
Story line sketch for CSTutor:
-
Instructor Builds Simple Lesson
-
Student Views Simple Lesson
-
Instructor Builds Advanced Lesson
-
Student Views Advanced Lesson
-
Instructors and Students Chat and Interact
- Students View their Stats
-
Instructor Builds Simple Lesson
-
Story line sketch for E-Class:
-
Instructor builds a simple lecture.
-
Instructor presents a lecture.
-
Meanwhile, students view the lecture.
-
Instructor builds an advanced lecture.
-
Students view advanced lecture.
-
Classroom interacts.
- Instructor performs admin tasks.
-
Instructor builds a simple lecture.
-
Story line sketch for the Grader:
-
Instructor downloads and sets up roster.
-
Instructor adds items and students.
-
Instructor views charts and graphs.
-
Instructor adds gradesheet details.
-
Student Views and Predicts Grades.
- Student views historical information.
-
Instructor downloads and sets up roster.
-
Story line sketch for the Scheduler:
-
Instructor Sets Up Preferences
-
Admin Creates Simple Schedule
-
Admin Edits Databases
-
Admin Creates More Complicated Schedule
-
Admin Deals with Scheduling Constraints
- Student Views and Comments on Schedules
-
Instructor Sets Up Preferences
-
Story line sketch for the TestTool:
-
Instructor creates a simple test.
-
Instructor edits question database.
-
Instructor creates more complicated test.
-
Student takes test.
-
Instructor grades test.
- Instructor manages tests and question DB.
-
Instructor creates a simple test.
-
In conjunction with the scenario story line, there should be a consistent set
of example data to support the scenarios.
-
These example data must be extensive enough to support all of the scenarios in
the requirements.
-
At the same time, the data need be no more expansive than is necessary to
support the scenarios.
-
The data exemplify a variety of realistic examples, in conjunction with the
overall scenario story line.
-
Typically, no single scenario shows all of the data, but rather scenario-
specific excerpts of it.
- A requirements document appendix can show the complete content of the underlying example data.
-
These example data must be extensive enough to support all of the scenarios in
the requirements.
-
In the case of large data collections, the scenarios are organized into two
broad categories of data editing and data viewing.
-
Data-editing scenarios present functionality to add, modify, and delete data
elements in the collections.
-
Data-viewing scenarios present functionality to search the collections, and
show the data in whatever forms are available to the user.
-
For data-editing scenarios, a sufficient number of representative examples are
shown, but there is no scenario that shows each element being added
individually to a large collection.
-
Rather, following scenarios that show representative data elements being added,
the narrative can say something to the effect of "The user now proceeds to
add additional data elements, in the same manner as described in the preceding
scenarios."
- The subsequent data editing and viewing scenarios then display scenario- specific collection elements.
-
Data-editing scenarios present functionality to add, modify, and delete data
elements in the collections.
-
A fundamentally important reason to have consistent underlying data examples is
to provide continuity through the scenario story line.
-
Typically, early scenarios show data being created.
-
Subsequent scenarios show the same data being modified, and selected pieces of
data being deleted.
-
After that, scenarios present viewing functionality for the same data that have
been created in the preceding editing scenarios.
-
In some cases, viewing scenarios may come first, before editing details.
-
In such cases, the narrative says something to the effect of "The following
scenarios assume that the user as created some data ... . Full details of
creation are covered in the scenarios of Section X."
- Continuity is maintained by having the subsequent editing scenarios use example data that appeared in the preceding viewing scenarios.
-
In such cases, the narrative says something to the effect of "The following
scenarios assume that the user as created some data ... . Full details of
creation are covered in the scenarios of Section X."
-
Typically, early scenarios show data being created.
-
Discussed below are the major data examples for this year's 308 projects.
-
These are example data that provide continuity among the scenarios that present
the major functionality of the tools.
- The discussion does not cover data examples for all tool functionality; the focus is on the major stuff.
-
These are example data that provide continuity among the scenarios that present
the major functionality of the tools.
-
In the Calendar Tool requirements, there are consistent underlying calendar
examples for a number of users, and consistent examples for each of the
databases.
-
The main example used in most of the scenarios is the work calendar for a
single user.
-
It has a sufficient number of scheduled items to support the scenarios for
scheduling and viewing an individual user's calendar.
- It provides continuity across all of these scenarios.
-
It has a sufficient number of scheduled items to support the scenarios for
scheduling and viewing an individual user's calendar.
-
There are also smaller examples for the same user's personal and off-campus
calendars; these examples support scenarios that illustrate multi-calendar
functionality.
-
To support scenarios for meeting scheduling and viewing other-users' calendars,
there are underlying example calendars for a number of other users.
-
All but one of these calendars have only a few items each, to support the
scenarios for meeting-scheduling functionality.
- One of the calendars has enough items to show full details of viewing other user's calendars.
-
All but one of these calendars have only a few items each, to support the
scenarios for meeting-scheduling functionality.
-
There is one full example for each of the three databases.
-
These have a sufficient number of entries to support database viewing and
editing operations.
- They provide continuity across the scenarios for regular user and administrative user functionality.
-
These have a sufficient number of entries to support database viewing and
editing operations.
- Finally, there is an appendix that shows the complete content of the example calendars and databases.
-
The main example used in most of the scenarios is the work calendar for a
single user.
-
Underlying data for CSTutor:
-
You need example lessons and a student account database.
-
A single main lesson can be used in most of the scenarios.
-
It must have a sufficient number of pages to support scenarios for lesson
authoring and viewing, including quizzing.
- A few additional smaller lessons can be used to support the scenarios for the inter-lesson navigation, and multiple lesson scoring for students.
-
It must have a sufficient number of pages to support scenarios for lesson
authoring and viewing, including quizzing.
-
You can provide just the shells for a number of additional lessons, to fully
illustrate the lesson database and its browsing features.
- You also need an example student user database, that has enough student entries to support scenarios on student/instructor interaction in chat sessions, and overall student statistics.
-
You need example lessons and a student account database.
-
Underlying data for EClass:
-
You need sample lectures and student roster.
-
A single main lecture can be used in almost all of the scenarios.
-
It must have a sufficient number of topics and slides to support scenarios on
lecture preparation, presentation, viewing.
- In particular, the lecture must varying topic depths to thoroughly illustrate the various navigation features, including expand and collapse.
-
It must have a sufficient number of topics and slides to support scenarios on
lecture preparation, presentation, viewing.
-
One or two additional lectures can be provided to illustrate how lectures are
stored and transported.
- You also need a sample student roster, with a sufficient number of students to illustrate all of the roster-related functionality.
-
You need sample lectures and student roster.
-
Underlying data for the Grader:
-
You need example gradesheets and an example SIS student roster.
-
A single main gradesheet example can be used in most of the scenarios.
-
It must have a sufficient number of student rows and graded-item columns to
support the scenarios for row/column operations, graphic display, and student
what-if scenarios.
- It provides continuity across all of these scenarios.
-
It must have a sufficient number of student rows and graded-item columns to
support the scenarios for row/column operations, graphic display, and student
what-if scenarios.
- Additional smaller gradesheet examples can be used in the scenarios that show grade trends, and storage of gradesheets on the server.
-
You need example gradesheets and an example SIS student roster.
-
Underlying data for the Scheduler:
-
You need example generated schedules, and example databases.
-
A main schedule example schedule must have a sufficient number of scheduled
classes to illustrate generating and editing a good schedule.
-
Additional smaller example schedules can be used in the scenarios that cover
specialized scheduling constraints and preferences.
- The example databases should have a sufficient number of entries to support all forms of scheduling; most likely, a single example for each database should be sufficient.
-
You need example generated schedules, and example databases.
-
Underlying data for the TestTool:
-
You need example tests question database(s).
-
A single main test example can be used in most of the scenarios.
-
It must have a sufficient number of questions to support the scenarios for test
generation, test taking, and test grading
- It provides continuity across all of these scenarios.
-
It must have a sufficient number of questions to support the scenarios for test
generation, test taking, and test grading
-
Additional smaller test examples can be used in the scenarios that illustrate
details of test generation.
-
A single main question database example must have a sufficient number of
questions to support test generation and database viewing scenarios.
- If your team chooses to work on functionality for question database sharing, then you'll need some additional (smaller) database examples for these scenarios.
-
You need example tests question database(s).
-
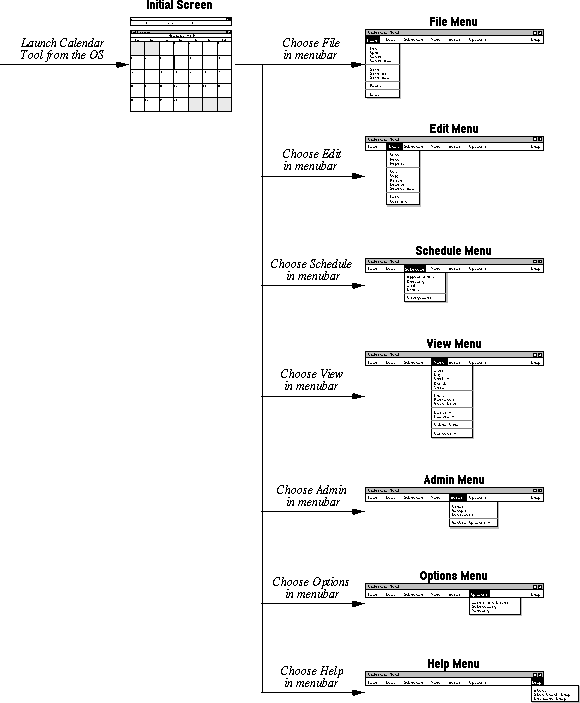
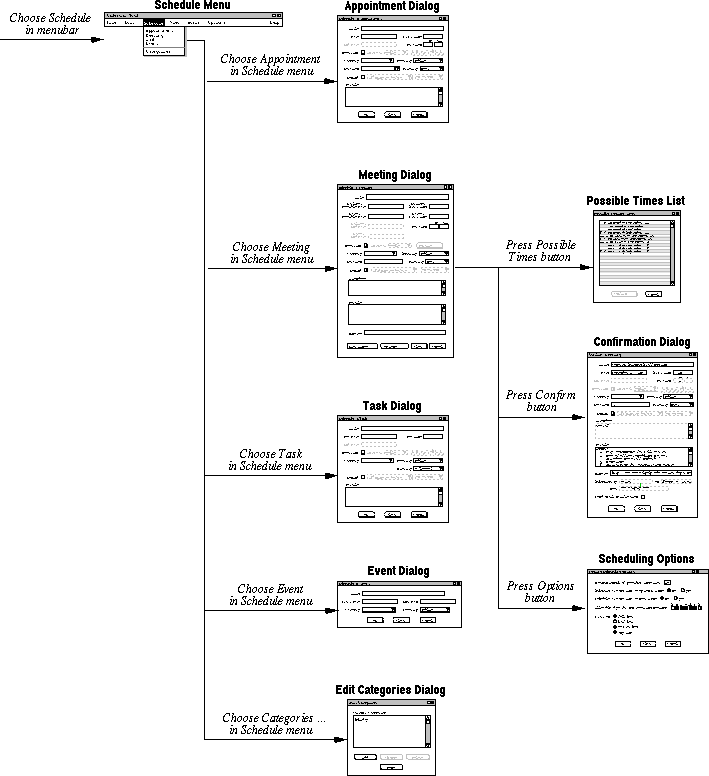
A potentially helpful high-level view of a GUI is a screen map that
shows the flow of user interaction.
-
A screen map consists of sketches or thumbnails of interface screens, connected
in a cascading tree that depicts the order in which screens appear in response
to user command selection.
-
Following are a couple sample pages of a screen map for the calendar tool,
showing the top-level menus and two levels below the Schedule menu.
-
When sketching out screen maps, it can be useful to sketch them out initially
on a large drawing area, such as a whiteboard.
- In the online versions, each thumbnail in the screen map can be a link to the full-sized picture in the requirements.
-
When sketching out screen maps, it can be useful to sketch them out initially
on a large drawing area, such as a whiteboard.
- Note that screen maps are not required for CSC 308, but you may find them helpful.
-
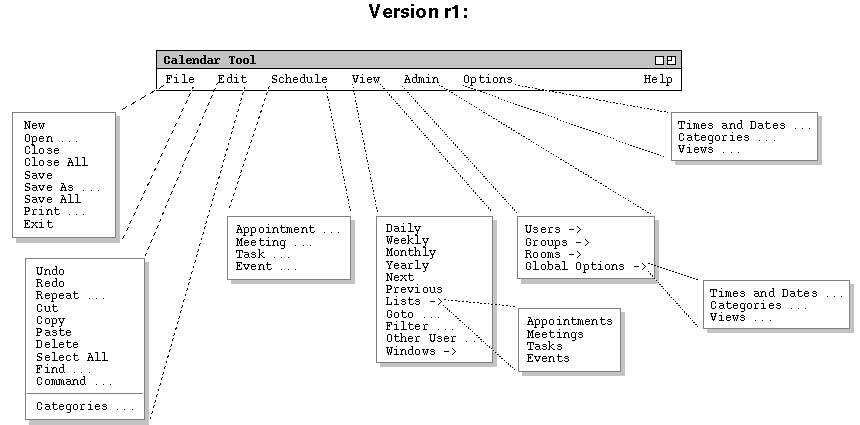
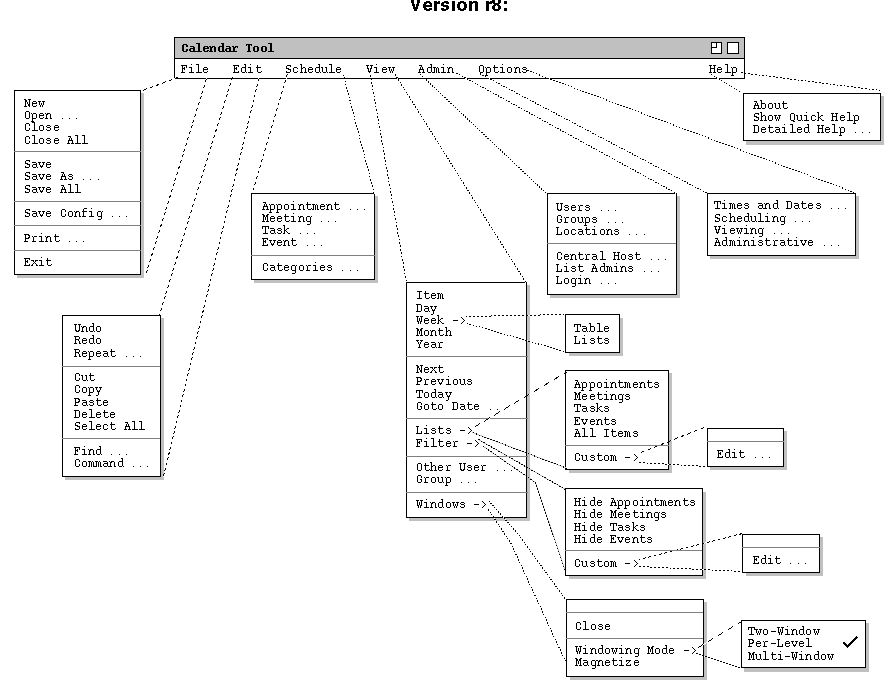
Given below is a Subversion log report and snapshots for the evolution of the
command menus of the Calendar Tool.
-
The log entries are those reported by the `svn log' command, which
displays the revision history for a file.
-
There is some book keeping at the top of the file that you can mostly ignore.
-
The entries describe versions 1.1 through 1.8, shown as being checked in on
Friday afternoons throughout this Fall quarter.
-
The log messages are those record with the `-m' argument to the
`svn commit' command.
-
The log history is shown for the file name "menus.idr", which is
idraw source file for the menus screen.
- For images, you can check in the source file and/or the generated GIF or JPEG image.
-
There is some book keeping at the top of the file that you can mostly ignore.
-
Here are excerpts from the Subversion log report:
------------------------------------------------------------------------------ r8 | gfisher | 2007-11-26 15:01:04 Replaced `Admin Global Options' with `Central Host', `List Admins', and `Login'. Also added 'View Today', 'View Windows Close', and `File Save Config'. ------------------------------------------------------------------------------ r7 | gfisher | 2007-11-19 14:20:41 Added 'Magnetize' item to 'Windows' menu. Made 'Admin->Global Options' menu have exactly the same items as 'Options' menu. Added four new items to Filter submenu. ------------------------------------------------------------------------------ ... ------------------------------------------------------------------------------ r3 | gfisher | 2007-10-22 15:16:25 Added an 'All Items' item to 'View->Lists' submenu. Nuked submenus for Admin User, Group, and Room in favor of uniform dialog for each. ------------------------------------------------------------------------------ r2 | gfisher | 2007-10-15 14:25:26 A nice bit of revamping to add separator lines between items, add the new Help menu, add Sorting to View->Lists submenu, add multi-widow-mode-on-off to View->Windows submenu, redesign Admin menu, and move entire Options menu to Edit->Preferences. ------------------------------------------------------------------------------ r1 | gfisher | 2007-10-08 14:51:35 Initial checkin. -
Here are the screen shots for versions 1.1 and 1.8 in the history