
A calendar can be displayed at five levels of detail. The levels, from the greatest detail to the least are: an individual scheduled item, a day, a week, a month, and a year. The commands to show these levels are the first five items in the 'View' menu (see Figure ). In the discussion that follows, these are referred to as the view- level commands.
During normal use of the Calendar Tool, the user has one or more viewing windows displayed on the screen. The most recently selected window is called current. When the user wants to view the calendar at a different level than is displayed in the current window, she chooses one of the five view-level commands.
Each of the five viewing levels is displayed in a separate level-specific window, sized appropriately to fit its contents. For example, if the user executes a 'View Day' command followed by a 'View Year' command, both a daily and yearly window are displayed on the screen.
By default, one separate window is used at each of the five view levels. Hence, there are up to five windows for the view-level commands, each holding the result of the most recently executed command at a particular level. When the user changes the display at a particular level, that level's display is changed and brought to the front, without a new window being created. For example, if the user moves from one day to the next at the daily level, the day-level display window is changed, with no new window created.
The user may change the default display style by enabling multi-window viewing mode. In this mode, the results of every view command are shown in a separate new window, even for commands at the same level. For example, if the user executes two successive 'View Month' commands in multi-window mode, the results are shown in two separate month-view windows. This allows the user to create side-by-side displays of as many different periods as desired. Complete details of multi-window viewing are described in Section 2.3.6.
By default, the target date for all view-level commands is today's date. The
user can select another target by clicking on a desired date in the current
window. For example, the user can click on a specific date in a month view and
choose the 'View Day' menu item. In response, the system displays the day-
level view for the selected date. Complete details of target date selection
are covered in
Section 2.10.4
2.3.1.1. Day View
To view the daily details for today's date, the user chooses the 'View
Day' menu command. In response, the system displays a window of the form
shown in Figure 13.
Figure 13: Day view.
In Figure 13, the user is viewing the details of Wednesday, September 9. The items shown in Figure 13 reflect a number of scheduling commands having been performed by the user, subsequent to the commands illustrated in the scenario of Section 2.2. In particular, the user has scheduled some typical items such as meetings, lunch dates, and class lectures.
At the top of the day view is a full description of the day of the week, month,
and year. Immediately to the left and right of the description are arrow
buttons used to change the display to the previous or next calendar day. For
example, when the user chooses the right-pointing arrow in the display of
Figure 13, the display changes to that shown in Figure 14.
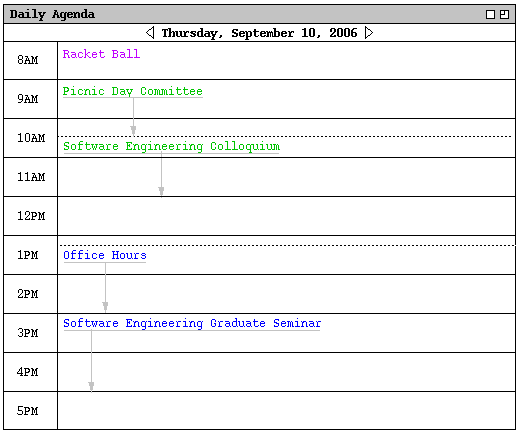
Figure 14: Result of pressing the next day arrow.
The following options are available to control the format of the day display:
As an example of alternate option settings, Figure 15 shows a day view of the
same information shown in Figure 13, with the following non-default option
settings: normal time range 7AM to 6PM; time increment of 1/2 hour; increment
height equal to one line; show 24-hour display; show exact time; hide dashed
lines; and hide extension arrows.
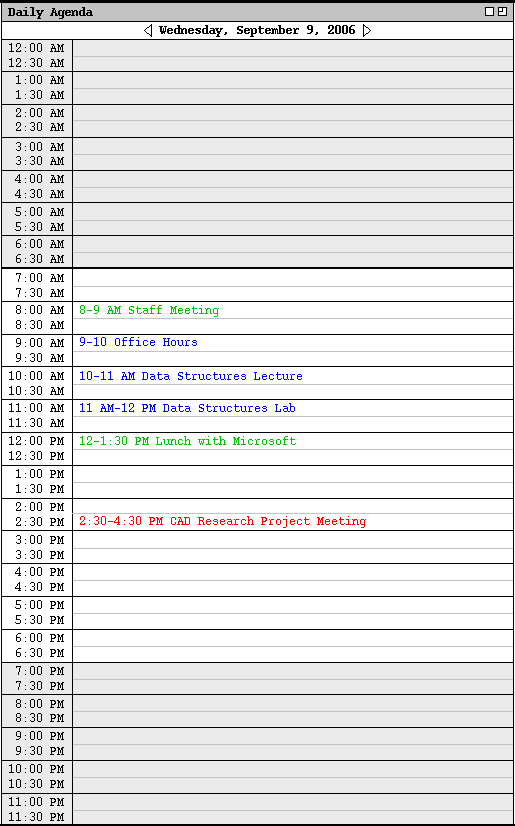
Figure 15: Day display with non-default option settings.
To illustrate the display of overlapping items, Figure 16 shows an updated
version of the daily schedule shown in Figures 13 and 15.
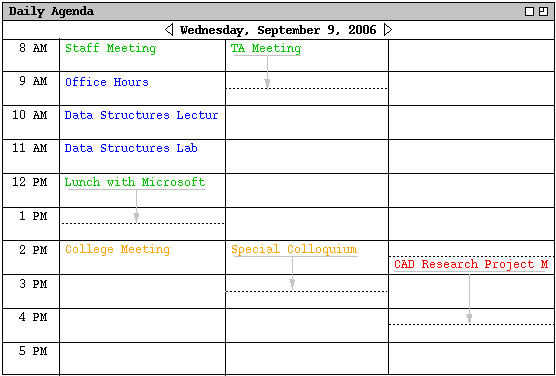
Figure 16: Day view with overlapping times.
The layout of overlapping items may be further complicated when three or more items do not overlap fully, for example if the user were to add an appointment from 3-4PM to the schedule shown in Figure 16. The precise layout rules for such cases are covered in Section 2.12.1.2.
In displaying overlapping items horizontally, the system attempts to display the full width of all items in one screen. If there is insufficient physical screen width to display all items in full width, the system truncates the display, leaving overlap columns of equal width. If the display window is resized, each column is resized proportionally and equally. Further exact details of truncation and display resizing are covered in Section 2.12.1.1.
Figure 17 shows the same information as
Figure 16,
after the user has changed the overlapping display option from
horizontal (the default) to vertical.

Figure 17: Day view with overlapping times, displayed vertically.
Of note in
Figure 17
is the automatic resizing of the 2PM time slot from two to three rows, even
though the current setting of the increment height option is 2.
Whenever the number of items in a time increment is greater than the current
increment height, the system automatically increases the height of the affected
increment to show all items that start in that increment. This automatic
height increase is performed as necessary for any time increment in a day view,
not just for increments with overlapping items.
2.3.1.2. Week Views
After the day view, the next larger-grain level of viewing is a week. There
are two choices for the format of the week view: table and lists. These
choices are available on a submenu when the user chooses the 'Week'
command from the 'View' menu. When the user chooses the table-style
week view, the screen appears as shown in Figure 18.
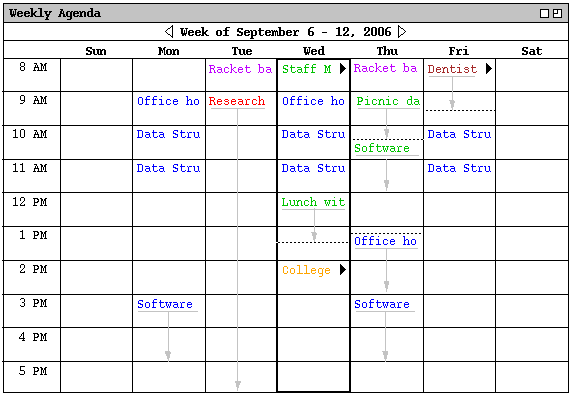
Figure 18: Table-style week view.
When the user chooses either style of week view, the displayed week is the one that contains the most recently selected day. Here for example, the user is viewing the week that contains the most recently viewed day of Wednesday, September 9. The current date, that is today's date, is highlighted with a darkened border in the week display. In this scenario, for example, the current date is Wednesday, September 9.
The table-style weekly view shows items in the same format as the day view, except with narrower columns to accommodate all the days of the week. Each item is shown with as much of the title as fits horizontally within its display area. The columns of the weekly table view are all of equal width. If the display window is resized, each column is resized proportionally and equally. At the top of the weekly view is the exact description of the week, with arrow buttons to go to the previous and next weeks.
A notable aspect of the weekly table view is the display format for days that contain overlapping items. In the example shown in Figure 18, there are three overlapping appointment times. These overlaps are indicated by solid right- pointing arrows wherever overlap occurs. When the user presses a right- pointing arrow, the display for the column scrolls to the left to allow overlapping items to be viewed.
Figure 19 further illustrates the display of overlapping weekly table items.
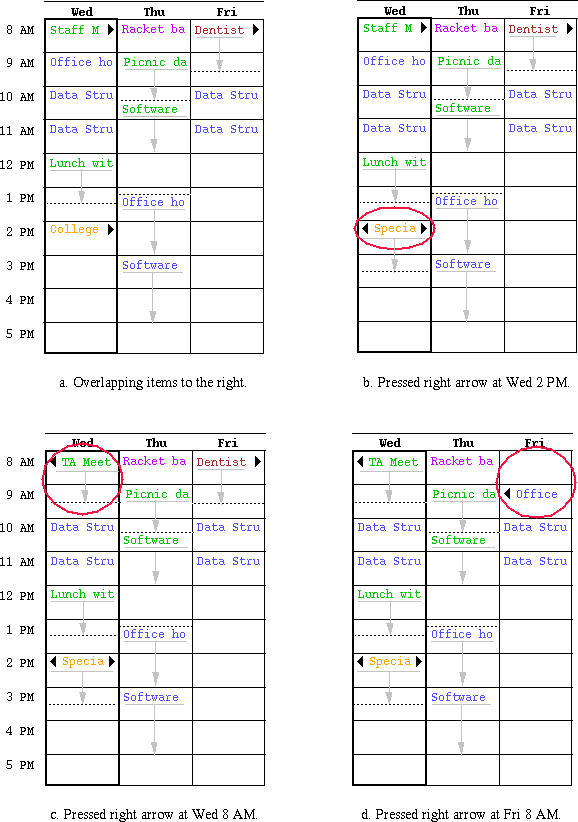
Figure 19: Clarification of overlap in a weekly table view.
When the user clicks on the right-pointing arrow at Wednesday 2 PM, the list of 2 PM overlapping items scrolls to the left. The result is shown in Figure 19b, with the changed item circled. Figure 19c shows the result of the user clicking on the right-pointing arrow at Wednesday 8 AM. The display change is again circled. Of note in Figure 19c is that the Office Hour item at 9 AM has been removed from the display. When overlap scrolling in a weekly view, the system displays only complete overlapping items, no partial items. That is, the system removes all items from the display with which a scrolled-to item fully or partially overlaps.
Figure 19d shows the result of the user clicking on the right arrow at Friday 8 AM. This change again illustrates how only one overlapping item is displayed at a time. That is, the Dentist appointment at 8 AM is not displayed at all in 19d, even though it would fit partially in the display. Figure 19d also illustrates that the left-pointing arrow always appears at the top of the item that is displayed. Hence, the left-pointing arrow in 19d appears next to the 9 AM office hour appointment, not in the empty 8AM slot where the Dentist appointment previously appeared.
When necessary, a left-pointing arrow appears to allow scrolling back. Examples of left-pointing arrows are shown in Figures 19b, 19c, and 19d. The 2 PM item in Figures 19b-d has both left- and right-pointing arrows, since there are overlapping items on both sides. When there are no further overlapping items, the left- or right-pointing arrow disappears, as appropriate. Disappearance of the right-pointing arrow is illustrated in the Wednesday 8 AM item in Figure 19c and the Friday 9 AM item in Figure 19d.
All of the display options available for the day view are also available for the table-style week view. In addition, the following display options are available for the week view only:
The display of a list-style weekly view is shown in Figure 20.
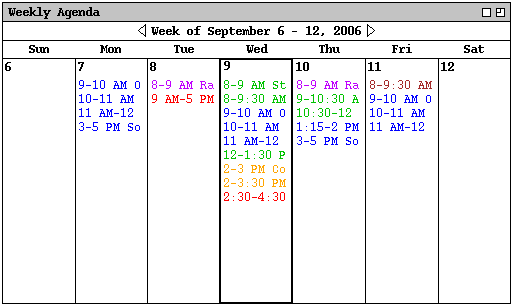
Figure 20: List-style week view.
For each day of the week, the items for that day are listed consecutively in the column for that day. The items in each daily list are sorted first by start time (earliest first), second by duration (shortest first), and third by alphabetic order of the title. No further sorting criteria are necessary, since the system disallows multiple scheduled items with exactly the same values for start time, duration, and title. This and other scheduling restrictions are discussed further in Section 2.10.
A subset of the table-style display options are applicable for the list-style weekly view. These options are:
An example of the month view was shown originally in the initial screen
configuration (
Figure 1
). since the month view is the standard default. It is chosen explicitly with
the 'Month' command from the 'View' menu. Figure 21 shows
the result of the user making this selection for the month of September 1998.

Figure 21: Month view.
In the month view, the display format for an individual day is the same as the
list-style weekly view. That is, the time and title for each item are
displayed in a vertically-formatted list, sorted by start time, duration, and
title. Since the height of each day in the month view is considerably shorter
than in the week view, a transient vertical scrollbar is provided when the
number of items in a day is greater than fits vertically in the display box for
a day. "Transient" for the scrollbar means that it only appears when the user
clicks within a day for which scrolling is necessary. For example, if the user
clicks within the display box for Wednesday September 24 (in Figure 21), the
scrollbar appears as shown in Figure 22.

Figure 22: Transient scrolling in a month view.
A subset of weekly list-style display options are applicable to the month view. These options are:
The largest-grain calendar view is a year, as shown in Figure 23.
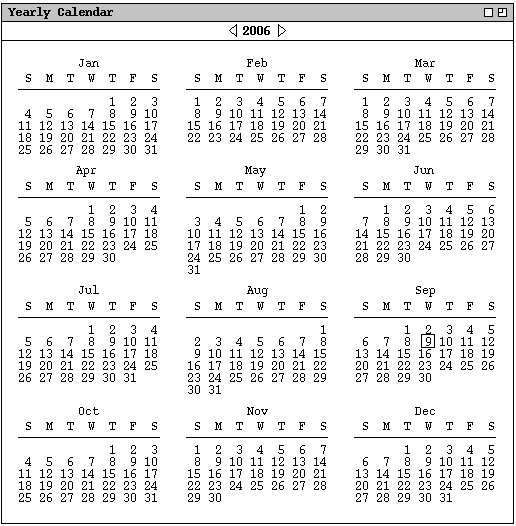
Figure 23: Year view.
Unlike the smaller-grain views, the yearly view shows no information about
scheduled items. The user may select any date as the target of another view
command to show item details.
2.3.1.5. Scheduled Item View
The user may view the full scheduling details for an item shown in any day,
week, or month display. To do so, the user selects the item time or title and
then chooses the 'View Item' menu command. A short cut to view item
details is to double click on the item time or title in any larger-grain view.
Figure 24 shows the result of the user having selected to view the item for 8
AM September 11.
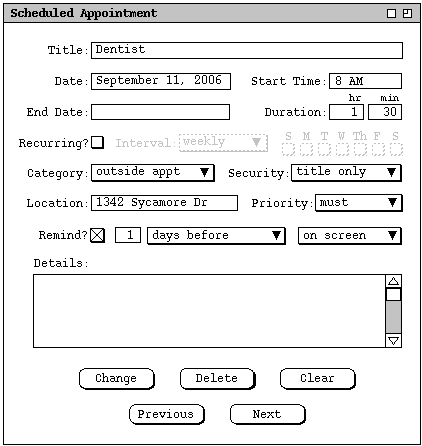
Figure 24: Details of selected scheduled item.
The item-level display has the same data fields as the scheduling dialog shown in Figure 6. The item display differs from the scheduling dialog in the command buttons along the bottom of the dialog window. Specifically, the scheduling dialog has only 'OK', 'Clear', and 'Cancel' buttons. In the item display there are buttons to 'Change' the item, 'Delete' the item, and 'Clear' the dialog. There are also 'Previous' and 'Next' buttons to view the chronologically previous and next scheduled items.
To change the displayed item, the user makes one or more changes in the item data fields and then presses the 'Change' button. If the user presses 'Change' without having performed any data-field editing, the system responds with an explanatory error dialog. To delete the displayed item, the user presses the 'Delete' button. The system responds with a confirmation dialog. If the user confirms affirmatively, the system deletes the scheduled item and removes the display from the screen.
The effects of the change and delete commands are potentially wide-ranging,
particularly for recurring items or meetings with multiple attendees. Complete
details of item change and deletion are covered in
Section 2.4.6