There are three classes of users: administrators of the tutorial, authors of the tutorial and the users of the tutorial and there are two different basic interface. However, the users' interface is quite similar to the author's interface. It is a strict subset of the professors interface. The professors interface contains some tools that the student interface does not. Tools to create lessons and change administration settings are some tools that the student interface will not contain.
2.1.1 Administrator
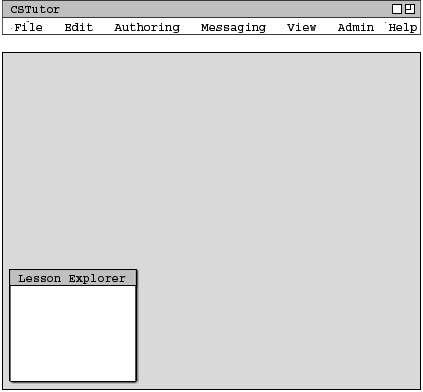
When the Admin initially invokes the CSTutor tool, it is an empty tool with a completely empty lesson planner. The initial view of the of the tool appears in figure 1.
Figure 1: Initial Admin Interface
The Admin must first setup the tool so it will be usable. The
administrative functions are discussed in detailed in
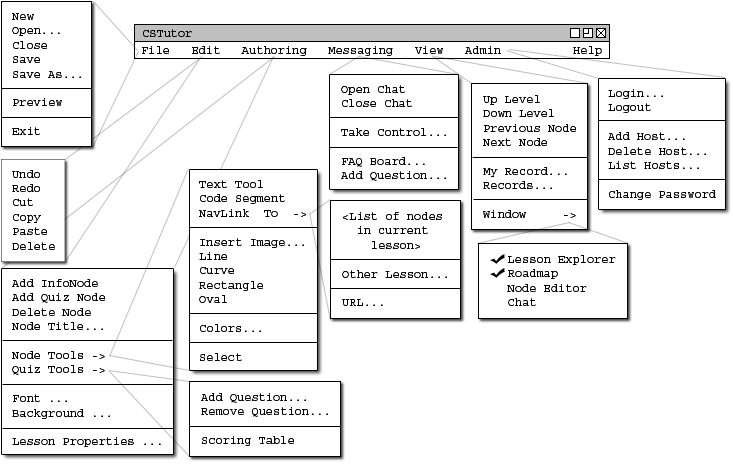
section 2.10. Figure 2 shows an expansion of the command menus.
Figure 2: Expanded command menus.
The File menu contains typical commands for manipulating data files and performing other system-level functions. 'File New' opens a new tutorial in the display window. 'File Open' opens a dialog box that allows the user to open an existing tutorial from a previously saved file, displaying in the current display window or a new window as selected by the user. 'File Close' closes the currently active tutorial, offering to save if it has been modified since opening. (The currently active tutorial is the one on which the user has most recently performed a command.)
'File Save' saves the currently active tutorial on the file from which it was opened, or on a new file if it was created from a new display. 'File Save As' opens a dialog box that allows the current tutorial to be saved on a different file from which it was opened or most recently saved upon. 'File Preview' will show in the display window preview of how the tutorial will look to the end user. 'File Exit' exits the CSTutor tool.
The Edit menu contains commands for manipulating tutorial data during editing. 'Edit Undo' undoes the most recently completed editing commands. Repeated successive invocations of 'Undo' will undo successively earlier commands. 'Edit Redo' redoes the most recently undone commands. Repeated successive invocations of 'Redo' will redo the series of undone commands in reverse order. '
'Edit Cut' removes and copies the currently selected datum in the current display. 'Edit Copy' copies the currently selected datum without removing it. 'Edit Paste' inserts the most recently cut or copied datum at the currently selected edit point in the current display. 'Edit Delete' removes the currently selected datum without copying it.
'Authoring Add InfoNode' displays a editable node that allows the author to be add information to the lesson. 'Authoring Add QuizNode' displays a editable node that allows the author to be add a quiz to the lesson. 'Authoring Delete Node' deletes the current node. 'Authoring Node Title' displays a dialog box that allows the author to be give a title to a node.
'Authoring Node Tools' displays the possible tools in 'Node Tools'. 'Authoring Node Tools Text Tool' allows the author to type in text in a node. 'Authoring Node Tools Code Segment' allows the author to type in text in code in a node.
'Authoring Node Tools NavLink To' displays the possible tools in 'NavLink To'. 'Authoring Node Tools NavLink To <List of nodes in current lesson>' allows the author to add a hyperlink from a list of the current lesson's current nodes in a node to a node. 'Authoring Node Tools NavLink To Other Lesson' opens a dialog box that allows the author to add a hyperlink from the current node to a node in another lesson. 'Authoring Node Tools NavLink To URL' opens a dialog box that allows the author to add a hyperlink from a URL address to a node.
'Authoring Node Tools Insert Image' opens a dialog box that allow the author to chose an image to add from files to add to a node. 'Authoring Node Tools Line' allows the author to insert a line in a node. 'Authoring Node Tools Curve' allows the author to insert a curve in a node. 'Authoring Node Tools Rectangle' allows the author to insert a rectangle in a node. 'Authoring Node Tools Oval' allows the author to insert an oval in a node. 'Authoring Node Tools Colors' opens a dialog box that allow the author to chose a color to use in the lesson.
'Authoring Quiz Tools' displays the possible tools in 'Quiz Tools'. 'Authoring Quiz Tools Add Question' allows the author to add a question to a quiz node. 'Authoring Quiz Tools Remove Question' allows the author to remove a question from a quiz node. 'Authoring Quiz Tools Scoring Table' display the scoring table for viewing and editing.
'Authoring Font' displays a dialog that allows fonts to be changed. 'Authoring Background' will displays a dialog that allows the background color and graphics to be edited. 'Authoring Lesson Properties'' allows the user to view or change the properties of the current lesson.
`Messaging Open Chat' will display the chat room associated with the current lesson. `Messaging Close Chat' will close the chat room and remove the chat room from the display. 'Messaging Take Control' opens a dialog box that allows the user to take control of another user's application. `Messaging FAQ BOARD' opens a dialog box which allows the user to see the frequently ask questions, search for an answer to a question and post a question. `Messaging Add Question' opens a dialog box that allows a user to post a question.
The view menu contains commands for manipulating a lesson's view. 'View Up Level' moves the of the Lesson Explorer up a level. Repeated successive invocations of 'Up Level' will successively moves up a level in the Lesson Explorer. 'View Down Level' moves the of the Lesson Explorer down a level. Repeated successive invocations of 'Down Level' will successively moves down a level in the Lesson Explorer.
'View Previous Node' will move the view of the current lesson node to the preceding node. Repeated successive invocations of 'View Previous Node' will successively moves the the view to the preceding node until it is at the beginning of the lesson plan. 'View Next Node' will move the view of the current lesson node to the subsequent node. Repeated successive invocations of 'View Next Node' will successively moves the the lesson plan to the subsequent node unless it is at the end of the lesson plan. `View My Record' will display the the users personal records. `View Records' will display student's statistics.
`View Windows' allows the user to select for viewing from all active display windows. 'View Window Lesson Explorer' will display the Lesson Explorer window. The check mark next represents that the window is currently opened. 'View Window Roadmap' will display the roadmap of the current lesson. The check mark next represents that the window is currently opened. 'View Window Node Editor' will display the Node Editor window which allows the user to see the node and change attributes within the node. 'View Window Chat' will display the chat room window on the bottom of the screen.
`Admin Login' will display dialog box which allows the administrator to logon to the server to make administrative changes. `Admin logout' will logout the administrator from the server. `Admin Add Host' will display dialog box which allows the administrator to add a server where the lesson is located. `Admin Delete Host' will display dialog box which allows the administrator to delete a server where the lesson is located. `Admin List Host' will display dialog box shows a list of available hosts. `Admin Change Password' will display dialog box which allows the administrator to change his/her password.
`Help ' will display a dialog box which contain information about this application.
2.1.2 Instructor Editor
When the author initially invokes the CSTutor tool, the screen is the same as the admin screen shown above. The only difference between an author interface and the admin's interface is that the admin options will be deactivated. The initial display consists of two windows: a standard form of pull down command menu and a display of the lesson explorer. The tools palette is also shown to allow quick access for authors. The lesson explorer display is the standard default view. The user may change this and other default settings using the view commands discussed later.
The lesson explorer will be empty in the initial startup and remains empty until the user connects to the server to retrieve the lesson plans, this is discussed in section 2.10.2.
The menu functionality is the same as the admin.
2.1.3 Student Lesson Viewer
When the user initially invokes the CSTutor tool, the screen appears as shown in
Figure 3.
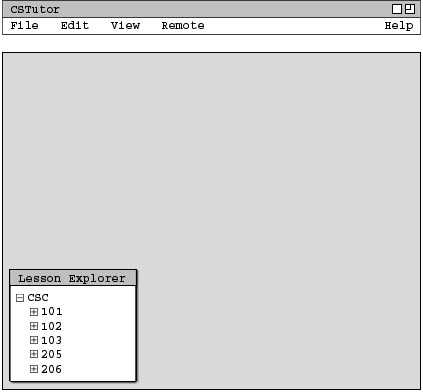
Figure 3: Initial screen.
The initial display consists of two windows: a standard form of pull down command menu and a display of the lesson explorer. The Computer Science (CSC) branch is expanded to show available course tutorial. The lesson explorer display is the standard default view. The user may change this and other default settings using the view commands discussed later.
The lesson explorer will be empty in the initial startup and remains empty until
the user connects to the server to retrieve the lesson plans.
Figure 4 shows an expansion of the command menus.
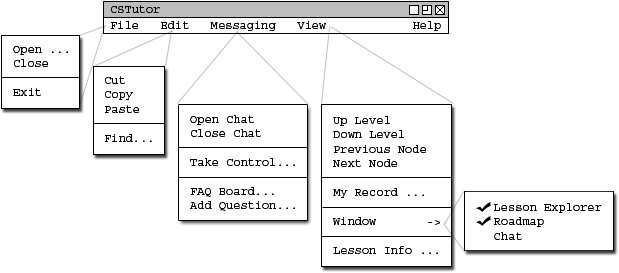
Figure 4: Student command menu.
The users menu system for the users interface is a subset of the authors so it contains the same functionality as discussed in Administrator section. When the student first load the application the student can keep a log of his her activities. This functionality is discussed in section 2.1.3.1.