2.3.2. Designing Quizzes
This introductory scenario shows a teacher creating a quiz. Creating a quiz is an additional feature that teachers can utilize in addition to creating tutorials. In this scenario, the user clicks on New Quiz from the File menu and the system responds by creating a new quiz as shown in Figure 2.3.2a.

Figure 2.3.2a: A new quiz.
2.3.2.1. HTML
CSTutor uses HTML as a source for pages and quizzes. It renders all of the HTML tags used in pages and quizzes as they would be in any standard web browser. However, CSTutor uses a few XHTML tags made specifically for pages and quizzes. 2.3.1.1. Notes about HTML defines page-specific XHTML tags.
There is one quiz-specific XHTML tag, and that is <question>. It has two attributes, and both are required:
- number - This is equal to an integer value, and corresponds to the question number. For example, the first question on a quiz would have number="1".
- value - This is equal to an integer value, and corresponds to the point value for the question. For example, if a question is worth five points, then that question would have value="5".
An HTML example of the question tag is shown below.
-
<question number="1" value="5">
Question one's content goes here.
</question>
The result of the above code is shown in Figure 2.3.2.1a.
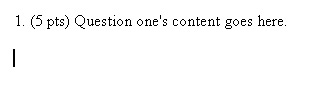
Figure 2.3.2.1a: Question tag example.
The closing tag not only denotes the end of a question, but also creates two line breaks after the question (Note the cursor position in Figure 2.3.2.1a).
There are two tabs for each quiz, one tab which shows the HTML used to generate the page, and another tab with the quiz in it. In this scenario, and by default, the user is in "Quiz Editor" mode. That is, the user can edit the quiz by typing text in the quiz window and by inserting objects, either from the toolbar or the menubar. This will probably be the most frequently used mode, therefore it is described in greater detail below. The user cannot directly edit the HTML in "Quiz Editor" mode. In order to edit the HTML code directly, the user must select the "HTML Editor" mode from the Edit menu. This mode is discussed more thoroughly in 2.3.1.8. Editing HTML.
2.3.2.2. General Quiz Information
The user is free to enter text into the quiz window, as one would with any other text editor. Features that are not unique to quizzes (such as text formatting, images, and links) are explained in the 2.3.1. Designing Pages portion of CS Tutor. There is a toolbar at the top, which allows the user to add to their quiz using convenient buttons that add various objects into the Quiz window. The toolbar items specific to quiz-building are grouped together and are shown in Figure 2.3.2.2a.

Figure 2.3.2.2a: Toolbar buttons for quizzes only.
From left to right, these buttons are:
- Insert Question
- Insert Radio Button
- Insert Checkbox
- Insert Textbox
- Insert Code Segment
- Insert Submit Button
- Insert Reset Button
Questions have three main types of answers:
- multiple choice (or true/false)
- short text
- code segment
There is no partial credit for any question.
2.3.2.3. Multiple Choice - Radio Buttons
The user enters some center-aligned text, as shown in Figure 2.3.2.3a (the figure below, along with subsequent figures, show only the window for the quiz tab).

Figure 2.3.2.3a: Quiz after some text added.
The user creates the first question, a multiple choice question. The user clicks on the "Insert Question" button, which is a generic button for creating a new question. The system responds by bringing up a dialog as shown in Figure 2.3.2.3b.
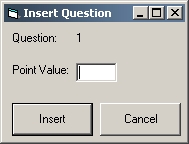
Figure 2.3.2.3b: Insert Question Dialog.
Since this is the first question on the quiz, the dialog shows a "1" next to "Question". "Point Value" sets the number of points a question is worth. The user types "5" next to "Point Value". The completed dialog is shown in Figure 2.3.2.3c.

Figure 2.3.2.3c: Insert Question Dialog after user input.
The user clicks "Insert". The dialog is removed from the screen and the system responds by printing "1. (5 pts) " in the screen. The user types the body of the question, enters a line break (presses enter), and clicks on the "Insert Radio Button" button and the system responds by showing a dialog as shown in Figure 2.3.2.3d.
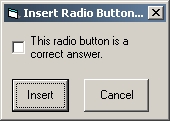
Figure 2.3.2.3d: Insert radio button dialog.
The user clicks "Insert" and the system responds by inserting a radio button into the quiz. The user types "True", presses enter, and inserts another radio button - this time selecting, "This radio button is a correct answer." (Figure 2.3.2.3e).
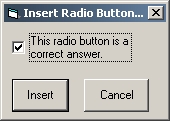
Figure 2.3.2.3e: Insert radio button dialog with checkbox selected.
The system responds by inserting a "selected" radio button, which denotes a correct answer. The user types "False" next to that radio button. Note that only one radio button per question can be selected at the same time. Figure 2.3.2.3f shows what the quiz looks like after the user has finished the first question.
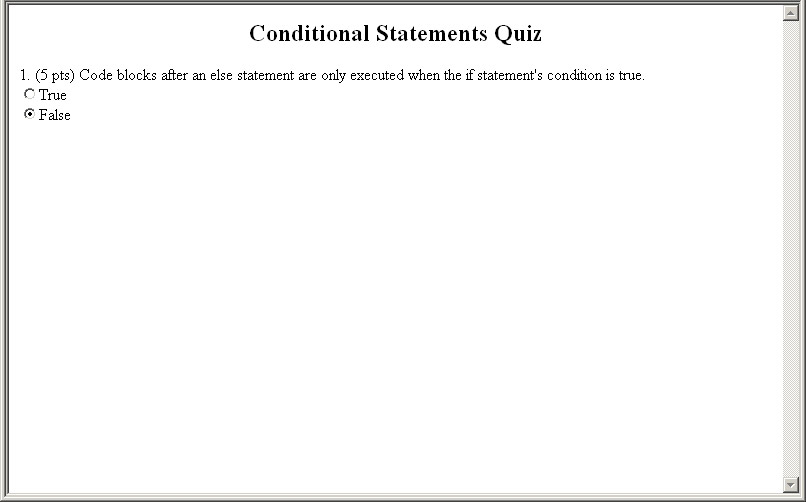
Figure 2.3.2.3f: Quiz after question one.
To edit the point value for the first question, the user could right click on the text "1. (5 pts) " and a dialog similar to the "Insert Question" dialog would appear. Instead it would be entitled "Edit Question" and the "Point Value" field would be equal to the current value of the question. To edit a radio button, the user can right click on the radio button and a dialog similar to the "Insert Radio Button" dialog would appear, except it would be entitled "Edit Radio Button". If the user wanted to edit the radio button next to "False", the checkbox next to "This radio button is a correct answer." would be selected.
2.3.2.4. Multiple Choice - Checkboxes
Next, the user makes a multiple choice question using checkboxes. Unlike radio buttons, multiple checkboxes can be selected as answers. The user inserts a new question and makes it worth ten points. The user types the body of the question. The user clicks on the "Insert Checkbox" button and the system responds by showing a dialog as shown in Figure 2.3.2.4a.
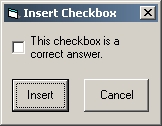
Figure 2.3.2.4a: Insert checkbox dialog.
The user checks "This checkbox is a correct answer." (Figure 2.3.2.4b) and clicks Insert.
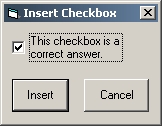
Figure 2.3.2.4b: Insert checkbox dialog with checkbox selected.
The user types "for" as the answer, inserts a line break, and repeats that step - making three more checkbox answers, with the correct answers denoted by selected checkboxes. Figure 2.3.2.4c shows the quiz after the user is done with question two.
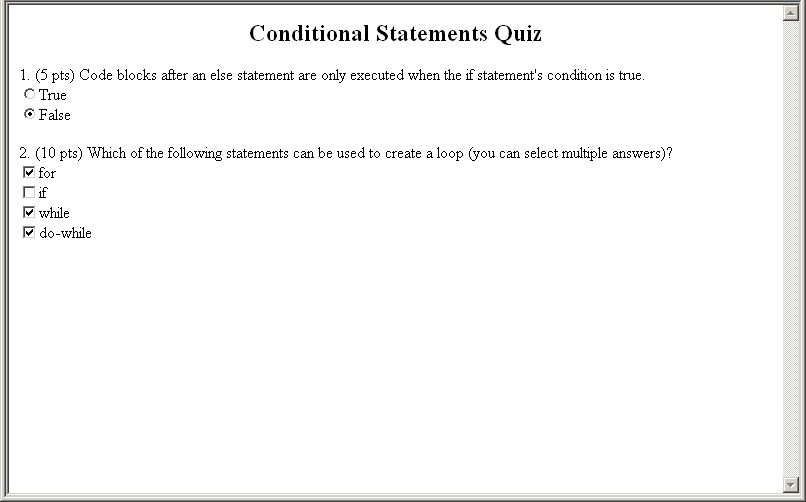
Figure 2.3.2.4c: Quiz after question two.
If the user wants to edit whether a checkbox is a correct answer or not, the user can right click on the checkbox and a dialog will appear so the user can change whether it is a correct answer or not.
2.3.2.5. Short Text
For the next question, the user makes a "short text answer" question. The user inserts a new question and types "10" for the point value. The user types some of the body of the question, but inserts a textbox in the question. Inserting a textbox brings up a dialog as shown in Figure 2.3.2.5a.
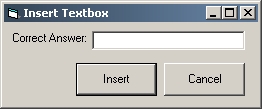
Figure 2.3.2.5a: Insert textbox dialog.
The user types "infinite" in the textbox (Figure 2.3.2.5b) and clicks Insert.
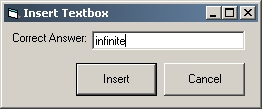
Figure 2.3.2.5b: Insert textbox dialog with correct answer inputted.
The system responds by creating a textbox that says "infinite" in it. This denotes that the correct answer is "infinite". The textbox size is equal to five more than the number of characters in the answer. If the user wants to edit the textbox answer, the user can right click on the textbox and a "Edit Textbox" dialog will appear. The user finishes typing the rest of the question. Question three is shown in Figure 2.3.2.5c.
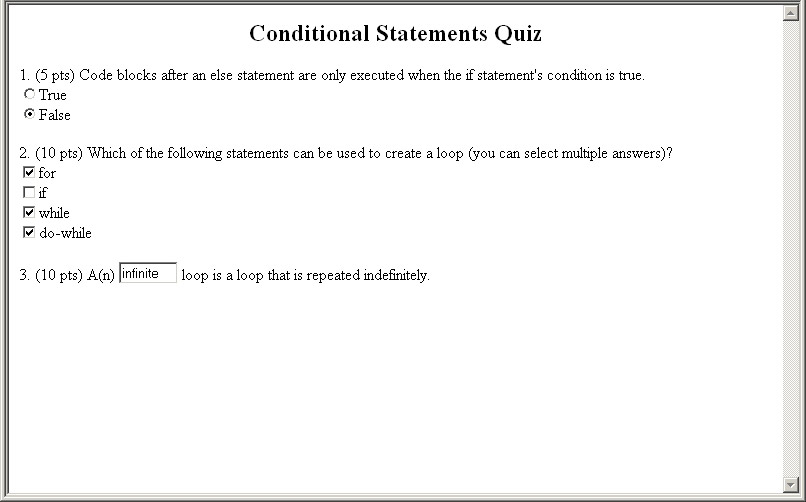
Figure 2.3.2.5c: Quiz after question three.
2.3.2.6. Code Segment
The fourth question the user inputs involves a code segment answer. The user inserts a new question and makes it worth fifteen points. The user types the body of the question. The user clicks on the "Insert Code Segment" button and the system responds by showing a dialog as shown in Figure 2.3.2.6a.
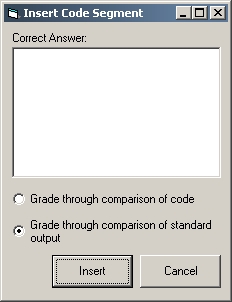
Figure 2.3.2.6a: Insert code segment dialog.
The user types in the correct answer (Figure 2.3.2.6b), selects the radio button next to "Grade through comparison of standard output", and clicks "Insert".
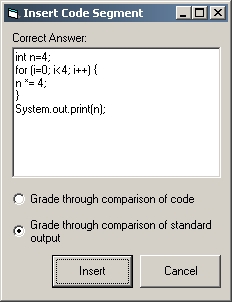
Figure 2.3.2.6b: Insert code segment dialog with correct answer inputted.
The system responds by inserting a code segment with the correct answer displayed in it. The number of rows for the code segment is equal to the number of rows in the answer. The number of columns is equal to five more than the maximum number of columns in any row of the answer. The "Grade through comparison of standard output" option means that the question is graded by string comparison of the standard output produced. The other option, "Grade through comparison of code", directly compares code for any incongruencies. The latter option is recommended for only short code answers. If the user wants to edit the answer, the user can right click on the code segment and an "Edit Code Segment" dialog will appear. Question four is shown in Figure 2.3.2.6c.
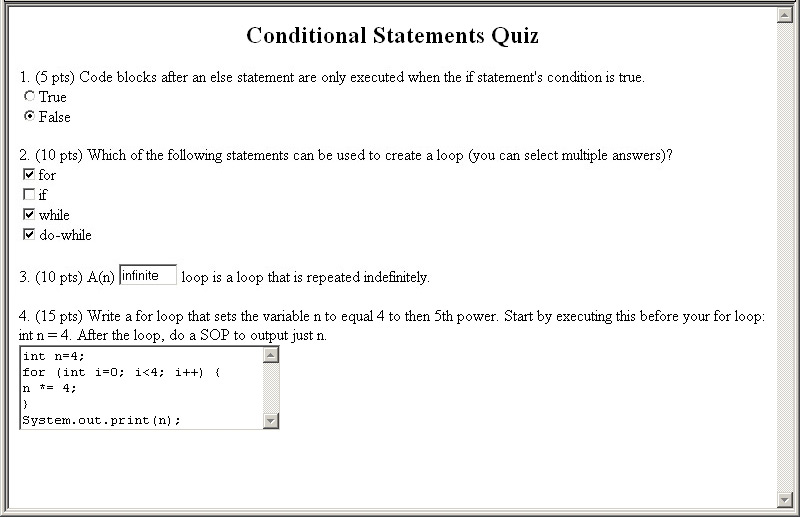
Figure 2.3.2.6c: Quiz after question four.
The user then presses enter twice, clicks on "Insert Submit Button", presses the spacebar, and clicks on "Insert Reset Button" to add those buttons to the bottom of the quiz. Figure 2.3.2.6d shows the completed quiz.
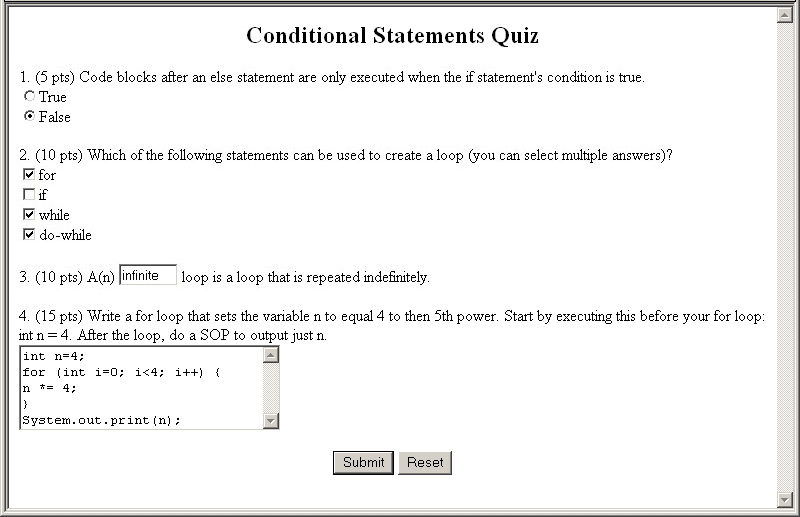
Figure 2.3.2.6d: A completed quiz.
Quiz answers are shown here so that the teacher can see what the correct answers are. When the student takes the quiz, as described in 2.4.6. Taking Quizzes, the student is not given these answers, and takes a "blank" quiz.
The HTML used to that generates this quiz is shown in Figure 2.3.2.6e.
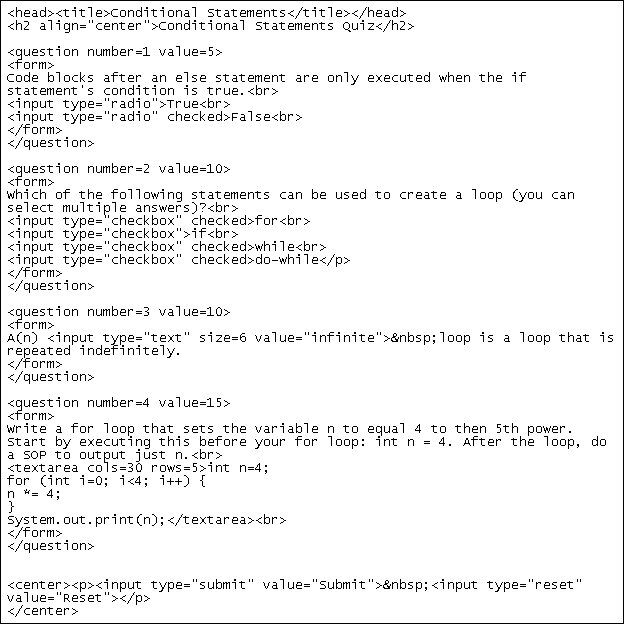
Figure 2.3.2.6e: HTML for a completed quiz.
2.3.2.7. Quiz Options
The user now edits quiz-specific options. The user clicks on "Edit" in the menubar and selects "Quiz Options". If the user unchecks "Show students their quiz results", then the options below it become unavailable (Figure 2.3.2.7a).
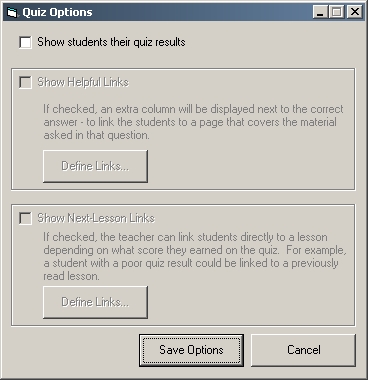
Figure 2.3.2.7a: Quiz Options with optional settings grayed out.
"Show students their quiz results" is checked by default, and in this scenario the user leaves it checked. The user then clicks on the checkboxes next to "Show Helpful Links" and "Link Students to Lesson based on Score" as shown in Figure 2.3.2.7b.
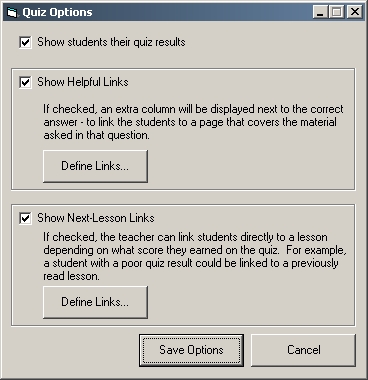
Figure 2.3.2.7b: Quiz Options.
The user clicks the "Define Links..." button for Helpful Links, and the system responds by showing a dialog as shown in Figure 2.3.2.7c.
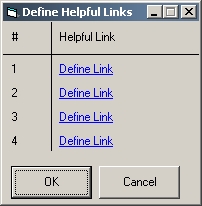
Figure 2.3.2.7c: Dialog that lets the user define Helpful Links.
The user clicks on "Define Link" to define an internal link. Internal links are discussed in further detail in 2.3.1.1. Notes about HTML. When an user takes the quiz, these Helpful Links are displayed next to their correct answer, as shown in 2.4.6. Taking Quizzes. The user selects a link for each question as shown in Figure 2.3.2.7d.
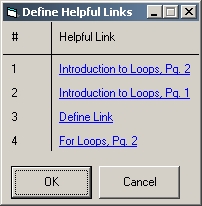
Figure 2.3.2.7d: Helpful Links dialog after user input.
The user selects a link for all of the questions except for the third one, which still says "Define Link" next to it.
The user clicks on "Done" and is returned to the "Quiz Options" dialog. The user clicks on the "Define Links..." button for the Next-Lesson Links. This opens up a dialog as shown in Figure 2.3.2.7e.
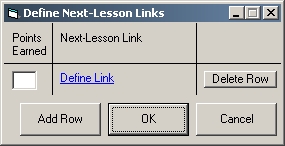
Figure 2.3.2.7e: Next-Lesson Links dialog.
The "Add Row" button adds more rows to breakdown the point groupings. "Delete Row" eliminates a specific row, shifting up the rows below it. The user clicks on "Add Row" twice to add two more groups, as shown in Figure 2.3.2.7f.
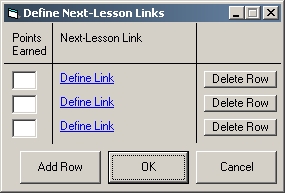
Figure 2.3.2.7f: Next-Lesson Links dialog with more rows.
For the "Points Earned" column, the integers entered here are out of the total points on the quiz, in this case forty points. The user types "30", "15", and "0" for the three point groupings. They must be entered in descending order, as here. These point values are checked when the user presses "OK". If there is one or more invalid entries, then an error message appears and the dialog does not disappear. The user clicks on "Define Link" for each and defines the internal link. Internal Links are discussed further in 2.3.1.1. Notes about HTML.
The completed dialog is shown in Figure 2.3.2.7g.

Figure 2.3.2.7g: Next-Lesson Links dialog after user input.
Students who earn thirty points or more, are supplied with a link to "Introduction to Objects" at the bottom of the quiz results page, as shown in 2.4.6. Taking a Quiz. Students who earn fiften points or more (but less than thirty), are supplied with a link to "The If Statement". Lastly, students who earn between zero and fourteen points are given a link to "Introduction to Loops". The user clicks OK to exit the dialog.
The user clicks on "Save Options" to exit the "Quiz Options" dialog. The user goes to the "File" menu and clicks on "Save As.." to save the quiz.
Prev: designing pages
| Next: roadmap
| Up: functional requirements
| Top: index