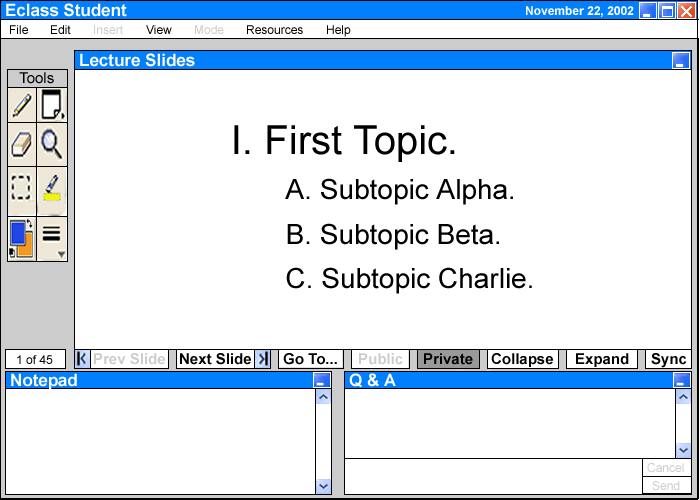
Figure 2.5 I1: The Default Student Interface
The default student interface consists of three windows and a toolbar. The three windows are the 'Lecture Slides', the 'Notepad', and the 'Q & A'. Section 2.6 Student/Instructor Interaction, will further discuss the 'Q & A' interface. The main focus of the student user is the 'Lecture Slides' window, where the instructor will present his/her lecture slides. The 'Lecture Slides' window is highlighted initially along with the toolbar on its left and some navigation and layer control buttons below. The Eclass tool automatically loads the lecture slides and displays the first slide when the student launches the program during class (Figure 2.5 I1). Please note that the private layer is on by default and the 'Public' button is faded (see Section 2.5.3 for layer details). The toolbar consists of eight buttons which the student presses to select different editing tools. The student uses these editing tools on the private and/or public layer in the 'Lecture Slides' window to perform a certain writing operation. The Eclass tool accepts inputs from the terminal's keyboard, mouse, and electronic pen and tablet.
After the student
familiarizes him/herself with the default student interface, he/she may begin
viewing the lecture.
The instructor begins his/her presentation with Slide #1 (as seen in Figure 2.5 I1). As the instructor moves through the slides on his terminal, the slides in the student's 'Lecture Slides' window will move along with the instructor. The Eclass presents the slides in the student user's 'Lecture Slides' window as a background. This means that the student user is unable to alter the content of the slides (Please see 2.5.3 Details on Student's View of Private and Public Layers for more information on the different layers). If the instructor gives the student user 'Limited Control' or 'Free Access' to the Eclass tool, he/she may use the navigation buttons located at the bottom of the 'Lecture Slides' window at anytime to navigate throughout the lecture slides ahead of the instructor. Please see Section 2.6 Student/Instructor Interaction for more information on how different access rights can affect the student's control of the interface.
The buttons below the 'Lecture Slides' window work similarly to any navigation button in other applications. If the student is on the first slide, the 'Prev. Slide' button is faded. Also, if the student is on the last slide, the 'Next Slide' button is faded. Assuming that the student is on the first slide, clicking the 'Next Slide' takes the student to the second slide (see Figure 2.5.1 I1). Each slide has its slide number shown in a box on the bottom left hand corner of the 'Lecture Slides' window, so the student knows his/her current slide position.
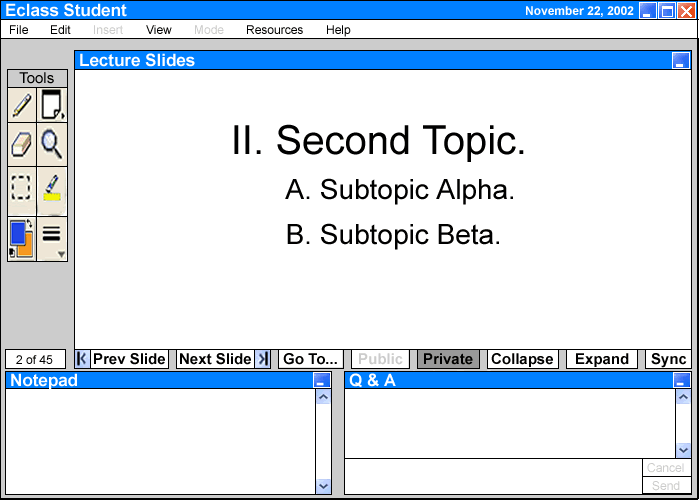
Figure 2.5.1 I1: Slide #2
Clicking the 'Go To' button brings the student user to a particular slide. The 'Go To' window will appear with a scrollable selection menu that contains a short description or heading of each slide and the slide number (see Figure 2.5.1 I2). The student chooses the appropriate slide and clicks the 'Go' button. This automatically hides the 'Go To' window and displays that slide in the 'Lecture Slides' window.

Figure 2.5.1 I2: The 'Go To' Window
For example, the student can proceed to Slide #5 by using the 'Next Slide' button or 'Prev. Slide' button, depending on the student's current slide position, or by simply selecting the slide from the 'Go To' window. The student may also double click on the Slide Number Indicator (Figure 2.5.1 I3) and enter the desired slide number directly. This brings Slide #5 to the 'Lecture Slides' window (Figure 2.5.1 I4).
![]()
Figure 2.5.1 I3: The Slide Number Indicator
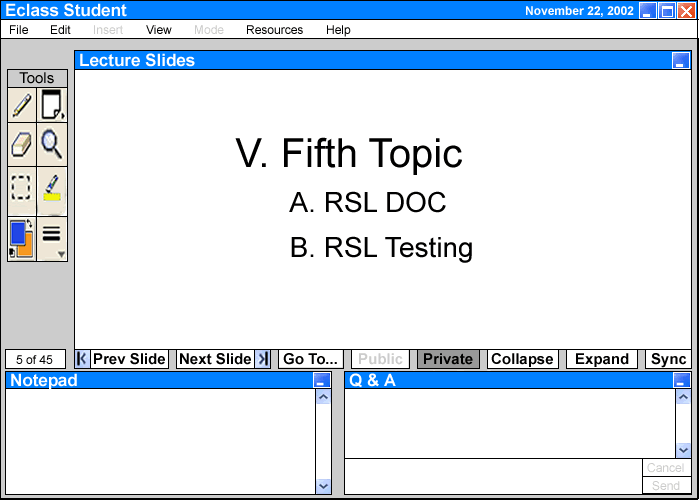
Figure 2.5.1 I4: Slide #5
Now, the student is seeing a slide that the instructor is not lecturing on. After browsing through the lecture slides, the student wishes to return to the slide that the instructor is currently lecturing about. Instead of repeatedly using the navigation buttons, the student clicks on the 'Sync' button. This automatically brings up the current class slide, Slide #1, which is also on the overhead projector, in the student's 'Lecture Slides' window. The student is now on Slide #1, in sync with the class.
When the student wishes to view the detailed lecture notes that are hidden in the slides, he/she clicks the 'Expand' button to view the collapsed notes. When the slide data becomes too large to fit in the window frame, a scrollbar will appear on the right side of the 'Lecture Slides' window (see Figure 2.5.1 I5). The student may choose to expand only one section by clicking on that particular section, or expand all sections by clicking the 'Expand' button without choosing a particular section. The 'Collapse' button works the same way, except that it hides detailed notes.
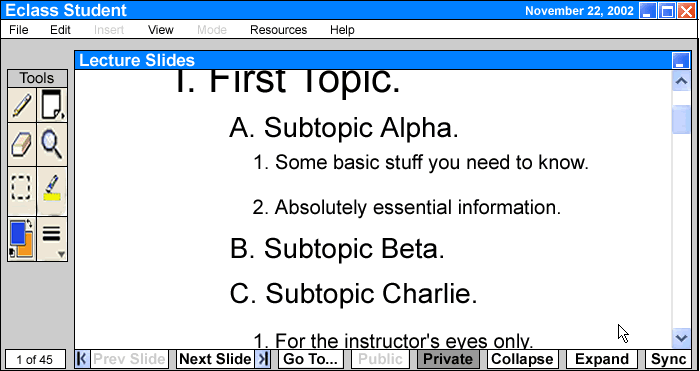
Figure 2.5.1 I5: Expanding all hidden notes in the lecture
slides
All these slide
viewing options are also available in the View Menu.
This scenario shows
a student user taking notes in the 'Lecture Slides' window during an in-class
slide presentation. To promote a paperless classroom environment, the Eclass
tool offers the student user the ability to electronically take notes on the
instructor's slides. In this scenario, we assume that the instructor has already
begun his lecture and the 'Lecture Slides' window in the main interface is displaying
the slides. He/She is currently on Slide #1 with the detailed notes expanded.
The student needs to have his/her private or public layer on.
To take notes on a particular location on a slide, the student user left clicks
on the 'Post-It' button in the toolbar on the left of the 'Lecture Slides' Window.
The student knows that he/she is in 'Post-It' tool mode because the mouse cursor
has changed from the shape of an arrow to that of the 'Post-It' icon. Then the
student moves the cursor back to the 'Lecture Slides' window and double clicks
on the location where he/she wants to insert the notes. A red number 1 appears
at that spot and a rectangular textbox opens next to it. A blinking cursor in
the textbox indicates that the student may begin typing in notes (see Figure
2.5.2 I1). There is no text limit. After the student has finished taking notes,
he/she double clicks anywhere outside of the textbox. The textbox minimizes
into the red number and Eclass automatically saves the notes at that location
(see Figure 2.5.2 I2).
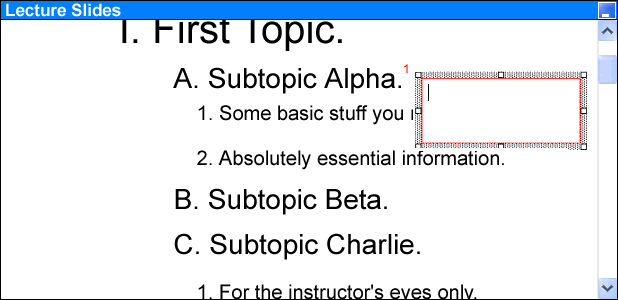
Figure 2.5.2 I1: In the 'Lecture Slides' window, where the
student user opens up the Post-It textbox
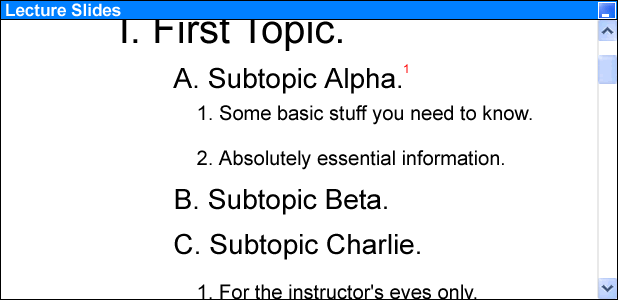
Figure 2.5.2 I2: The first Post-It saved
Eclass saves all 'Post-It' notes in a separate HTML file, in a log format. As the student creates a 'Post-It' note, the Eclass automatically assigns a number to the note and records it in the log file. Please see later section for details on saved slides and notes.
When the student wishes to edit his/her old 'Post-It' notes, he/she places the
mouse pointer over a red number and double clicks it. The textbox reappears
in an editable format (see Figure 2.5.2 I3) and disappears when the student
again double clicks anywhere outside of the box. If the student just wants to
view the 'Post-It', he/she simply needs to place the mouse pointer over the
red number and the textbox will appear in a non-editable format (see Figure
2.5.2 I4).
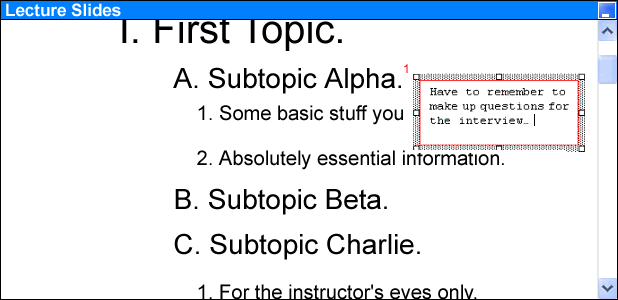
Figure 2.5.2 I3: Reopening the first Post-It
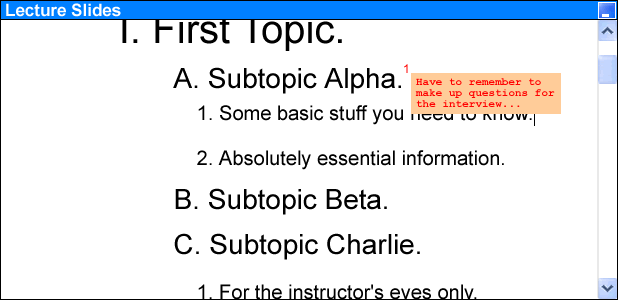
Figure 2.5.2 I4: Viewing the first Post-It
The student may also use the 'Notepad' window in the lower left hand corner to take plain text notes. This window acts exactly like a regular text editor. The student clicks anywhere on the window to bring it to the foreground and begins typing (see Figure 2.5.2 I5).
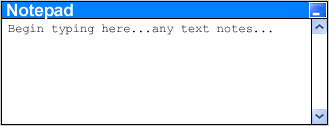
Figure 2.5.2 I5: The 'Notepad' Window
When the instructor gives the student the access right to the public layer, namely the overhead, the Eclass tool will first activate the 'Public' button with the 'Private' button remaining selected in the student's view (see Figure 2.5.3 I1). To display the public layer, the student selects the 'Public' button. This automatically unselects the 'Private' button (see Figure 2.5.2 I2). Whatever is displaying on the class overhand, the instructor's lecture slides and private layer, will appear in the student's 'Lecture Slides' window, covering the student's lecture slides and the student's private layer. That's the student public layer's background. The student may do any writing operation on the public layer using the toolbar function, but he/she cannot alter the content of the layer's background. This layer will appear on the overhead in the class.
![]()
Figure
2.5.3 I1: The 'Public' Button Activated
![]()
Figure 2.5.3 I2: The 'Public' Button Selected
There are a total of three layers in the student user's 'Lecture Slides' window. The lecture slide presentation is the background layer (see Figure 2.5.3 I3). The student is unable to edit the content of the lecture slides because they lie in the background. To take notes on the slides, the student needs to write over the background, on the private layer.
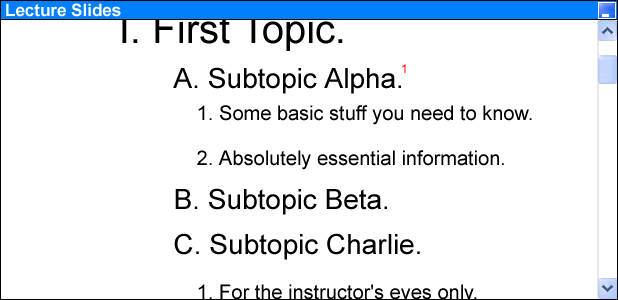
Figure 2.5.3 I3: The lecture slides as the background layer
The private layer, on which the student takes notes, acts as a transparency above the background layer (see Figure 2.5.3 I4). The student user may use the editing tools anytime to draw on it, without erasing the lecture slides themselves. The Eclass tool automatically locks this private layer with the background, so if the student user decides to scroll up or down any particular slide, the private layer will not fall out of place. The student may unselect the 'Private' button and view the slides only, in case his/her notes become too messy.
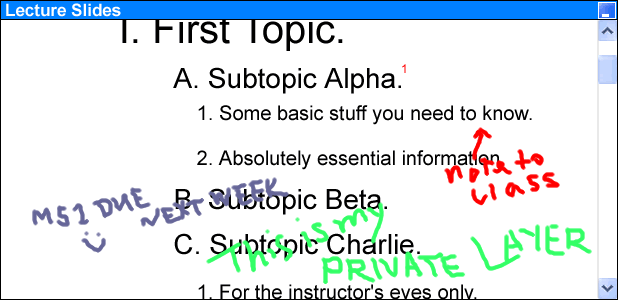
Figure 2.5.3 I4: The private layer as a transparency over the background
The public layer is only accessible to the student user if the instructor specifically gives the student the control of the overhead. It is another layer that the student can write on. However, unlike the private layer, everything that appears on the public layer shows up on the class overhead. The public layer acts as a piece of paper with the screen shot of the class overhead as its background over the student private layer and the slides (see Figure 2.5.3 I5). This layer is currently blank because the instructor has turned off his/her private layer and lecture slides. In another words, when the student selects the 'Public' button, whatever is on the class overhead is transferred to the student's 'Lecture Slides' window as a third layer, covering the student's private layer and lecture slides.
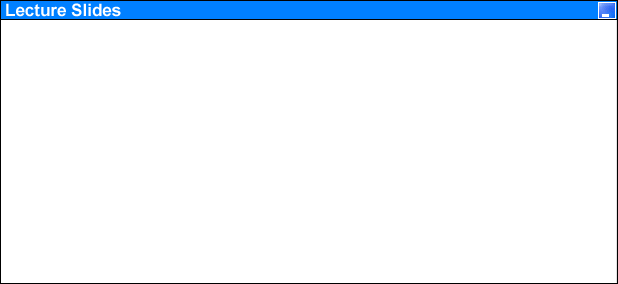
Figure 2.5.3 I5: The public layer
To edit the public layer, the student may use any tools in the toolbar. Because the public layer is not transparent, it covers the lecture slides and the student's notes, the private layer. If the student wants to show a part of his/her private layer in the public layer, he/she may click the 'Private' button below the 'Lecture Slides' window that will temporarily turn off the public layer and take him/her back to his/her private layer with the lecture slide as the background. The student may then search through his/her lecture slides privately. When the desired notes are found, he/she uses the 'Selection' box in the toolbar to box an area in the private layer and selects 'Make Public' from the Edit Menu (see Figure 2.5.3 I6).
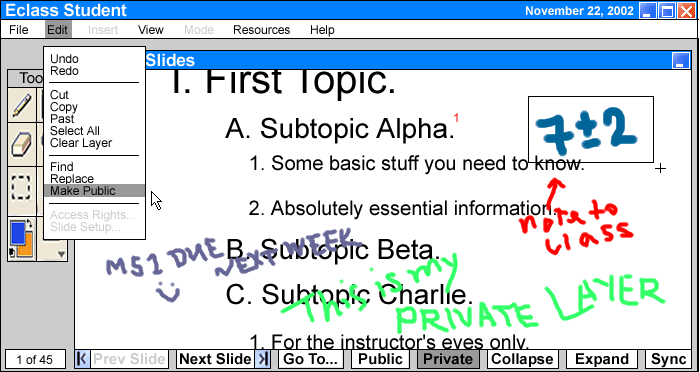
Figure 2.5.3 I6: The student makes a selection in his/her
private layer
Then, the selected part will automatically appear in the public layer and the overhead as an image (see Figure 2.5.3 I7). The student toggles him/herself out of the private layer by pressing the 'Public' button below the window. In the public layer, the student may move the image anywhere on the layer by dragging it with the mouse.
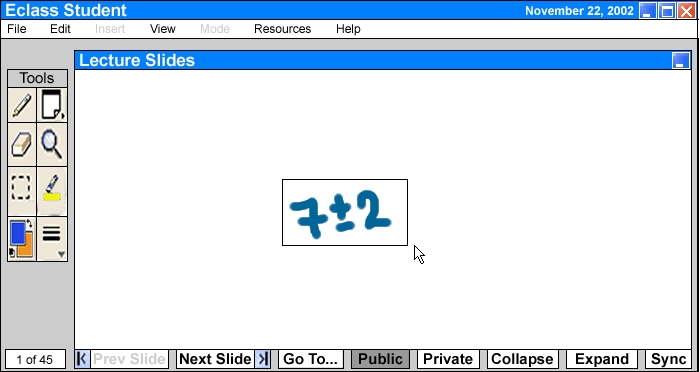
Figure 2.5.3 I7: The selection appears in the public layer as an image
The instructor has full control of the student's public layer. He/she may
turn off the background of the student's public layer anytime, namely his/her
slides and notes (see Section 2.4 Details
of Instructor's Interface for more detail on instructor's public layer
controls). In the last 'Make Public' scenario, the student's public layer's
background appears white (Figure 2.5.3 I7) because the instructor has chosen
to hide his/her lecture slides and notes to give the student more white space
to write on.
Note that when the instructor writes something on the public layer, it will
also show up on the student's screen (Figure 2.5.3 I8).
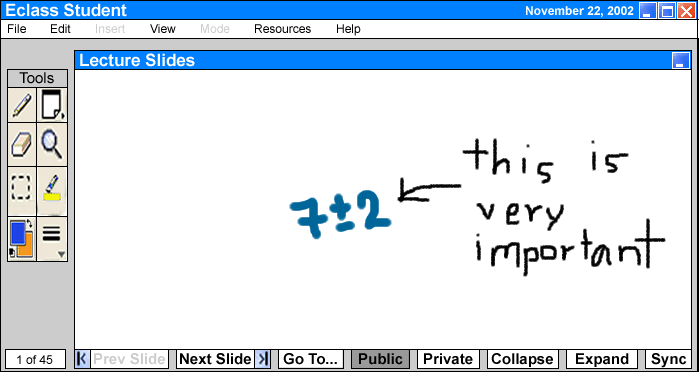
Figure
2.5.3 I8: The instructor writes on the public layer
The student uses the public layer to perform any writing operation to express his/her ideas on the overhead. Everything on the public layer will appear on the class overhead. When the instructor takes away the 'Individual Control', the public layer will disappear and the 'Public' button will fade. All work done on the public layer will be lost.
When the class ends, the student can go to the File menu and select Save or Save As to save the lecture slides and notes. The lecture slide merges with the private layer and The Eclass tool saves them as a PDF file along with the 'Post-It' numbers. Each 'Post-It' number is a link to its corresponding 'Post-It' note. The 'Post-It' notes are saved as a separate HTML file with appropriate invisible anchor tags according to their numbers. The student can click on the number link in the PDF file and it will automatically launch an Internet browser and go to the section in the 'Post-It' HTML file.
The 'Notepad' will be saved as an HTML file.
For other saved files, please see Section 2.4 Details of Instructor's Interface.
The Eclass tool provides the student an after-class lecture viewing feature. The student may use the tool anytime after class and view old lectures and notes. When the student first launches the program after class, the three main windows are empty and the navigation buttons are deactivated (see Figure 2.5.5 I1). The student needs to fetch the lecture notes and slides from the database by going to 'File' 'Open' (see Figure 2.5.5 I2, see Appendix A for changes). A regular open-file window will appear that automatically has the default lecture notes directory from where the student can select the old lecture notes of his/her needs. The Eclass tool also activates the navigation buttons below the window after the student opens a lecture.
![]()
Figure 2.5.5 I1: Default Empty Student Interface
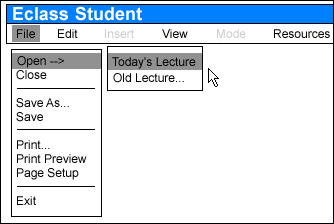
Figure 2.5.5 I2: Opening today's lecture