After creating the
presentation in the 'Prep' mode, the instructor opens the presentation in the
'Presentation' mode of Eclass. At the beginning of class, the instructor's view
before opening the lecture is completely blank. By opening a lecture presentation,
the slides appear in the 'Lecture Slides' window and the slide buttons and options
become active. These steps are explained in more detail in section 2.2
Introduction to Presenting and Viewing a Lecture.
2.4.1 Presenting the Material
Initially, the 'Lecture Slides' window displays the lecture material as slides with collapsed notes. Slide notes can then be expanded into detailed notes at any time during the presentation with the expand and collapse feature. However, none of the actual text can ever be edited during a presentation. This window is made up of three layers, 'Lecture,' 'Private,' and 'Public.'
The deepest layer, or background, is the 'Lecture' layer that consists of the slide data, but is not editable during 'Presentation' mode. However, each level of text on the slides can be expanded or collapsed if setup to do so in 'Prep' mode. Initially, each slide is not scrollable and just displays an appropriate amount of text. When a level of the outline is expanded and no longer fits on one screen, a scrollbar automatically appears to make room for any additional text.
The 'Private' layer, found on top of the 'Lecture' layer, acts as a whiteboard to allow the instructor to add additional notes, comments, or drawings on top of the lecture notes without affecting the text. The 'Lecture' and 'Private' layers are always displayed on the overhead screen showing the slide data and the instructor's additional notes that correspond to specific parts of the slides.
The 'Public' layer is an optional layer that appears on top of the last two layers only if the instructor gives a student 'Individual Control.' It is the same as the 'Private' layer except it is saved with a solid white background. When activated, it appears on the overhead as a third layer on top of the previous two mentioned. The instructor can turn off the 'Lecture' and/or 'Private' layers if they interfere with the 'Public' layer, e.g. the student needs more space to write.
The 'Tools' window has all of the functions that can be used on the 'Private' and 'Public' layers.
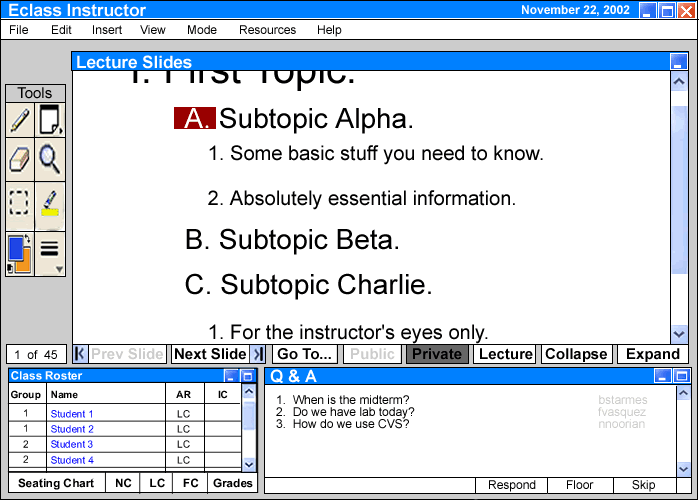
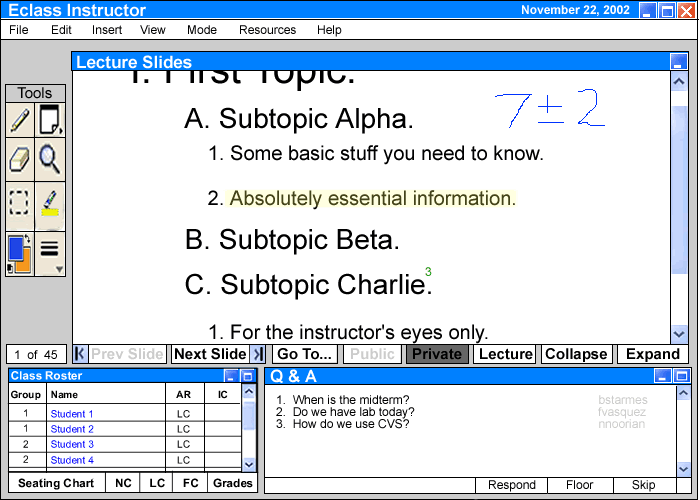
The 'Lecture Slides' represents a breakdown down of the full lecture outline as created by the instructor during 'Prep' mode, discussed in section 2.3. These slides are created with expand and collapse capability to be able to view more detailed notes on the overhead as necessary. By selecting the section 'A. Subtopic Alpha' and then clicking the expand button at the bottom of the 'Lecture Slides' window, the bullet under 'A' is expanded into full notes now showing the subtopics, 1 and 2. Each slide individually is scrollable if there is more data than can fit on a slide after expanding (Figure 2.4.1.1 I1). Section 'C' has previously been expanded in the same way. To collapse the section 'A. Subtopic Alpha' once again, the instructor must highlight 'A' and click the 'Collapse' button. The same can be done for section 'C.'
Figure
2.4.1.1 I1: Expanding Slide Notes
To switch to another slide the instructor clicks the 'Next Slide' or 'Prev. Slide' buttons at the bottom of the window. He/She also has the option to jump to the first or last slide of the presentation by clicking on the appropriate arrow found in the bottom tool bar. In this case, the 'Prev. Slide' button remains inactive, because the slide being presented is the first one in the presentation. However, the instructor may switch to slide two by clicking the 'Next Slide' button. An example is presented in the next section.
The 'Private' layer serves as an additional transparent layer that appears on top of the 'Lecture Slides' background layer to add freehand text or drawing. This layer "snaps-on" to the slides presented and is viewed on the overhead also. As the instructor switches slides, the information on the 'Private' layer scrolls away with it to refer to specific parts of the notes. The information is not lost or moved from where it was originally placed. The 'Post-it' feature is used to add hidden side comments for personal use. Although this feature is mainly intended for student use, the option is still available for the instructor. Upon closing the program, the hidden post-its are stored in one log that is numbered like footnotes, using little red numbers in the slides to link to the matching number in the log. This feature is presented in more detail in the next section.
The 'Q&A' feature has a log stored with little green footnotes, as opposed to the red footnotes used for the post-its, to match up with the part of the presentation that it refers to. The instructor highlights question 3 and clicks the 'Respond' button, then clicks onto the 'Private' layer and notes at the location that pertains to the question. The response is typed into a text box, stored onto the 'Q&A' log, and a little green '3' footnote appears linking the 'Private' layer to the log with all of the questions that have been answered. This feature has the same characteristics as described for the post-its. More details of 'Q&A' and the stored log are found in section 2.6 Student/Instructor Interactions.

Figure
2.4.1.2 I1: Basic 'Private' layer features
As mentioned before, the 'Public' layer has the same tool options as the 'Private' layer. However, not all of the tools will be used as often for the 'Public' layer. This is because it serves a different purpose, for example, to allow students to explain their reasoning on a specific topic. When students one and two are given 'Individual Control' as seen in the 'Roster' window, a new layer is added on their screens, on the instructor's screen, and on the overhead. The 'Public' button at the bottom of the 'Lecture Slides' window is activated and selected. The students with 'IC' and instructor are all free to write on this layer (Figure 2.4.1.3 I1). So far nothing has been added to this public layer, and the instructor's 'Private' and 'Lecture' layers are still active as seen on the overhead and his/her screen.
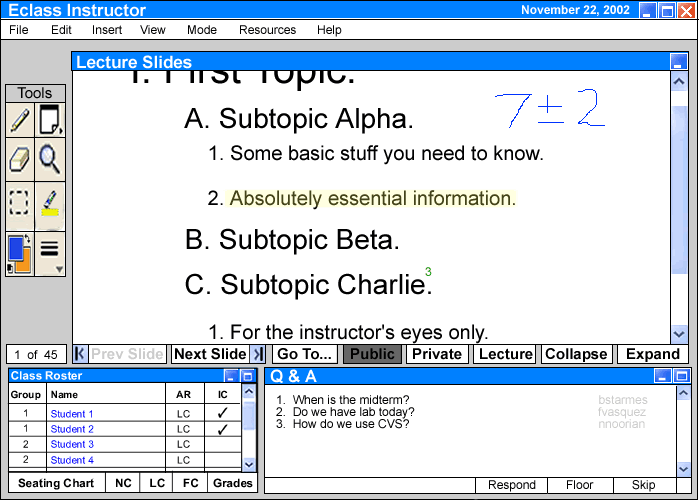
Figure 2.4.1.3 I1: 'Public' Layer Activated
The green footnote and highlighted segment have been added to the instructor's 'Private' layer from before. The instructor has now added a hand-written note, "7 +/- 2." The instructor notices that the students need more room to be able to write on the 'Public' layer and, therefore, decides to first turn of his/her 'Private' layer. This is done by first clicking the 'Private' button once, which selects it, and then a second click will deactivate it (Figure 2.4.1.3 I2).
Figure 2.4.1.3 I2: 'Private' Layer Turned Off
The instructor also decides to turn off the 'Lecture' layer in order to give the students a lot more space to write on. He/she needs to only click the 'Lecture' button once for this to occure, since the 'Lecture' layer can only be turned on or off, but is never selected. Notice that the scrollbar has now disappeared and all buttons are no longer active since there are no slides left on the screen (Figure 2.4.1.3 I3).
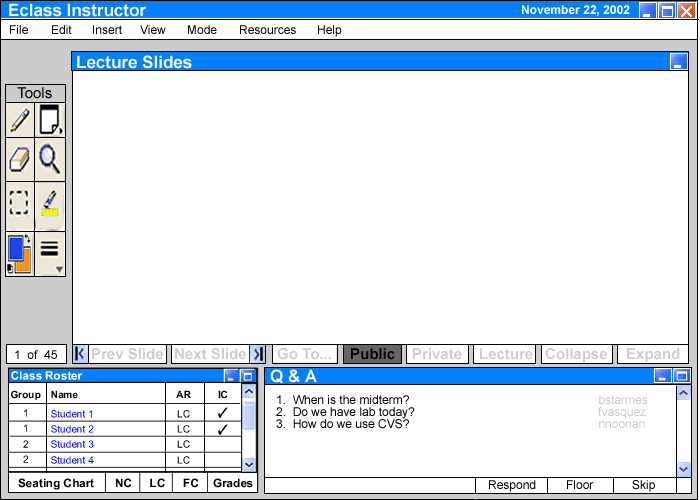
Figure 2.4.1.3 I3: 'Private' and 'Lecture' layers turned off
Now the student has added notes to the 'Public' layer, which appers on the overhead as well as on the instructor's screen (see Figure 2.4.1.3 I4).
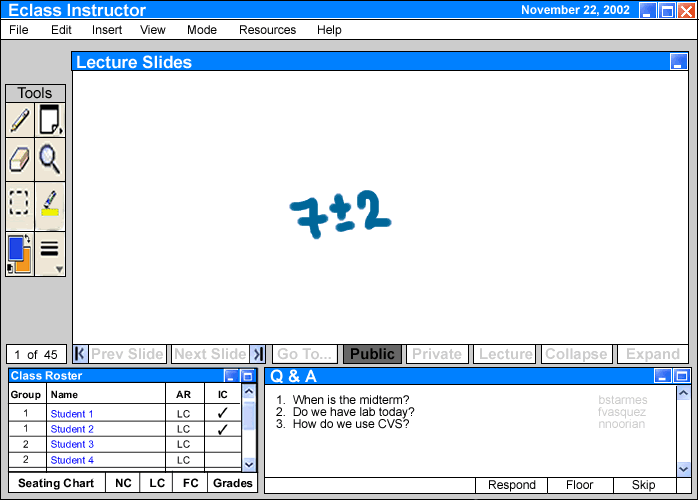
Figure 2.4.1.3 I4: Student Adds Notes to 'Public' Layer
The instructor decides to add some of his/her own notes to the 'Public' layer, which appears on the overhead also (Figure 2.4.1.3 I5).
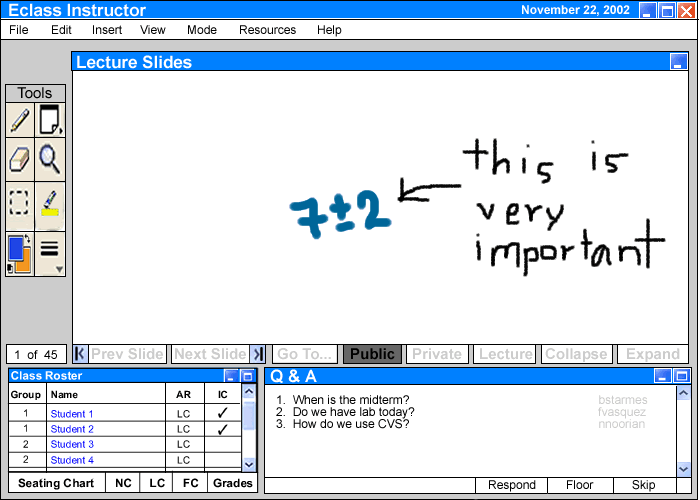
Figure 2.4.1.3 I5: Instructor Adds Notes to 'Public' Layer
The instructor removes the 'Individual Control' from both students, which then turns off the 'Public' layer. This autotmatically re-activates both the 'Private' and 'Lecture' layers in the instructor's 'Lecture Slides' window. He/she now continues the lecture from where it last left off (Figure 2.4.1.3 I6).
Figure
2.4.1.3 I6: 'Individual Control' and 'Public'
Layer Off
The 'Tools' window found to the left of the 'Lecture Slides' window has all the options available for the 'Private Layer' and the corresponding background slides. All tools are also used for the 'Public' layer, although not all of them are as useful.
The pencil is the main tool used to add a free hand note on the 'Private' or 'Public' layer with the tablet and pen, which acts like a mouse, found at each terminal. Upon selecting the tool, the cursor changes to a little pencil icon. The instructor then chooses to change the color to blue instead by clicking the colors box and selecting the desired color. He/she also changes the thickness of the line to size 1 by clicking on the lines tool and selecting the desired size to add the note, "7 + or - 2" as shown in section 2.4.1.3. The instructor now draws with a pencil of color red and width of 5. Unfortunatley, this new addition covers up some parts of the notes (Figure 2.4.2 I1)...
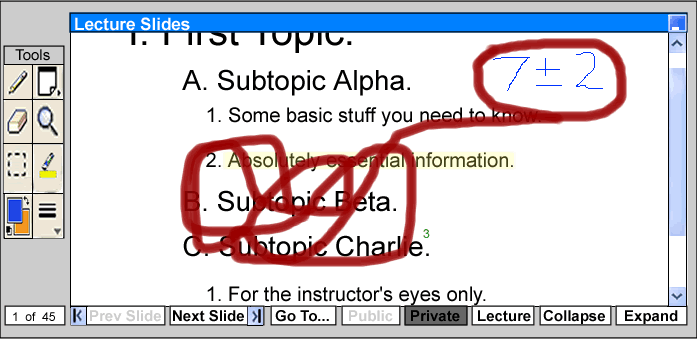
Figure 2.4.2 I1: Drawing
with thick red pencil
If the instructor accidentally covers
a part of the notes using the pen and tablet on the 'Private' or 'Public' layer,
the eraser is used to erase it without affecting the background slide notes.
Once again, when the eraser is selected, the icon changes to a little eraser
to represent the desired tool. The instructor selects the desired thickness
of the eraser with the line width tool, then clicks and drags the eraser over
the part of the arrow that covers up the notes, but the background 'Lecture
Slide' layer remains unaffected (Figure 2.4.2 I2). The color remains default
(clear) for the eraser.
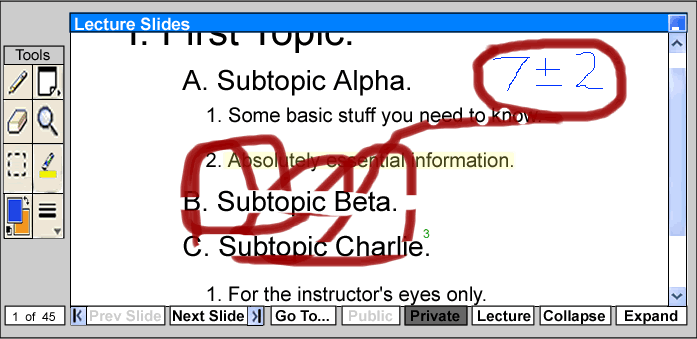
Figure 2.4.2 I2: Erasing pencil error
To add a hidden note, the instructor selects the 'Post-it' note and clicks onto the 'Private' or 'Public' layer. This places a numbered red link on the notes wherever he/she has clicked and a text box appears to add a note. This is similar to the process of responding to questions. To edit 'Post-it' again, he/she just double clicks on the corresponding footnote and it opens the text box with the note. By rolling the mouse over the number, the 'Post-it' note is just viewed without editing options. An example is presented in section 2.5 Details of Student's Interface.
The highlighter is used to make a specific part the slide notes stand out. To use the highlighter with a default color (yellow) and size (2), the user left clicks on the highlighter icon in the toolbar. The mouse pointer will change to the icon of a highlighter. The instructor then just needs to select the portion of text as shown earlier in Figure 2.2 I4. The user can also change the color or line width of the highlighter in the same way as the pencil.
The selection box is used to select a specific part of a users 'Private' layer then copy and paste it somewhere else in their 'Private' or 'Public' layers. The most useful opportunity to use this is when students want to add a part of their 'Private' layer to the 'Public' layer without having to re-write/re-draw the whole thing. A full example of this procedure is discussed in the student's section 2.5.3.
All the tools mentioned above are deselected by clicking on the tool one more time in the 'Tools' window, which un-clicks the button.
The color and line width tools have a little box of options that opens upon clicking and holding down the button. Once the mouse or pen/tablet is positioned over the correct option, the user releases the mouse or pen which deactivates the color or line width tool. These tools are only used if one of three tools is activated, pencil, highlighter, or eraser. Note, however, that color never changes for the eraser.
The magnifying glass represents the search tool, which the instructor uses to find a specific phrase in his/her slides. This is just a standard feature, which saves some time of having to search through slide after slide. By clicking on this tool, a dialog box appears with an empty field. The instructor types the phrase "System Specification Requirements" into the blank field and then clicks 'Find Next' (Figure 2.4.2 I2).
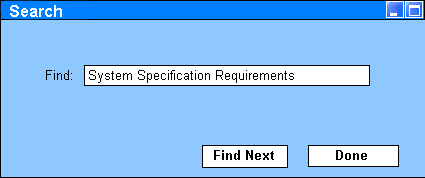
Figure 2.4.2 I2: Search Tool
Once the phrase is located, the 'Lecture Slides' window jumps to slide 5 with the desired text (Figure 2.4.2 I3), and that part of the text is highlighted. If the pharse is located in a part of the notes that have not yet been expanded, it is automatically expanded to make the phrase appear on the screen. If there are multiple locations with the same phrase, the instructor clicks 'Find Next' until it reaches the one that he/she is looking for. When this tool is closed, the 'Lecture Slides' window jumps back to the slide that the instructor was originally lecturing from.

Figure
2.4.2 I3: Search Result Highlighted
At the beginning of class, the instructor
first looks at the 'Roster' window, as a method of taking roll. Initially, the
names of all the students who are enrolled in the class appear in this box.
As each student logs into his/her terminal, the student's name will change color
from black to blue. Beside their names, there is a column that shows their corresponding
group numbers and another column that displays each of their control levels,
which is always set to 'Limited Control' (LC) at the beginning of class. The
instructor has the option to change these control levels for any or all students
by highlighting their names and clicking the button that represents the desired
control. The instructor presses the 'Seating Chart' button to look at a class
seating chart with students' names listed at their appropriate terminals. This
is all discussed in further detail in section 2.7 Class
Roster Window .
Students ask questions throughout
the lecture by typing them into a little window found on their individual terminals.
The 'Q&A' window appears on the instructor's screen with each question numbered
chronologically and identified by the sender. Whenever there is a chance, the
instructor looks through the list of questions and chooses to skip or respond
to each question. More details are discussed in section 2.6
Student/Instructor Interactions.
After closing the Eclass program, all the changes are saved in a format that allows the instructor to post it on the web for students to view at a later time and place. The 'Lecture Slides' and attached public 'Private' layer are saved as a PDF with links to post-it and question logs. A separate 'Public' layer is saved as a PDF also. An MPEG video recording is saved accompanied by the audio commentary. The 'Lecture', in HTML format, is available on the web before class even begins. The 'Post-it' and 'Q&A' logs are saved as HTML files. All of the instructor's files are available to be downloaded from a public class website or account.