Figure 25: Layers Window
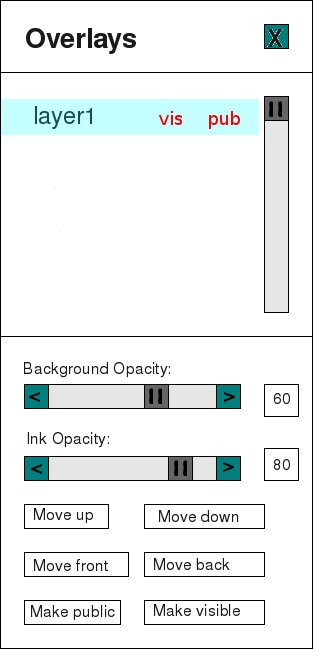
The Overlays Window controls drawing layer manipulation. The top of the window shows the name of the active layers. The bottom of the window allows the user to control opacity, permission and placement of the layer. NOTE: The current implementation of layers does not allow color-manipulation of the layer background. All backgrounds are solid white by default.
|
|
|
Figure 25: Layers Window |
The Overlays tool window can be found from going to VIEW on the menu bar and choosing Show Layer Toolbar.
The Overlays window will appear. The user has the following layer features available:
Current Layers: The top of the window lists current layers and their status. If there are more layers than space permits, the user may scroll up and down in the window. The scroll slider is to the right of the layer names, in the top half of the Overlays window.
Close Window: Click the X on the top right corner.
Background Opacity: Make the current layer's background clear, or make it cover up the lecture slide and layers below it. The user should note this is a separate operation from adjusting the opacity of text and drawings on the current layer. The slider may be adjusted by left-clicking and holding down the mouse button while adjusting the central slider icon left and right. On the right side of the slider is a percentage indicator, showing the opacity. In the example above, the background opacity is 60 percent.
Background to Zero: The Background Opacity slider has a button on the left marked with a < less-than. Double-clicking the < mark will immediately drop the Background Opacity to 0. This is a clear background.
Background to Full: The Background Opacity slider has a button on the right marked with a > greater-than. Double-clicking the > mark will immediately bring up the Background Opacity to 100. This is a solid-white background.
Ink Opacity: This is the opacity of the text and drawings on the current layer. The user may choose to have the drawings appear solid by adjusting the opacity slider to 100 (all the way to the right,) while having the background opacity clear. This is how a student would draw over an instructor's slide for example.
The Ink Opacity slider may be adjusted by left-clicking on the central slider icon and holding down the mouse button, while adjusting the slider left or right. On the right side is a percentage indicator, showing the ink and drawing opacity. In the example above, the Ink Opacity is 80 percent.
Ink to Zero: The Ink Opacity slider has a button on the left marked with a < less-than. Double-clicking the < mark will immediately drop the Ink Opacity to 0. This makes the drawing on that layer invisible.
Ink to Full: The Ink Opacity slider has a button on the right marked with a > greater-than. Double-clicking the > mark will immediately bring up the Ink Opacity to 100. This makes the drawing and text on that layer solid.
Feature Buttons:
There are six feature buttons on the Layer Toolbar: Move up, move down, move front, move back, make public, and make visible.
Move up: This moves the layer up one level on the stack. The name of the layer will switch to a higher place in the list of layer names.
Move down: This makes a layer drop below its current position by one place.
Move front: This brings the currently selected layer to the top of the Overlay stack.
Move back: This drops the currently selected layer to the bottom of the Overlay stack.
Make public: Each student and instructor is allowed to make one layer public at a time. Selecting this button while a layer is highlighted will change that layer to be the Public Layer.
Make visible: Just as in other photo-editing and graphics programs, the user may choose to make the current layer visible, or to hide it. This is useful when drawings overlap, or when an instructor has questions and answers on separate layers.
Above the six buttons is the list of layer names. To the right of each name is a space for 2 indicators, showing whether the layer is visible (vis) or public (pub).
In the figure above, the layer called layer1 has been selected.
When a new layer is created, the default behavior is to name the layer consecutively, (layer2, layer3, etc...)
The user may choose to rename the layer by double-clicking on the name. This brings up a cursor over the layer name.
Prev: Grab Object Tool | Next: Making a Layer Public | Up: Drawing | Top: index