2.2. Basic Grade Sheet Set Up
The scenarios in this section descibe the basic grade sheet set up.
The instructor creates a new grade sheet by selecting New in the File menu. Figure 5 below shows a newly made, empty grade sheet.
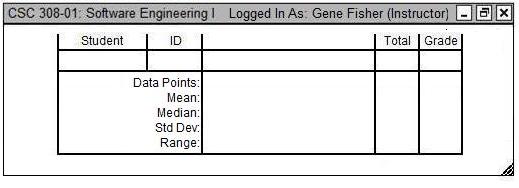
Figure 5: Newly made, empty grade sheet.
From here, the instructor now adds students and graded items onto the grade sheet.
The instructor adds students into the grade sheet either by manually adding them or adding through an SIS roster. PolyGrade reads an SIS (Student Information Services) roster when adding students from a roster. SIS provides instructors with class rosters for online grading programs such as Blackboard. Essentially, SIS is a particular name associated with the idea of a server from which an instructor downloads and initial class roster. Section 2.3.1 shows the format of an SIS roster.
To add new students from a roster, the user first selects the Download Roster item in the File menu as shown in the toolbar listed in the ui-overview, causing the following window to appear as shown in Figure 6.
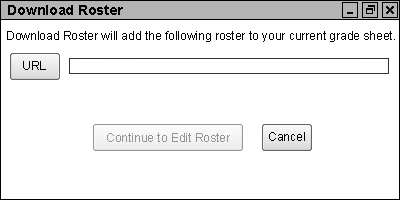
Figure 6: Download Roster window.
Clicking the browse button allows the user to locate and select a local roster. The user may also locate a roster online by copying its URL into the resulting browsing menu. The user then clicks OK to return to the Download Roster window.
Section 2.3 further explains details of managing class rosters and students.
Figure 7 shows the grade sheet with students.
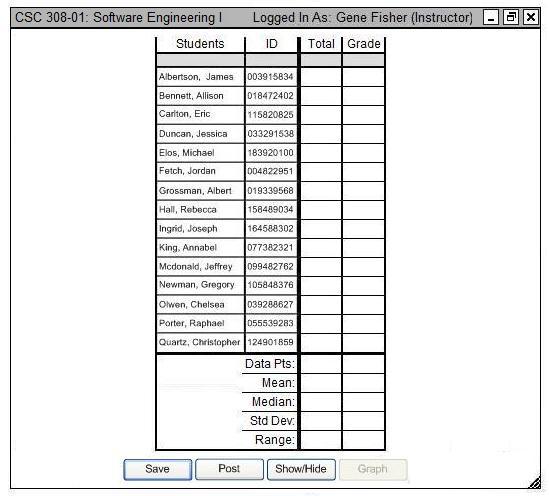
Figure 7: Grade sheet without any graded items added.
After the roster is in place, a grade sheet displays a bottom row of buttons. These buttons provide quick access to often used functions. The user clicks Save to save all entered grade scores. The user clicks Post to post grades online, making them accessible to students. The user clicks Show/Hide to filter out certain parts of the grade sheet, making those parts no longer visible. Graph is disabled by default until the user enters grade scores. It allows the user to generate various graphs to view. Section 2.5.1 shows senarios of these same buttons.
Once satisfied with the roster, the instructor adds in graded items. To do this, the instructor must first select an area on the grade sheet where to insert the new item. The instructor clicks on a blank area or a boundry between two existing items to hightlight this section. Figure 8 below shows how the instructor highlights an area.
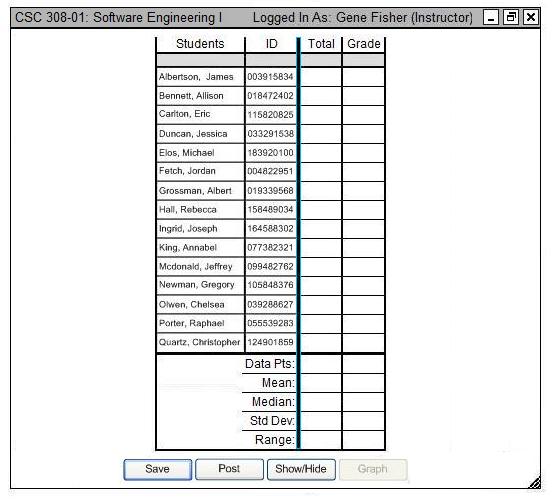
Figure 8: Selecting a boundry of where to insert an item.
Note that the grade sheet highlights the boundry between ID and Total in a light blue color. Now the instructor selects the New Item item in the Manage menu in the command menu bar. Also with an already existing graded item selected, the instructor selects Edit Item from the same menu to edit the details of that item. Figures 9 and 10 below show empty and filled windows for creating a new graded item.
|
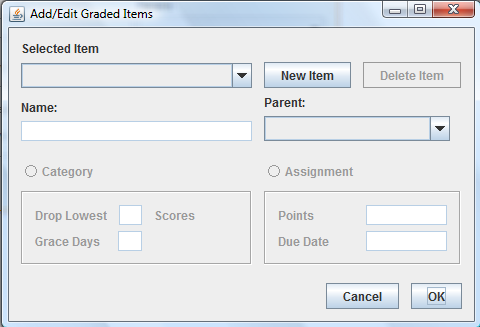
Figure 9: Empty dialog for creating a new graded item.
|
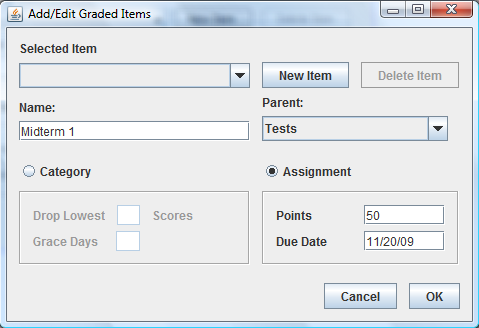
Figure 10: Filled dialog for creating a new graded item.
|
In Figure 9, the instructor clicks on New Item to begin creating a new graded item. The drop down box Selected Item lists all existing items in the grade sheet. The instructor uses the Name field to give the item a label. The instructor uses the Parent selection if this new item is an assignment that falls beneath an existing category. The Category options allow the instructor to set how many lowest scores the grading system drops and to set a period of grace days allowed to the students for this assignment. The Assignment options allow the instructor to set the assignment's point worth and due date. The instructor clicks OK to submit the newly created item to the grade sheet and clicks Cancel to return to the main grade sheet.
Figure 10 shows an example of a newly created item. The instructor labels this item as "Midterm 1," which falls beneath the "Tests" category. "Midterm 1" is worth 50 points and is due on November 20, 2009.
With a newly added item in place, the instructor selects the boundary between the new item and another column to add another item. The instructor proceeds to add many more items until the grade sheet is ready for the instructor to enter grades. Section 2.4 further explains details of managing graded items.
Figure 11 shows a fully completed grade sheet after the instructor adds a student roster and all graded items.
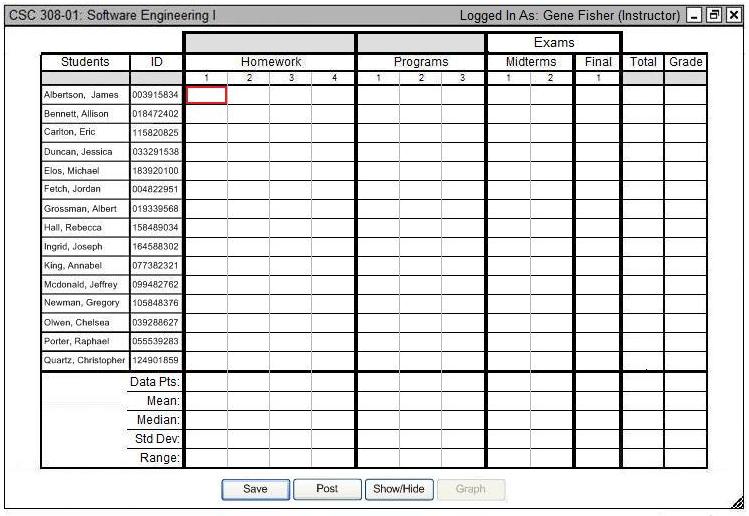
Figure 11: Fully completed grade sheet without any scores.
The grade sheet is now ready for the instructor to enter scores.
Prev: ui-overview
| Next: managing-students
| Up: functional
| Top: index