2.5.1. Grade Sheet Overview
The scenarios in this section describe certain key aspects and functionality. These give an overview of how the user interacts with the grade sheet.
Figure 45 shows a grade sheet with already added students and graded items for a typical class. Section 2.3 and Section 2.4 describe managing students and graded items, respectively.
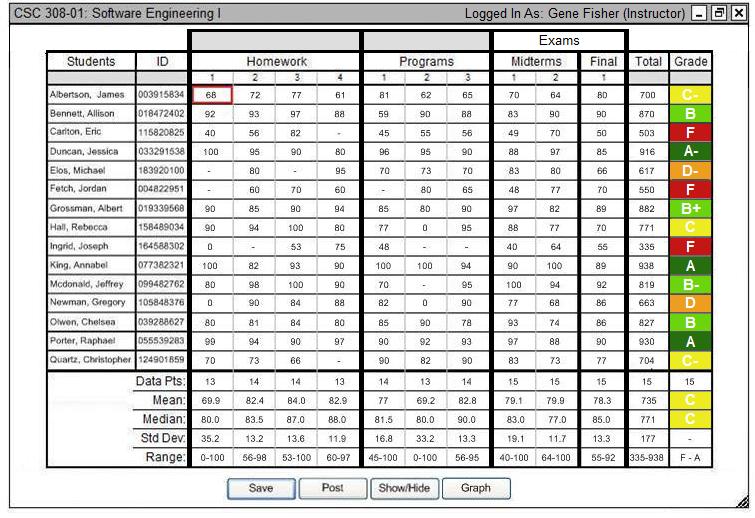
Figure 45: Updated grade sheet.
Moving from left to right, the grade sheet displays students, IDs, categories with graded items, total scores, and overall grades. The student column contains all enrolled
students in the class. By default, the grade sheet sorts students in alphabetical order. The user may sort in other ways, as shown in Section 2.5.4.
The second column shows student IDs. The next few columns make up the majority of the grade sheet. Each header section, the category, collects smaller pieces, items.
In this example, the categories are Homework, Programs, Midterms, and Final with 4, 3, 2, and 1 items respectively. In the last column, however, the top nested layer category Exams
collects both middle nested layer categories Midterms and Final. Section 2.4 further explains the details of graded items. The next column shows the
total accumulated points from all graded work. The final column shows the student's overall grade in the class. Depending on the grade scheme settings and user preferences, the
grade sheet displays overall grades with the color associated to it. The instructor chooses how to set this color display via Preferences from the command menu. The figure below
shows a variation to the color setting in the above image.

Figure 46: Updated grade sheet with different color display setting.
The grade sheet now displays the final grade with colored text and a white background.
The cursor starts in the upper-left cell by default. To navigate between cells, the instructor uses the arrow keys on the keyboard or clicks on an individual cell. Once the cursor highlights a cell, the instructor inputs a score for that graded item. The instructor hits Enter to move the cursor down the column. For an assignment that a student has not turned in, the instructer either leaves the cell blank or marks it with a hyphen.
The buttons at the bottom of the spread sheet allow for quick access to often used instructor operations. The instructor clicks "Save" to have the application save all data to a local copy of the grade sheet. The window below pops up, notifying the instructor of a successful save.

Figure 47: Successful save notification.
The instructor clicks "OK" to return to the main grade sheet.
The instructor clicks "Post" to post grades online for students to retrieve and view. The series of windows below pops up, asking the instructor for confirmation.
|

Figure 48: Post grades confirmation.
|

Figure 49: Successful post notification. |
In the first screen, the instructor clicks "Yes" to allow the application to post the grades online. This allows students to log into their accounts and fetch the grades for viewing. The instructor can also click "No", which returns the instructor to the grade sheet for any additional grade changes the instructor wants to make.
The instructor clicks "Show/Hide" to filter certain columns. Section 2.5.5 contains scenarios that further explain this feauture.
The instructor clicks "Graph" to choose which type of graph to use for the selected data. Section 2.5.6 contains scenarios that further explain this feature.
Later sections explain other aspects of the grade sheet.
Prev: [none]
| Next: statistics
| Up: gradesheet
| Top: index