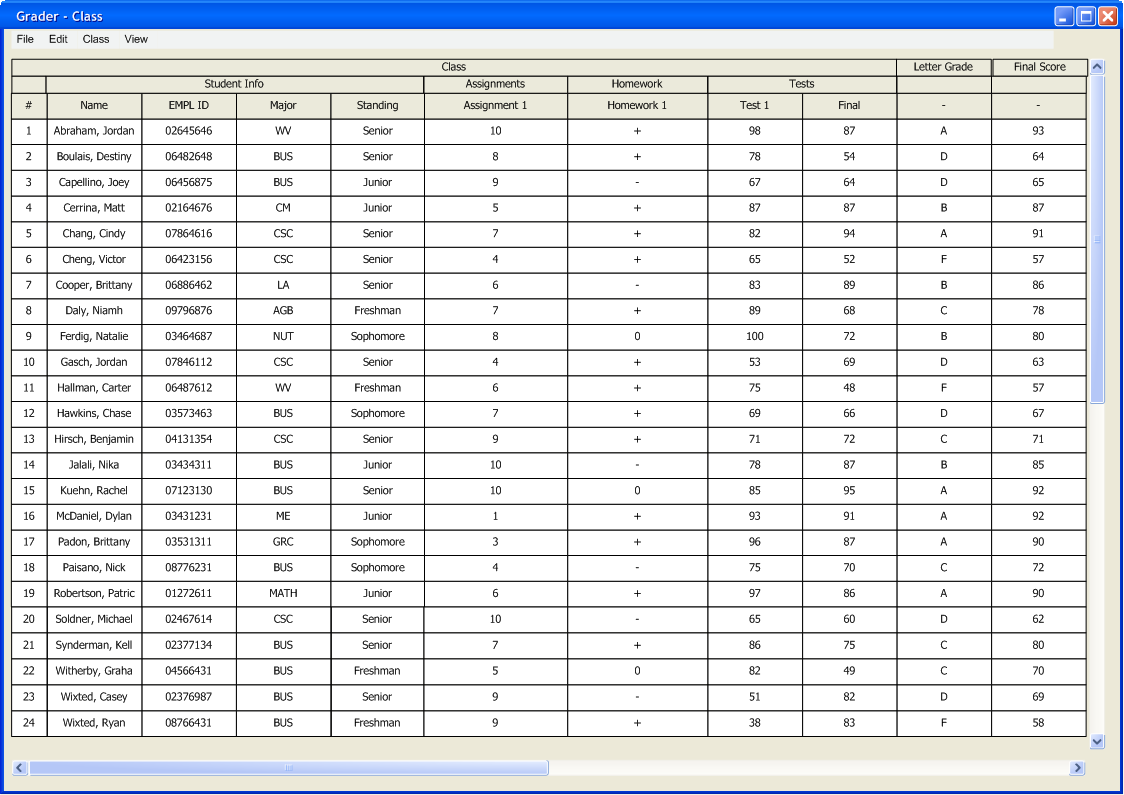
Figure 2.4.1a: Gradebook Before Adding a New Graded Item
This introductory scenario shows a user how to add a new graded item to the gradebook. A graded item is an item in the class that has a maximum point value and every student is given a point value out of the maximum, either explicitly or implicitly with a custom grading scheme. This scenario assumes that the user has a class gradebook open, created at least one grading scheme, and has determined all categories and their respective weights. These topics are covered in sections 2.2. Basic Gradebook Setup, 2.4.4. Grading Schemes, and 2.2.3. Adding Categories to New Class, respectively. The spreadsheet looks something like Figure 2.4.1a.
Note that the only graded item underneath the "Assignments" category is "Assignment 1." To add a graded item to the gradebook, the user selects Class -> Add Graded Item and the screen in Figure 2.4.1b appears:
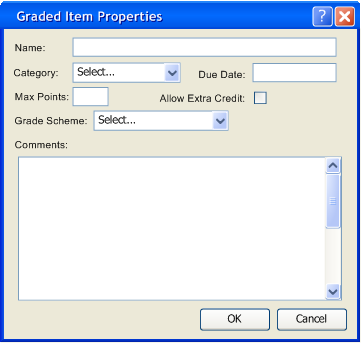
The graded item properties can be modified just like any existing graded item. This functionality is described below in section 2.4.2. Note that a new graded item has not been added to the gradebook yet. This is covered in the end of section 2.4.2.
The Graded Item Properties Window is displayed after the user selects "Add Graded Item" from the Class menu or if the user right clicks on the graded item name in the grade sheet and select Graded Item Properties. In either case the methods for modifying graded item properties are the same.
The Name field is a text field briefly describing the graded item. The user selects a category by clicking on the Category drop down box. A list of all user-created categories appears and the user selects the appropriate category for the graded item. Figure 2.4.2a demonstrates this.
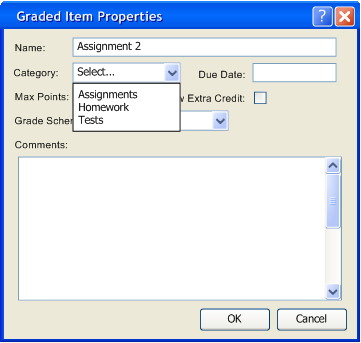
The user types "Assignment 2" for the name field and selects "Assignments" for the category for the graded item to fall under.
The Due Date is when the graded item is due and is input by text in a month/day/year format. This is used when an electronic submission is required from students. Before the deadline indicated by "Due Date", all students have a blank score indicating that a score has not been entered. If a student does not submit his work before the "Due Date", the Grader automatically enteres a score of 0. If a student does submit work before the "Due Date", a blank score remains indicating that it has not been graded yet. In either case, the user can later change these values.
The Allow Extra Credit checkbox allows the user to decide whether students are able to score higher than the maximum value. If the user enteres a value higher than the maximum point value when Allow Extra Credit is checked off, the window in Figure 2.4.2b is displayed indicating an error.

Alternatively, if Allow Extra Credit is checked on and the user enters a score higher than the maximum point value, the program continues without complaint.
Grading Scheme is a drop-down menu that displays all of the user-created grading schemes. Figure 2.4.2c demonstrates this. Max Points is a text input field taking an integer of the most points a student can get for the graded item. The user enters 10/15/10 for the due date, a maximum point value of 10, no extra credit, and selects "Standard A-F" for their grading scheme. Comments is a large text box allowing the user to add comments on the graded item. Once the fields are filled in, the dialog looks like Figure 2.4.2d. Once the user is done modifying the graded item's properties, the user clicks the OK button to save these changes and close the Graded Item Properties Window. Alternatively, if the user is not happy with the changes made since the window has been open, the Cancel button disregards all inputed information and the graded item remains unchanged. If this is the initial setup immediately after selecting "Add Graded Item", the Cancel button does not add a new graded item to the gradebook. Assuming the user clicked OK, the gradesheet now looks like Figure 2.4.2e. Note that the scores for "Assignment 2" are empty because scores have not been entered yet. Entering scores is explained in 2.1.4 Inputting Grades in the Main UI. The user can delete a graded item from the gradebook by right-clicking on the graded item in the gradbook and selecting "Delete Graded Item." At the start of this scenario the gradebook looks like Figure 2.4.3a. To delete "Assignment 2", the user right-clicks on "Assignment 2" in the gradebook and clicks the "Delete Graded Item" button as demonstrated in Figure 2.4.3b. "Assignment 2" is deleted and the gradegook now looks like Figure 2.4.3c.2.4.2.3 Completing a Graded Item
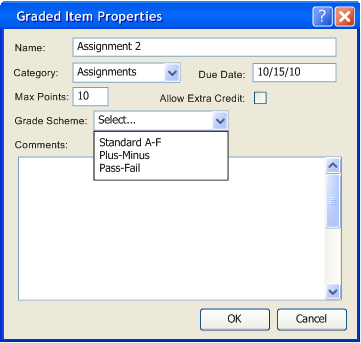
Figure 2.4.2c: Grading Scheme Drop Down Box
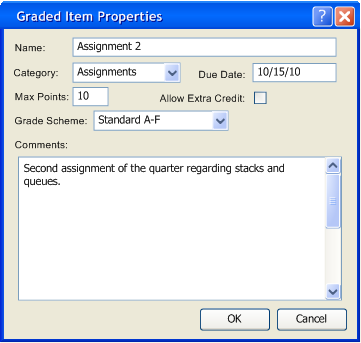
Figure 2.4.2d: Graded Item Properties Completed

Figure 2.4.2e: Gradebook After Adding a New Graded Item
2.4.3. Deleting Items
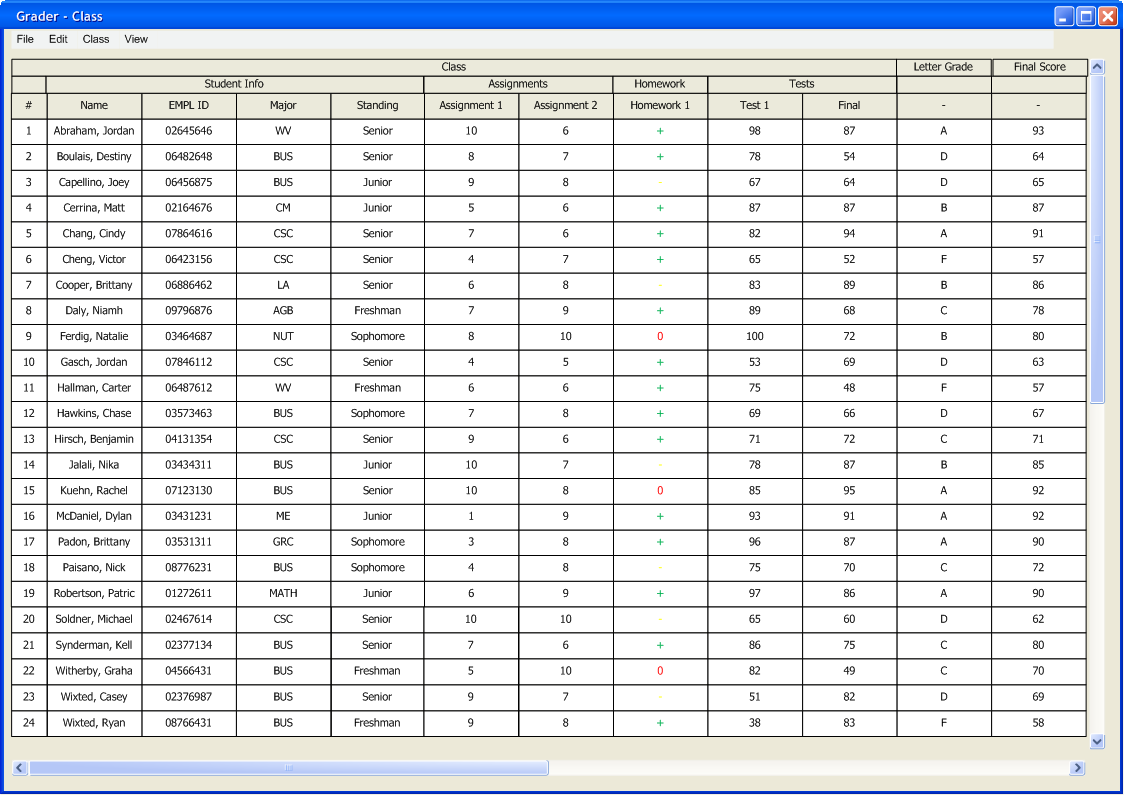
Figure 2.4.3a: Gradebook Before Deleting a Graded Item
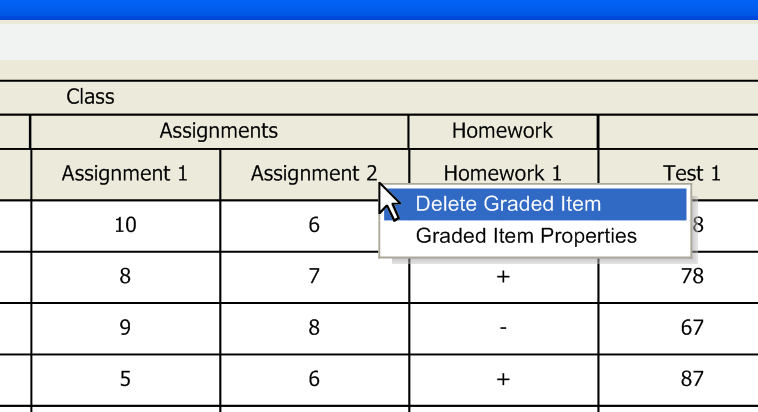
Figure 2.4.3b: Right Click Menu For Graded Item
Figure 2.4.3c: Gradebook After Deleting a Graded Item