The scenarios in this section cover full details of file-related commands, some of which have been introduced in preceding sections.
There is only one type of file that the Grader saves to the file system. This file is then used by the TA's version of the program as well but with limited options. The file consists of a Gradebook which consists of all gradebook items and a Grading Scheme.
All of this information is stored in a single grader file for each class created by the user. In this way, a single file encapsulates class-specific information that the user has defined for that class. "For that class" means that each class has its own setting information, but no settings for other classes that may be open at the same time. In particular, the class-specific information for the state of open windows means the windows open for a particular class, not for any other open classes.
Grader Tool files may be stored in any file directory accessible to the user. However, there is a specific directory called the Grader Tool user directory used for the following purposes:
There are no naming requirements for grader files. In particular, there are no requirements for filename extensions. If the user chooses to give grader files an extension, or if a particular operating environment recommends or requires that application files have known extensions, then the recommended extension for the grader is ".grde". If this extension conflicts with that used by some other application, then the installation process can assign a particular extension to be used in a particular operating environment.
The internal data format of grader files is not specified in these requirements, and therefore left to the implementors. In particular, there are no requirements that these files be editable as plain text or other external data format understandable to application programs other than the Grader. It is required that the Grader be able to identify a grader file as such, so they can be distinguished from each other and from other types of files. The specific means to accomplish this identification is left to the implementors.
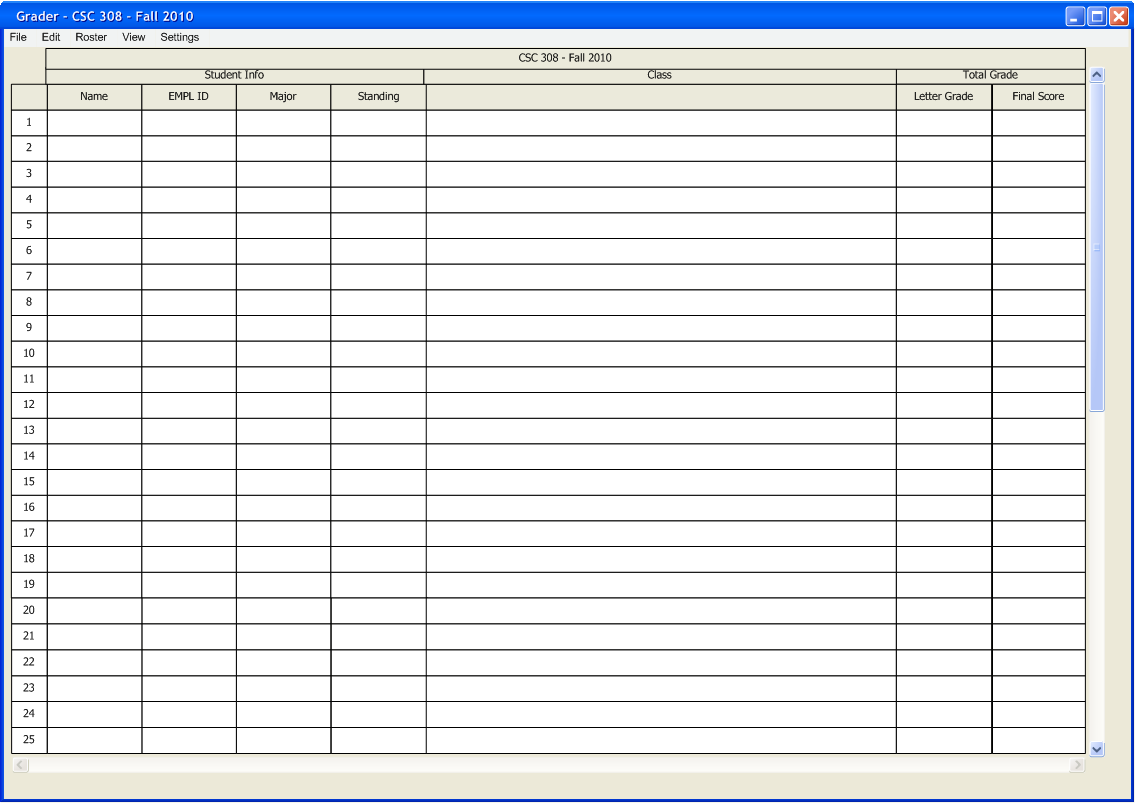
When the user invokes the File -> New Class menu item a prompt for the classes details are entered. These details are covered in Adding a Class Manually. This displays a blank class file with a default 75 lines of students. The initial screen is shown in Initial Instructor Screen.
The class must have a name inputed into the field in order to be constructed. The Grader specific settings are saved per class so when a new class is created, the user must specify settings.
The grader created becomes the current grader and is involved with all actions performed by the tool.
When the File -> Open command is enetered the Figure 2.9.2a is shown with all current classes in the current directory shown.
The dialog shown in the figure reflects the state of the Grader directory after the user has saved grader files (GRADER FILE NAMES). The `Directory' pulldown lists the components in the file path to the current working directory. As explained in Section 2.9.1, the default directory path for the file-open dialog is the Grader user directory for the current user.
The user may type the name of the file to open or select it from the scrollable list of file names. When the user selects the pulldown arrow in the `Directory' field, the system displays the directory path.
The user can navigate through the filespace and select files to open. Only grader files are able to be opened as to prevent the system from reading in a non-valid file. Selecting a directory and clicking OK or double-clicking the selected item displays the contents of the directory in the list.
When the user selects a valid file and hits OK, the file is then loaded into the grader with all the information that is stored in the file. All the information was talked about in 2.9.1.1. The opened class becomes the current class that the grader commands will use. Double-clicking the file in the list is a shortcut for the user selecting OK.
The user may type the name of a gradebook file or directory in the File field. If the user types the complete name of an existing gradebook file or readable directory, the effect is the same as when the user selects the name by clicking in the list. If the user types the name of a non-existent file, the user may press OK, whereupon the system creates a new file of the entered name. This is effectively a short cut for executing File->New with the entered name as the class name.
Since unreadable files, unreadable directories, and non-grader files are not allowed, the user cannot select one of these. However, the user may type the name of an unreadable file, unreadable directory, or non-grader file in the File field. If the user does so, the system disables the OK button, since these files or directories cannot be opened. If the user continues typing so that the name is not an unreadable grader file, unreadable directory, or an existing non-grader file, the system re-enables the OK button.
When a grader is opened from a saved file, the name of the grader is synonymous with its root filename. The root filename is the name of the file, less any leading file path and less any filename extension. For example, the name of the grader stored in the file "/users/home/dcollins/theGrader/CSC308.grde" is "CSC308". The Grader provides no command to change the name of a grader independent from its filename.
The `Close' and `Close All' commands are enabled in the `File' menu if there is at least one open gradebook, disabled otherwise. `Close' applies to the current gradebook; `Close All' applies to all open gradebooks.
When the user selects the `Close' command, the system performs the following pre-close steps for the gradebook to be closed, i.e., the current gradebook:
For the first pre-close step, the system checks if the current gradebook has any unsaved changes. The precise definition of an unsaved change is given in Section 2.9.4. If there are one or more unsaved changes, the system displays the dialog shown in Figure 2.9.3a.
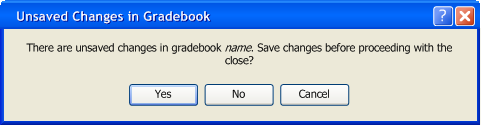
Figure 2.9.3a: Offer to save gradebook before closing.
If the gradebook to be closed has no unsaved changes, the system proceeds to the next pre-close step, without displaying the offer-to-save dialog. Gradebooks with no unsaved changes are those that have been saved prior to close.
For the second pre-close step, the system checks if there are any pending edits in editing dialogs by checking if those dialogs are currently open. If there any such pending edits, the system will blink the editing dialog(s) that are currently open. This is to prompt the user to deal with those dialogs first.
When the pre-close steps have been completed without a cancellation, the system completes the close operation by closing the current gradebook and removing all windows associated with the gradebook from the screen.
When the close operation has been completed or canceled, the system removes all close-related dialogs from the screen.When the user selects `Close All' in the `File' menu, the system executes a close operation for all open gradebooks, in the same manner as described above for `Close'. The offer-to-save dialog is displayed in turn, as necessary, prior to closing each gradebook. If the user presses `Cancel' in the offer-to-save dialog for any gradebook, the system cancels the close operation for that gradebook and all remaining open gradebooks. `Cancel' does not affect any already-closed gradebooks for which the user previously answered `Yes' or `No' in the offer-to-save dialog; these gradebooks remain closed.
When the system completes a `Close' or `Close All' for the last open gradebook, the Grader does not automatically exit. The Grader will now look as it did when first opened, as explained in
Section 2.1.1.
2.9.4 Save, Save As, and Save All
A new gradebook is not associated with a file until it is saved for the first time. For new not-yet-saved gradebooks, the `Save' and `Save As' commands have exactly the same effect. When the user selects either of these commands for a not-yet-saved gradebook, the system displays the dialog shown in Figure 2.9.4a.
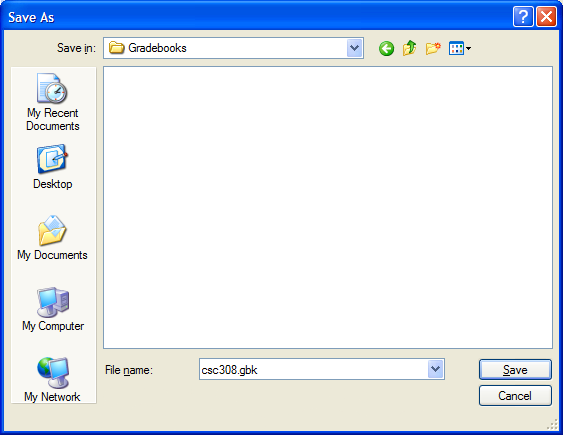
As in the file-open dialog, the user may navigate to another directory by selecting from the `Directory' pulldown list and by selecting directory names in the scrollable list. To save to a file, the user types its name in the `File' field.
When the user presses `OK', the system saves the entire contents of the gradebook onto the named file. After completing the save, the system removes the save dialog from the screen. If the user enters the name of an existing gradebook file and presses `OK', the system asks for overwrite confirmation, as described below. When the current gradebook is already associated with a file, the `Save' and `Save As' commands differ. The `Save' command is enabled whenever the current gradebook is associated with a file, and the gradebook has unsaved changes. A gradebook has unsaved changes when the user has performed one or more of the following actions since the file was opened or the last confirmed save operation, whichever has occurred most recently:The user selects the printer to which output is directed from a list of available printers. When possible, the Grader queries the underlying operating environment to determine the identity of the user's preferred printer. When such determination is made, the system inserts the name of the printer as the default value in the `Printer' field. If the user's preferred printer cannot be determined, the field is blank.
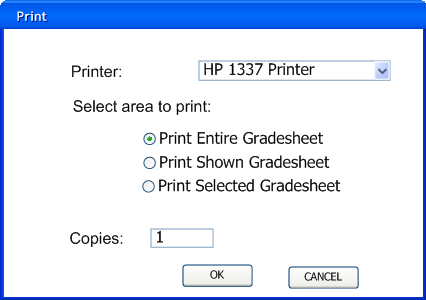
The user can select to print the currently shown window (without hidden columns), to print the entire grade sheet, or just a selected portion of the grade sheet.
The user may select the number of copies of each window to print, the default being 1. The system prints all copies of the same window in immediate succession, before printing the next window.
When the user presses `OK' in the print dialog, the system proceeds with the printing. If a window fits on a single page based on the page setup parameters, the system prints the window centered on the page. . If a window is too large to fit on one page, the system prints as much per page as possible, printing the multiple pages of the same window in row-wise order.
When the user selects the `Exit' command in the `File' menu, the system begins the exiting process by executing the `Close All' command. The associated processing for `Close All' ensues, including any necessary user interaction through the warning dialogs. This is described in Section 2.9.3. If the user responds at any point such that the `Close All' is canceled for all remaining calendars, the `Exit' operation is also thereby canceled.
Once the `Close All' has run to completion, the system exits.