
This scenario shows how a scheduling administrator would modify time blocks.How a user arrives at this screen can be explained in the navigation bar section: 2.1.3 UI Navigation Bar
Figure 1: Initial Time Block Management Screen
The first object on the box from the top is the Time Block name text field. Time Block names are not directly created or modified by the user but automatically generated based on the values of Days to Schedule and Length. For example a time block scheduled for Monday, Wednesday, and Friday for two hours would be named "MWF2" and a time block scheduled for Tuesday and Thursday for one and a half hours would be named "TR1.5".
The University Sanctioned checkbox is a flag to let others know if this Time Block is approved according to the Approved Scheduling Time Patterns. This flag is not directly verified by the scheduling program but left to scheduling admins to manually verify.
Under the Days of the Week label are a set of seven checkboxes with corresponding letters beneath them for each day of the week starting on Sunday and ending on Saturday. Selecting any combination of checkboxes defines which days of the week this Time Block will be relevant for. Note that a Time Block can only be created when at least one of these checkboxes has been marked.
Near the Length: label is a drop down menu to state how long the Time Block will be. All entries in the menu are different amounts of half-hour blocks. This drop down menu can be scrolled down through to access longer lengths of time.
When a user reaches this screen he wouldn't need to use the name drop down menu since it's default value is "new Time Block" and there are no other Time Blocks to select. He could check "T", "W", and "S" to signify this Time Block will be for Tuesday, Wednesday, and Saturday. When he hits the length drop down box the following drop down menu will be shown as in Figure 2.
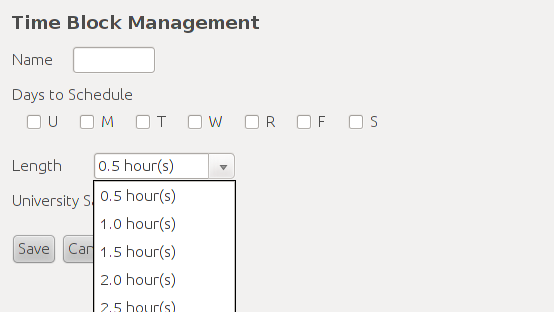
Figure 2: The Length drop down menu
Once the user has selected a length of time he will be ready to save this time block. At the very bottom of this menu are three buttons labeled Save, Cancel, and Delete. The Save button will perform the necessary operations and checks for saving a new Time Block or modifing an existing Time Block in the database. The Cancel button will close this box without modifying any part of the database. The Delete button will remove a currently selected Time Block from the database. If no name has been selected then this box will be greyed out. If the result of a save or delete will affect any users then the scheduling admin will be notified that this action will affect other users and will be asked for confirmation before the action will be carried out. So in this case the user would simply hit the Save button and this Time Block will be inserted into the database provided it passes all the checks.
In this example a new time block will be created and added to the Time Blocks database which is currently empty. Users can begin adding a new time block from the proper section in the Nav Bar Once he's started a new time block in the Time Block Management menu the user can begin filling in the fields that make up the time block he wants.
With the Days to Schedule and Length fields filled the user can check if this time block is University Sanctioned and check or leave unchecked the associated checkbox.
Finally the user can click the Save button to add this new time block to the Time Blocks database. If the user didn't want to add a new time block after all he can click the Cancel button to discard the new time block, close this menu, and return to the previous menu.
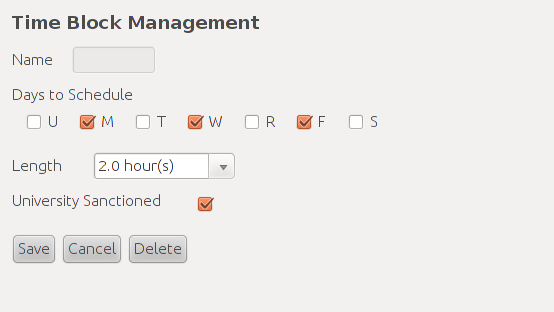
Figure 3: New Filled Time Block.
This scenario covers the selecting of a time block in the database for viewing which can lead into modification or deletion.
The actions necessary to select a single or multiple time blocks are covered in the nav bar section of the requirements document. When a user selects a time block the Time Block Management context window will appear with all the information for the selected time block filled in as seen in Figure 3.
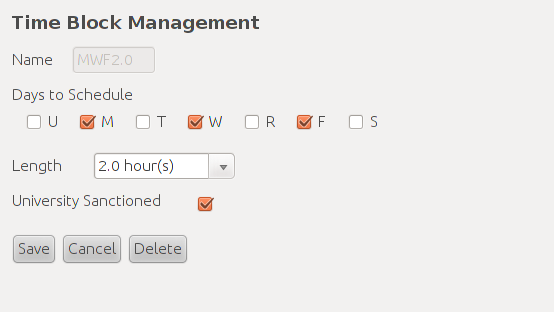
Figure 4: Viewing a Time Block.
The user can simply view the information for the time block and then close the context window using Cancel or he can proceed to modify or delete the time block as explained in thier respective scenarios.
The functionality of selecting multiple time blocks will be covered in its own scenario.
This scenario describes how a user modifies a selected time block. If the user performed the selection correctly then the user will be presented with a screen very much like Figure 4.
To change the Days to Schedule users need to check or uncheck any of the days of the week. Users need to make sure that one of the days is checked for this time block to be valid.
To change the Days to Schedule users need to expand the drop down list and select any of its values.
To change the University Sanctioned value users need to check or uncheck the box right by the University Sanctioned label.
When a user is finished making changes to a time block he can click Save to validate the modified time block and if it passes all the checks then the changes will be committed to the database. If this time block fails any check then a dialog box will pop up informing the user why the changes weren't committed to the database. Alternatively the user can discard all changes and close this context window by clicking Cancel.
This scenario describes the deletion of a selected time block as seen in the in the Selecting and Viewing a Time Block scenario. If the user performed the selection correctly then the Time Block Management screen should be displayed with all of the selected time block's information filled in as seen in Figure 4.
The act of deletion begins by clicking the Delete button. Upon doing so the dialog in Figure 5 pops up.
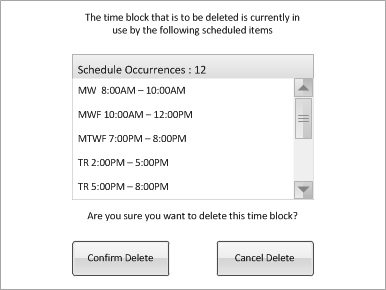
Figure 5: Time Block Deletion Dialog
Figure 5 asks the user to confirm deletion of the currently selected time block. If there are any scheduled items that are utilizing this time block then thier instances will be listed in the dialog box and the number of these items will also be displayed.
If the user still wants to procede with the deletion then clicking Confirm Delete will remove this time block from the database and all affected items will listed as TBA. If the user decides against the deletion then clicking Cancel Delete will close the dialog box and nothing will change in the database.
This scenario show how a user modifies multiple time blocks. This requires the user to select multiple time blocks from the Nav Bar. Upon doing so the user will be presented with the Time Block Management dialog box in Figure 6.
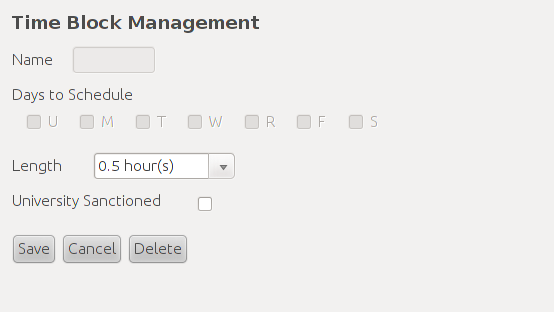
Figure 6: Time Block Multi-Selection Dialog
Selection of multiple time blocks leaves the user with only two operations: mass modification or mass deletion. Days to Schedule is left disabled to prevent its modification. Modifying the Length or University Sanctioned fields and clicking Save will change those properties for all selected time blocks. Clicking Delete will run through the deletion scenario for all selected time blocks. Clicking Cancel will cancel the selection and close the context window.