2.5.1 Adding a New Classroom
The introductory scenario shows a user adding a new classroom to the database. To add a new classroom the user presses the 'New' button on the Classrooms window. When this is done a window appears as in Figure 2.5.1-1.
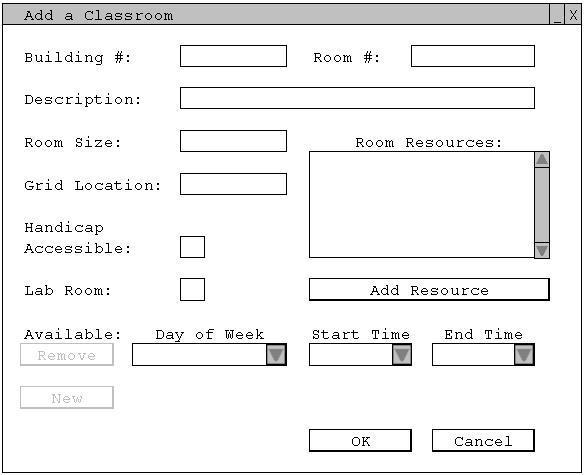
Figure 2.5.1-1: The Add Classroom window that appears after pressing 'New'.
The 'Building #' field contains the building number and the 'Room #' field contains the room number of the classroom the user is adding to the database. The 'Description' field is used to briefly describe the classroom. The 'Room Size' field is where the user enters the maximum number of people that the classroom can allow. The 'Grid Location' field describes the position the classroom is at relative to a given origin. The user inserts 'Grid Location' data as an integer followed by a comma followed by an integer. The 'Resource' field is where the user indicates which resources are in that classroom. For example, the user can indicate that it is a smart room, and that it is has a VCR. The 'Add Resource' button allows the user to add and delete resources, which is explained below. The 'Handicap Accessible' field is a resource that indicates whether or not the classroom is handicapped accessible. The 'Lab Room' field indicates that the classroom can be used for lab courses.
The 'Day of the Week' field is where the user can indicate what days the room
will be available. This field has a dropdown box with the options of choosing the
whole week 'Mon-Fri' or choosing each day individually like
'Monday',
'Tuesday', 'Wednesday',
'Thursday', or 'Friday'. The
'Start Time' field is
where the user indicates when the room is first available. It has a dropdown
box containing the hours '
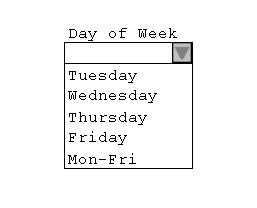
Figure 2.5.1-2: Day of Week dropdown that appears.
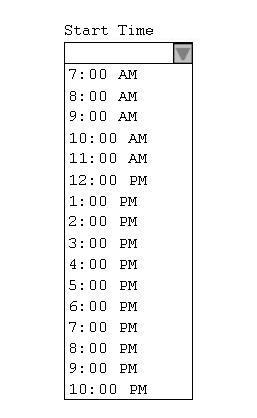
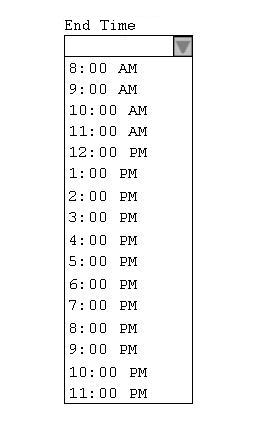
Figure 2.5.1-3: Start times that appear. Figure 2.5.1-4: End times that appear.
Unlimited 'Available' times can be added onto Figure 2.5.1-1. The user inserts data into two or more 'Available' fields and the 'Remove' button becomes active. The user presses the 'New' button and an extra row of dropdown boxes appear. The 'New' button becomes active if and only if the user inserts data into all 'Available' fields. The user presses the 'Remove' button and the row of dropdown boxes are removed. To make a classroom unavailable for the current schedule generation the user can simply just remove all available times and let the classroom remain in the database.
To complete an entry and enter it into the classroom database the user clicks on the 'OK' button at the bottom of the window in Figure 2.5.1-2. The database is then updated and the room is available for future schedule generation. If the user is unhappy with the entry of a room the user has the option to cancel the entry by pressing the 'Cancel' button at the bottom of the window in Figure 2.5.1-2. After clicking either button the user is returned to the Classrooms window, which will appear as in Figure 2.5.1-5 if the user saves the new entry.
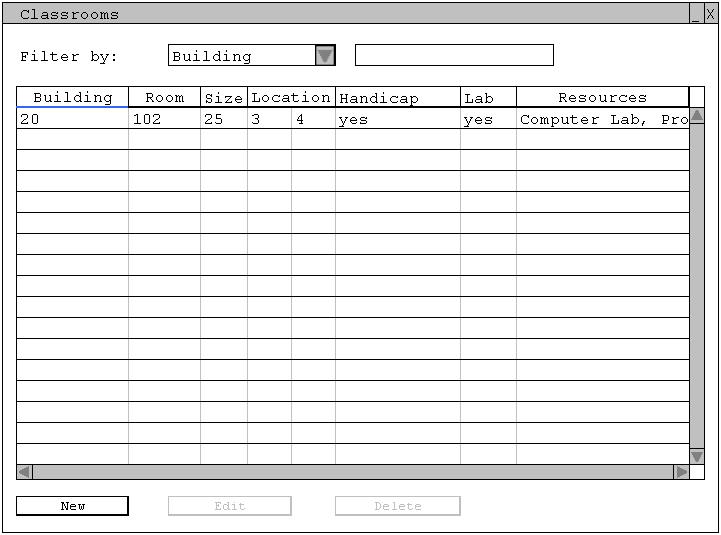
Figure 2.5.1-5: The Classrooms window after adding one entry.
The user adds all classrooms for the quarter in a similar way. After all classrooms are added the Classrooms window would look like Figure 2.5.1-6
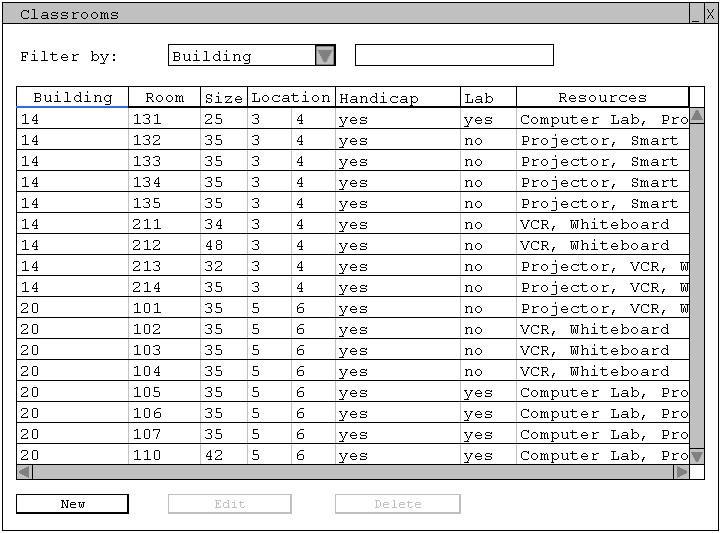
Figure 2.5.1-6: Classrooms window after multiple classrooms have been added.
To add, edit, or delete room resources the user presses the 'Add Resource' button in Figure 2.5.1-1 and a window appears as in Figure 2.5.1-7a.
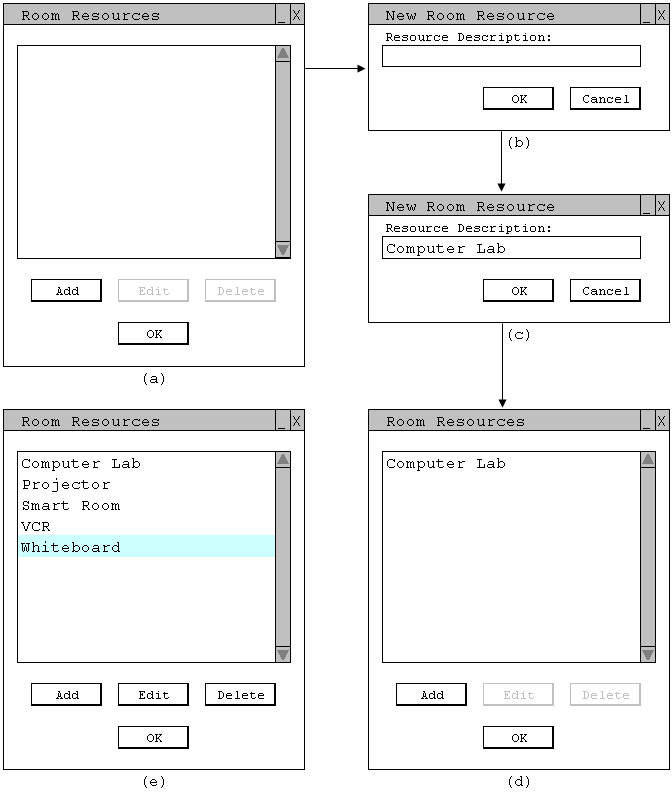
Figure 2.5.1-7:
(a) An empty Room Resources list.
(b,c) New Room Resources window that input a string describing the new resource.
(d) Room Resources list with a new resource added.
(e) Room Resources list with an entry highlighted.
The user presses the 'Add' button on Figure 2.5.1-7a and a window appears as in Figure 2.5.1-7b. The user inputs a string into the 'Resource Description' field as in Figure 2.5.1-7c. This field describes the resource that the the user is adding to the Room Resources list. The user presses 'OK' on Figure 2.5.1-7c and the Room Resources list is the updated as shown in Figure 2.5.1-7d.
The user highlights a resource and now has the option edit or delete that resource, as shown in Figure 2.5.1-7e. The user presses the 'Edit' button and a window appears as in Figure 2.5.7c. The user then edits the 'Resource Description' field appropriately, presses 'OK', and the Room Resources list is updated. The user highlights an entry as in Figure 2.5.1-7e, and presses the 'Delete' button to delete an entry from the Room Resources list.
Prev: [none] | Next:
editing an existing classroom | Up: adding and
editing classroom information | Top: index