When
the instructor selects the Open Local Question
Bank or Open Shared Question
Bank option from the Questions
menu of the Teacher Interface, a
window labeled Question Bank-Local
or Question Bank-Shared
pops up as shown in Figure 2.3.3.1.i1 and Figure 2.3.3.1.i2,
respectively. The appropriate names of the Question Bank appear next to
the word Local and Shared. Because viewing questions is exactly
the same in
both the
Local Question Bank and Shared Question Banks we will
discuss them both here.
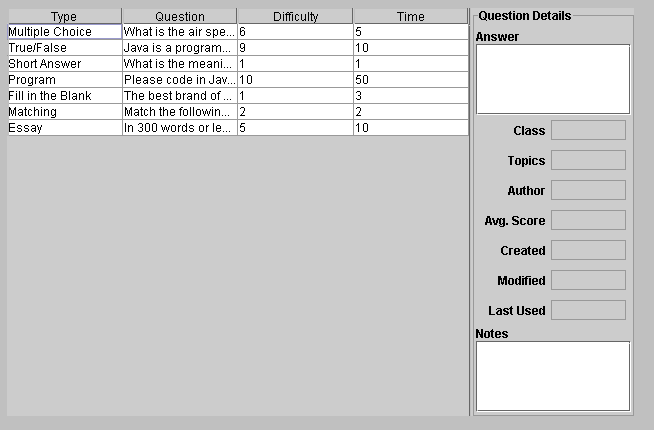
The initial window contains two sections as shown in Figure 2.3.3.1.i3. The main section, located on the left side of the screen, is divided into four columns. The columns are labeled Type, Question, Difficulty, and Time. The Type column displays the question type: Multiple Choice, True/False, Program, Short Answer, Essay, Fill in the blank or Matching. The Question column contains the text of each question. The question difficulty, ranging from one to ten, is displayed in the Difficulty column. The final column, Time, displays the recommended time a question should take to answer. Clicking on any column header will sort the questions in descending or ascending order using Stable Sort. Stable Sort will rearrange all the questions by ascending or descending order in the desired column and if repeating entries occur, they will be displayed in their previous order. Column sorting provides the instructor with a way to find identical questions in the Question Bank. The number of questions displayed on the page will depend on how many questions fit on a page, and a scroll bar will allow the instructor to navigate through the pages. The section on the right side of the screen is labeled Question Details. When the instructor highlights a question by clicking on the row the question is displayed in, more of the question's attributes, such as Class, Topics, Author, Average Score, date Created, date Modified, date Last Used and Notes, are filled as in figures 2.3.3.1.i4 - 2.3.3.1.i9: Question Details Panel.
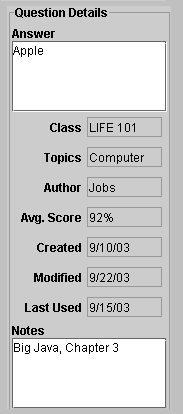
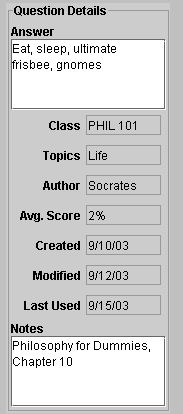
The box labeled Answer will
display a one word answer to the
highlighted question if it is True/False as in
Figure
2.3.3.1.i4. The fields for the class, topics, author, ave. score,
date created, modified and last used will also get filled in with the
highlighted question's attributes.
If the highlighted question type
is Fill
in the Blank the Answer box
will display the correct word or phrase that the student answer should
contain as in Figure 2.3.3.1.i5.
If
the highlighted question is Multiple Choice,
the box
will display the answer choices with the correct answer highlighted
as in Figure 2.3.3.1.i6.
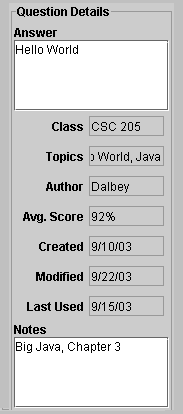
If the highlighted question type is
Short Answer or
Essay,
the answer box will display key words or phrases that the
student's
answer should contain as in Figure 2.3.3.1.i7.
For matching
questions, the box will display the matching choices side by side as
demonstrated in Figure 2.3.3.1.i8.
For programming questions the
correct program
output
will be displayed in the box as in Figure 2.3.3.1.i9.
Underneath the Answer box is a field entitled Class. Here, the author of the question will input the class level of the question. Below Class, a Topics field is located. This field summarizes, in one or more words, the topics of the question. Below Topics is a field for the name of the question Author. The Average Score box, which appears below the Author box, will show the percentage of students that answered the question correctly on previous tests. Below the Average Score field are fields for the date the question was Created, the date it was Modified and the date it was Last Used on a test. The last box, entitled Notes, displays any other comments the author of the question wants to input about the question such as the book name or book chapter. These fields are discussed in more detail in section 2.3.3.3, Add Question.
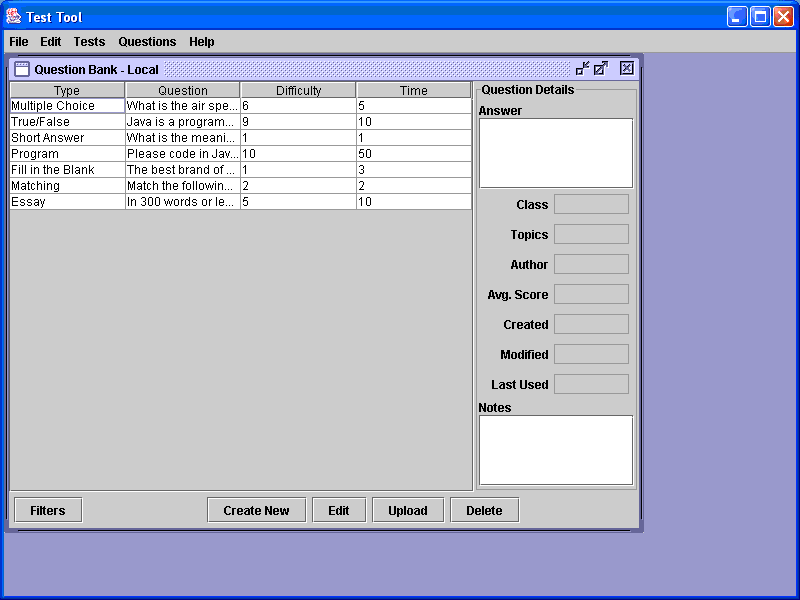
When the instructor connects to the Local Question Bank
a window labeled
Question Bank-Local pops up as shown in Figure
2.3.3.1.i1: Question Bank Local Initial Screen. How
questions are viewed and displayed in the Local Question Bank is
described in
section 2.3.3.1,
Viewing Questions. The
bottom of the initial Question
Bank-Local
window contains five buttons, Filters,
Create New, Edit, Upload and
Delete. The Create New and Edit buttons are
discussed
in sections 2.3.3.3,
Add Question and 2.3.3.4,
Edit Question. The Filters
button
is described in section 2.3.3.1.3,
Filters.
The Upload button
is described
in section 2.3.3.2,
Sharing Questions, and the
Delete button is
discussed in section 2.3.3.5,
Deleting Questions.
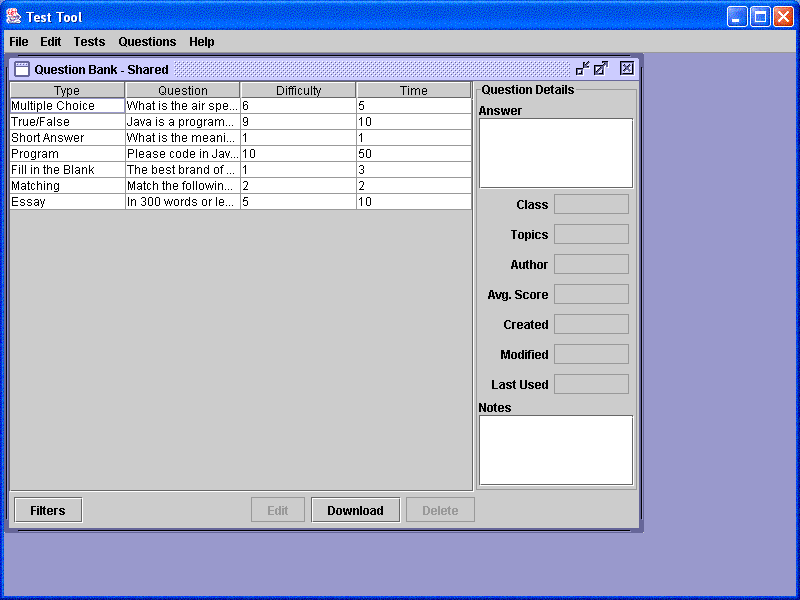
When the instructor connects to the Shared Question Bank a window labeled Question Bank-Shared pops up as shown in Figure 2.3.3.1.i2: Question Bank Shared Initial Screen. How the questions are viewed and displayed is described in section 2.3.3.1, Viewing Questions. The bottom of the initial Question Bank-Shared window contains four buttons, Filters, Edit, Download and Delete. The Edit and Delete buttons are grayed out because the sole purpose of the Shared Question Bank is for instructors to share questions and not to edit or delete them. The Filters buttons is discussed in section 2.3.3.1.3, Filters. The Download button is discussed in section 2.3.3.2, Sharing Questions.
If the instructor prefers to display only certain questions rather than all the questions by default, he can click on the Filters button for more options. These options will hide questions with certain undesired attributes. For example, if an instructor is making a test for CSC 101, it would be logical to not want to see questions from the class levels above CSC 101 because the user would have no use for them. The filter feature would allow the instructor to display questions with the class attribute CSC 101 in the following manner.
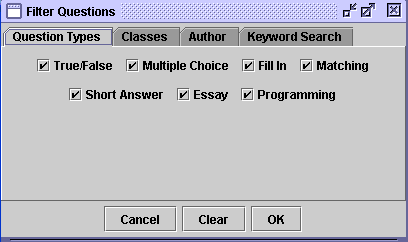
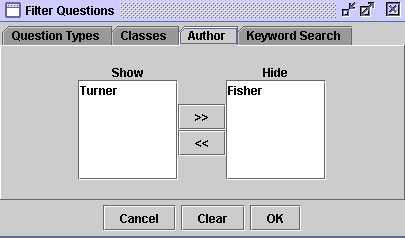
When the instructor clicks the Filters button a screen pops up as in Figure 2.3.3.1.3.i1. This screen contains four tabs labeled Question Type, Classes, Author and Keyword Search. Three buttons, Cancel, Clear and OK, are displayed on the bottom of the screen. If the instructor wants to display only certain types of questions, he would select from the Question Type tab. The instructor can select the types of questions he wishes to hide by un-checking one or more checkboxes and clicking OK. Following this procedure, the questions will be filtered and the questions displayed will be of the type or types the instructor has selected. The Cancel button will get rid of the Filter Questions window without changing anything in the Question Bank display. The Clear button will reset the filter in all four of the tabbed menus.
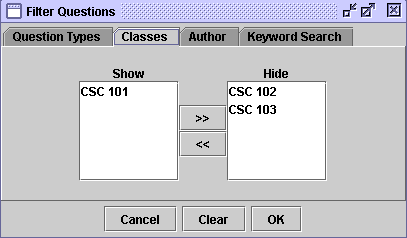
Clicking on the Class menu tab will display a screen containing two boxes labeled Hide and Show separated by two arrow buttons as in Figure 2.3.3.1.3.i2. By default all the class names contained in the Question Bank will appear in the Show box. The instructor can select the classes he wishes to hide by clicking on the class name, to highlight it, and then clicking the right pointing arrow button. This will transfer the selected class into the Hide box. The classes in the hide box will not be shown. If the instructor wishes to show the classes that are hidden, he would have to click on the class name in the Hide box to select it and click the left pointing button. This will make the class name appear in the Show box again. Clicking OK will filter the Question Bank, displaying the questions from the desired classes.
Filtering by Author as shown in Figure 2.3.3.1.3.i3 works exactly the same as filtering by Class. The instructor can also use the three menus, Class, Author and Type, in combination to filter the questions.
The instructor can also filter questions using the Keyword
Search tab as shown in figure 2.3.3.1.3.i4. Here, he can type
in words
relevant to the desired question. The keyword search looks for
the
keywords in the following fields: Question text, Answer,
Topics
and Notes. After clicking OK, the questions that
contain those exact keywords in the question text, topics or notes
fields will be displayed.
By using the above filters, the instructor can
customize the arrangement of the questions in the Question Bank.
An instructor can allow other instructors to see his questions by
Uploading his questions from
the
Local Question Bank to the Shared Question Bank. Likewise, an
instructor
can Download other
instructors'
questions
from the Shared Question Bank to his Local Question Bank.
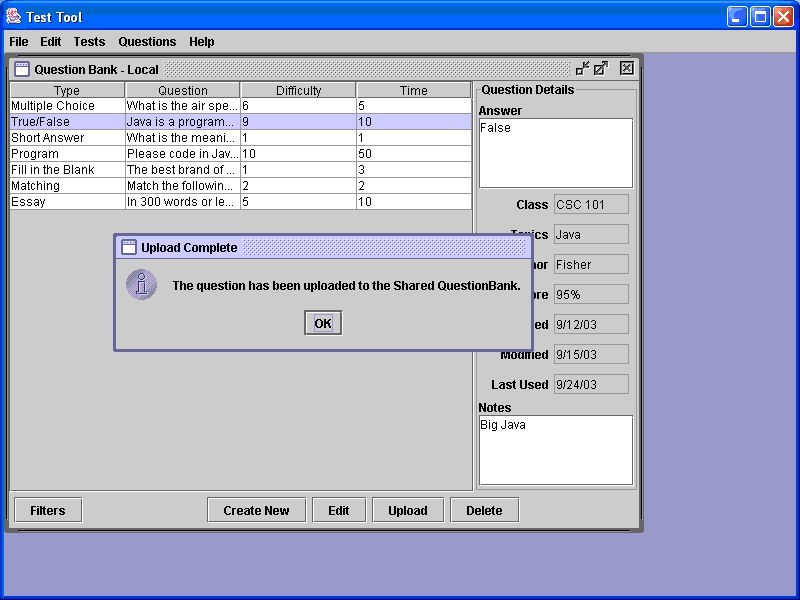
Upload is a feature specific to the Local Question Bank. This button is located at the bottom of the screen, in the initial Question Bank-Local display. The function of this button is to copy questions from the Local Question Bank to the Shared Question Bank. If the instructor decides to share some of his questions with other instructors, he would click on the row of the question he wishes to share. This will highlight the question and its corresponding row. After this, the instructor will click the Upload button. A message “The question has been uploaded to the Shared Question Bank” will appear soon after, as shown in Figure 2.3.3.2.i1. The instructor will click the only button in the message dialog box, OK. This action will get rid of the message box and the instructor will, once again, see the initial Question Bank-Local display. The question that was selected will no longer be highlighted, showing the instructor that it has been added to the Shared Question Bank. A copy of the question will now exist in the Shared Question Bank.
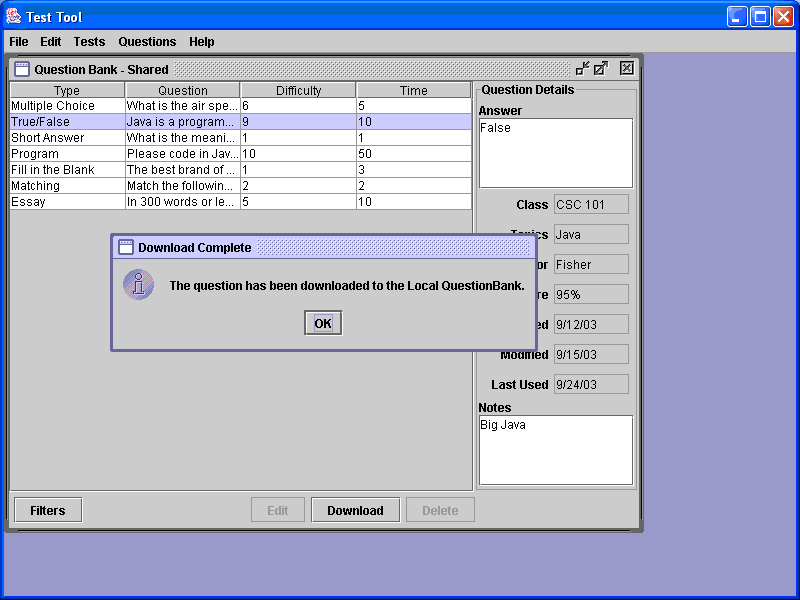
A button entitled Download is a unique feature of the Shared Question Bank. The button is located on the bottom of the initial Question Bank-Shared screen. Using the Download button, the instructor can download desired questions to his Local Question Bank. The instructor selects the desired questions by clicking on the row of the question he wishes to download. This will highlight the question and its corresponding row. After this, the instructor will click the Download button. A message, "The question has been downloaded to the Local QuestionBank" will appear on the screen and shown in figure 2.3.3.2.i2. Clicking the OK button will return the instructor to the initial Question Bank – Shared screen. The question that was selected to be downloaded is no longer highlighted letting the instructor know that it downloaded successfully to the Local Question Bank.
| Up: 2.3.3. Managing Questions |
Next: 2.3.3.3. Create Question |


