Figure 2.4.1.a.: Automatic Test Generation Dialog.
This advanced scenario shows an instructor generating an advanced test. Test generation is one of the most commonly performed operations with the Test Tool system. In this scenario, the user is assumed to have become aquainted with the simple test generation outlined in Section 2.3. This tutorial also assumes the user has added enough questions to the question database to generate a test. Details of adding questions to the question database are covered in Section 2.2. Details of user registration are covered in Section 2.9.
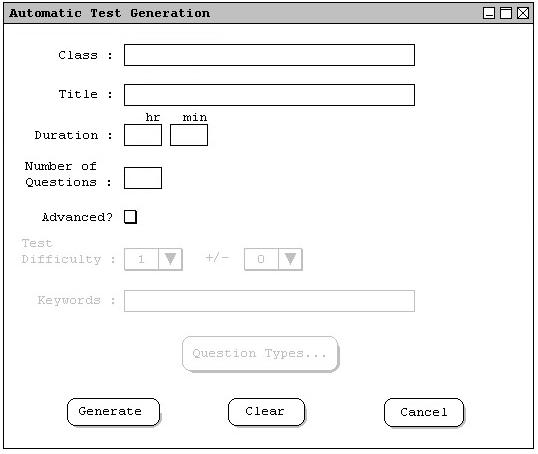
To generate an advanced test, the user selects the 'Generate' command in the Generation menu. In response, the system displays the dialog shown in Figure 2.4.1.a.
Figure 2.4.1.a.: Automatic Test Generation Dialog.
The figure shows the automatic test generation dialog. This is identical to the simple test generation dialog covered in Section 2.3. The information displayed below the 'Advanced?' checkbox is used to specify the advanced generation features. The user selects the 'Advanced?' checkbox, and the system responds by activating the text fields as shown in Figure 2.4.1.b.
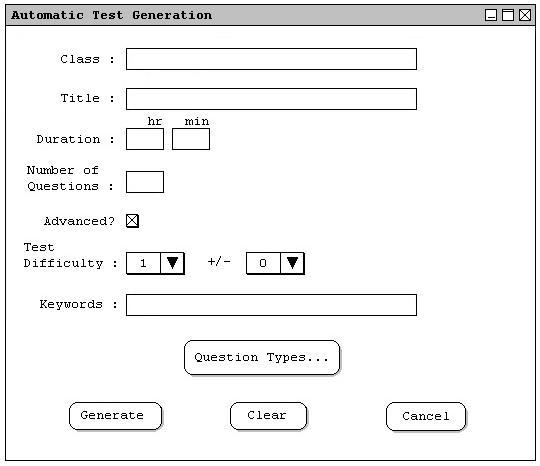
Figure 2.4.1.b.: Advanced Automatic Test Generation Dialog.
The figure shows the advanced automatic test generation dialog that contains a number of data-entry fields for the various components of a test. The 'Class' field is a one line string that describes the class briefly. The 'Title' is a one line string that describes the test briefly. The 'Duration' field specifies the time the test will last. The 'Number of Questions' field specifies the total number of questions on the test.
The added features of advanced test generation are included below the 'Advanced?' checkbox. These features include a pull-down field for 'Test Difficulty', and a pull-down field for 'Difficulty Range'. When the user selects one of these fields, a pull-down box appears similar to the one shown in Figure 2.4.1.c.
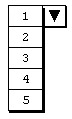
Figure 2.4.1.c.: Difficulty Range Pull-down Menu.
The pull-down menus for the 'Test Difficulty' field and for the 'Difficulty Range' field are very similar. The only difference between the two is that the 'Difficulty Range' pull-down menu contains the values '0 to 4', instead of the values '1 to 5' as shown in Figure 2.4.1.b. The reason for this being that the 'Difficulty Range' field acts as a supplementory value to the 'Test Difficulty' field. Specifically, when the user selects a 'Test Difficulty' value of 4, and a 'Difficulty Range' value of 1, the Test Tool will automatically search for questions approximately equal to the value in the 'Test Difficulty' field plus or minus the value in the 'Difficulty Range' field. Given these input values, the Test Tool would create a test with questions ranging in difficulty from 3 to 5.
However, if the user selects the 'Difficulty Range' value to 0, the Test Tool will make a best effort attempt at generating a test with questions as close to the value stored in the 'Test Difficulty' as possible. If not enough questions of the specified value are available, the Test Tool will fill out the test with questions of difficulty similar to that of the 'Test Difficutly' value. Specifically, the Test Tool will begin by choosing questions whose difficulty lies within plus or minus one of the given 'Test Difficulty'. If there are still not enough questions of the specified value available, the Test Tool will then continue to increase the difficulty range by one until the test is filled. If the test is not filled by the end of this incremental process, then an error message will result. Error message details are described further in Section 2.13.
Below the 'Test Difficulty' field are additional test entry fields. The 'Keywords' field is a comma-delimited string field that lists the specific keywords to search for during test generation. For example, the user may enter "CVS, design" as two keywords. The 'Question Types...' button is used to customize the type of questions that will be generated on the test. The functionality of this button is described later.
After the dialog appears on the screen, the user enters information by a combination of typing and selecting from pre-defined choices. Figure 2.4.1.d. shows the result of the user having filled in information for a new test titled "CPE 205 - Exam 1".

Figure 2.4.1.d.: Creating an Advanced Test.
This test has a class, duration, number of questions, difficulty and difficulty range, and it includes two keywords, "CVS" and "Design".

Figure 2.4.1.e.: Question Types Dialog.
The dialog contains the original question count and total questions remaining at the top of the screen. Each available question type contains a text field for inputing the number of the type of questions. The Test Tool contains built in support for the following types of questions:
The user may now select whichever question types suit the test they wish to create. Once the user enters values for the question types, the question count at the top will automatically update to remind the user how many questions are remaining. If the user enters too many question types for the available number of questions, the system will respond by indicating to the user that the total number of questions has been exceeded, and will return the value to a valid number. Figure 2.4.1.f. shows an example of a filled in question types dialog.
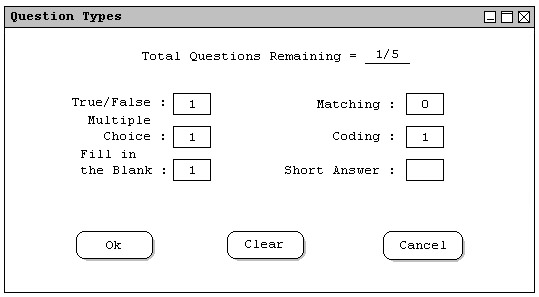
Figure 2.4.1.f.: Customizing Question Types.
In the Figure, the user has selected 1 'True/False' question, 1 'Multiple Choice' question1, 1 'Fill in the Blank' question, and 1 'Coding' question. The 'Total Questions Remaining' has updated to show that 1 out of 5 questions have been unassigned. This feature will allow the Test Tool to randomly choose the question type of the question, without further input from the user. Also note that the user may specify a zero into a field, indicating that the Test Tool should not include any of that question type on the test. In the example, the user has chosen to not inlcude any 'Matching' questions, indicated by a 0 placed in that field. The user may then click the 'Ok' button to confirm the selection of the question types and return to the automatic test generation screen.
Once the user selects the 'Generate' button on the test generation screen shown in Figure 2.4.1.a., the Test Tool will generate a test with the specified values. An example generated test is shown below in Figure 2.4.1.g.
Figure 2.4.1.g.: Example automatically generated test.
If the Test Tool does not contain a sufficient number of questions in the question database, or if there are not enough of the specific question types designated under the 'Question Types...' dialog, the auto generate feature will simply create a partial test. The partial test will include as many of the designated question types as possible, and will then return a warning message telling the user that the test is not complete. For more details regarding error and warning messages, refer to Section 2.13.