Preceding sections of the requirements have described options for controlling various aspects of Calendar Tool operation. The scenarios in this section cover the complete details of all Calendar Tool options.
There are three options-setting dialogs -- two for the regular user of the Calendar Tool and one for the administrative user of the Calendar Tool Administration program. The regular user options are covered first, followed by options for the administrative user.
For both the regular and administration interfaces, the top group of items in
the `Options' menu correspond one-for-one with tabs in an options
dialog. When the user selects one of the menu items, the system displays the
dialog with the corresponding tab selected. For example, when the regular user
selects the `Times and Dates' item in the `Options' menu, the
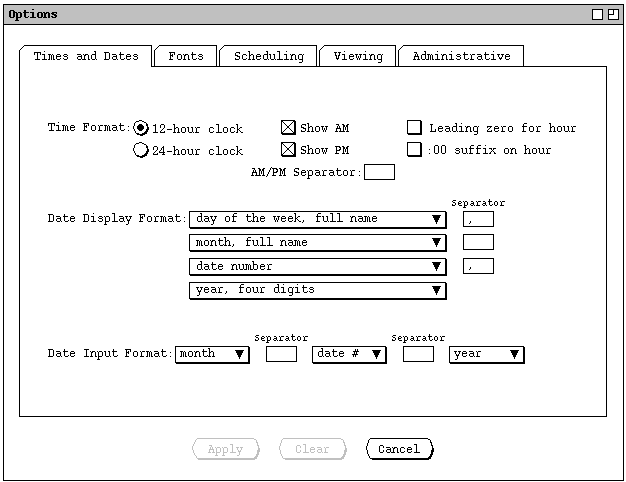
system displays the dialog shown in Figure 253.

Figure 253: Options dialog.
At the bottom of the options dialog is a row of buttons that is common to all of the tabs, and the effect of the buttons applies to all tabs simultaneously. The `Apply' button is used to apply any option changes entered in any of the tabs. `Apply' is initially disabled, becoming enabled when the user changes the options settings in one or more data-entry fields in one or more tabs. When the user presses `Apply', the system applies the changed settings to the current calendar, updating all open display windows for the current calendar.
Since the command buttons apply across all dialog tabs, pressing `Apply' has the affect of applying all changes made in any of the tabs, whether or not a changed tab is currently visible. Furthermore, switching between tabs does not automatically apply the changes in a tab that was previously displayed. All option changes remain unapplied until the user presses the `Apply' button. As soon as the changed settings are applied, the `Apply' button is reset to the disabled state. The `Apply' button remains disabled until the user changes one or more settings.
The `Clear' button is used to clear any unapplied changes. When the
user presses `Clear', the system restores all dialog settings in all
tabs to their most recently-applied values. The enabled/disabled state of the
`Clear' button coincides exactly with the `Apply' button.
Executing `Clear' disables `Apply', and vice versa. Pressing
`Cancel' in the option dialog clears all unapplied changes and removes
the dialog from the screen, without applying any changes.
For the regular user, there are four global option settings that are not
calendar-specific, but instead apply to the Calendar Tool operating session as
a whole. The dialog for these options is displayed using the `Global'
command in the options menu. These global options are described in
Section 2.7.6.
2.7.1. Times and Dates
The time and date options provide formating control for the times and dates that appear in various Calendar Tool displays. When the user selects the `Times and Dates' tab in the options dialog, the system updates the display to that shown in Figure 253. The `Time Format' settings allow the user to select between 12-hour and 24-hour time, whether to show the "AM" and/or "PM" suffix, and what separation if any goes between the time and AM/PM suffix. The user can also set whether or not a leading zero character appears in front of single-digit hours and if the suffix ":00" appears in on-the-hour times. The default values for these settings are: 12-hour time, show both "AM" and "PM" suffixes, one space of suffix separation, leading zero off, and ":00" suffix off. The `Separator' may be from zero to three characters. When the user selects 24-hour clock, the system disables the show AM, show PM, and AM/PM separator fields, but leaves the settings of these fields unchanged. If the user subsequently re-selects 12-hour clock, the AM/PM checkboxes and separator field are re-enabled, and retain the settings from when the 12-hour setting was last in effect.
The settings under `Date Display Format' specify the format and relative order of the components in the display of dates. A full date string consists of four components:
| Date Context | Components |
| Date text fields in all dialogs and displays | month, date, year |
| Date label at the top of an item view | day, month, date, year |
| Date label at the top of a day view | day, month, date, year |
| Date label at the top of a week view | month, date range, year |
| Date label at the top of a month view | month, year |
| Month name within year view | month |
| Date columns in list views | month (short or number), date, year |
Table 11: Date display contexts.
For date strings with fewer than four components, the date display settings specify the format and relative order of those components that are present.
All four date-display list boxes have the same list of items, which is shown in
Figure 254.
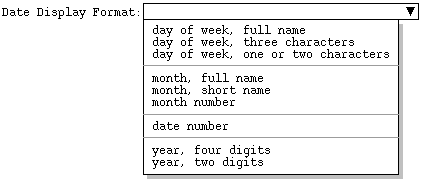
Figure 254: Date format combo box lists.
| full name | three chars | one or two chars |
| Sunday | Sun | S |
| Monday | Mon | M |
| Tuesday | Tue | Tu |
| Wednesday | Wed | W |
| Thursday | Thu | Th |
| Friday | Fri | F |
| Saturday | Sat | S |
Table 12: Day of the week formats.
In all cases, the day name is capitalized.
The fourth through sixth items specify the month name. The full name is the complete spelling of the month, capitalized. The short name is the first three letters of the month, capitalized. The month number is between 1 and 12.
The seventh list item is for the date number. It is an integer between 1 and 28 to 31, depending on the number of days in the selected month.
The last two date-display items specify the year as four or two digits. When the two-digit year format is selected, the two digits correspond to the current century or the previous century, which ever century contains the decade nearest the specified decade, where the decade is that specified by the first of the two digits.
Each of the four components of a date must specify exactly one of the day, month, date, and year. The values in the three boxes in the `Separator' column must be at least one character each. The separator defaults are ", ", " ", and ", ".
In some displays there are restrictions on date formats, such that the options apply only partially or not at all. The format restrictions are the following:
The settings under `Date Input Format' specify the order and separation of date components when input by the user. Each of the three list boxes contains the list of `date #', `month', and `year'. Both separators must be the same single character, with the default a space character. The system provides the user a good deal of flexibility when inputting dates, in order to reduce the amount of typing the user must do. Once dates are input, they are confirmed for validity and converted to the format specified in the `Date Display Format' settings. Complete details of date input rules, including the precise interpretation of input format settings, are covered in Section .
Figure 255 shows the user having changed the time and date option settings.
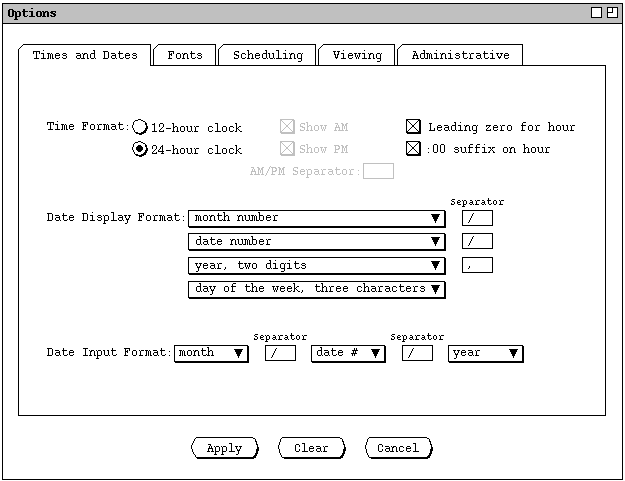
Figure 255: Changes to time and date options.
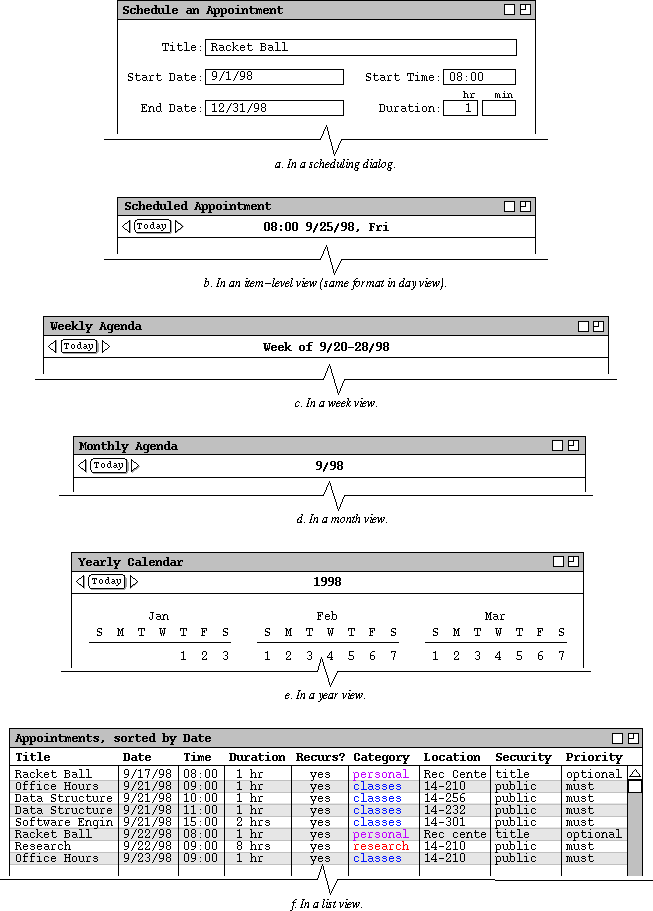
Figure 256: Effects of time and date option changes on different displays.
The fonts options provide control over the text fonts used in all Calendar Tool
windows. When the user selects the `Fonts' tab in the options dialog,
the system updates the display as shown in Figure 257.
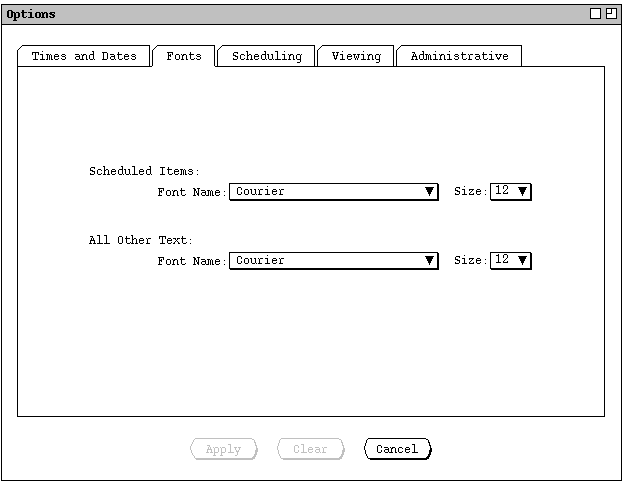
Figure 257: Fonts options tab.
The same two data-entry fields are available for both forms of text. The `Name' and `Size' menus are platform-specific lists of available fonts and their sizes. With only a few exceptions, the same relative font size is used throughout all Calendar Tool display windows. The exceptions are the following:
The font options tab provides no control of font style or color. The normal, boldface, or italic style of text is controlled entirely by the system. The user can change the text color of scheduled items using the category editing features described in Section 2.5.5. No other control of text coloring is available, the coloring being black except for the coloring defined by categories, as defined in Section 2.5.5.
The font options settings do not apply to the text in the banners of display windows. The format of banner text is considered to be under the control of the underlying operating environment, and is therefore not settable from within the Calendar Tool.
Figure 258 shows the user having changed font option settings.
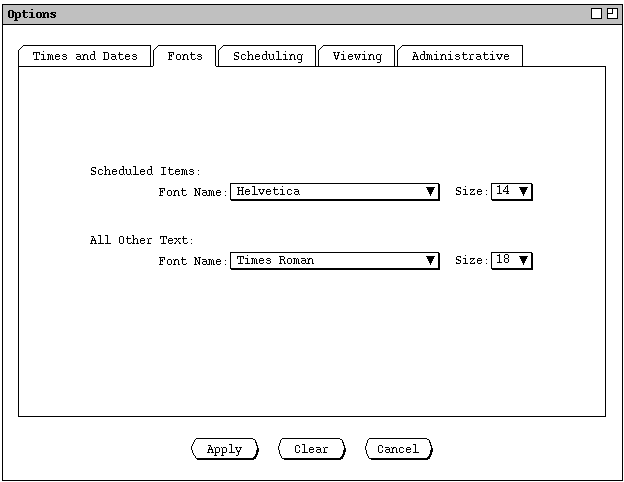
Figure 258: Changes to font options.
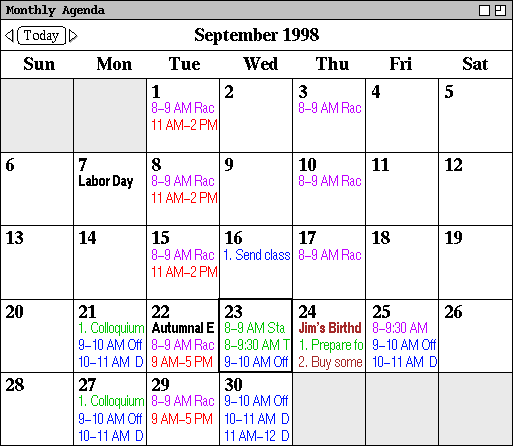
Figure 259: Monthly view with font changed applied.
The scheduling options provide control over the commands in the
`Schedule' menu. When the user selects the `Scheduling' tab
in the options dialog, the system updates the display as shown in Figure 260.
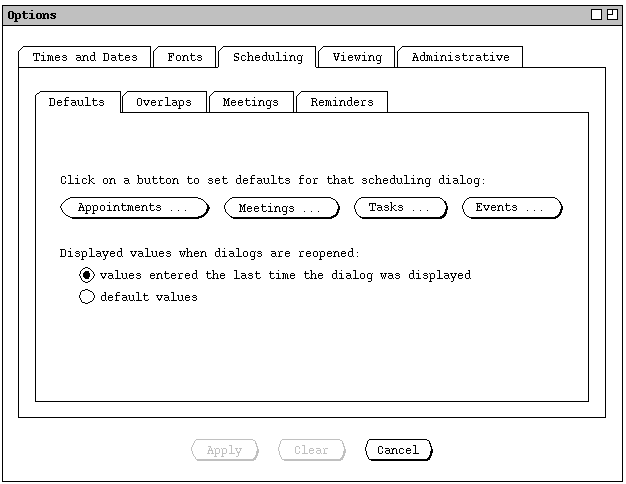
Figure 260: Scheduling options tab.
The `Defaults' tab allows the user to control the default values that
appear in scheduling dialogs when they are initially displayed and when the
user presses `Clear'. To set the default values for a scheduling
dialog, the user presses one of the four dialog-type buttons to bring the
dialog up. When the user does so, the system displays a normal scheduling
dialog that is augmented for the purposes of setting default values. For
example, when the user presses the `Appointments ...' default-setting
button, the system displays the dialog shown in Figure 261.
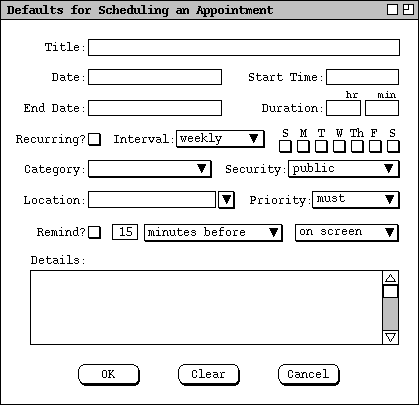
Figure 261: Appointments scheduling defaults dialog.
Operationally, the regular scheduling dialog and defaults-setting dialog differ as follows:
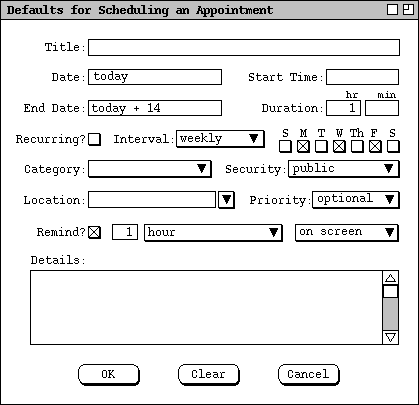
Figure 262: Appointments scheduling defaults dialog with values filled in.
When the user presses `OK' in
Figure 262,
the system records the entered values and removes the default-setting dialog
from the screen; the options dialog remains on the screen. The recorded
default values become part of the changed option settings that the user can
apply by pressing the `Apply' button in the options dialog. When the
user executes `Apply', the default settings come into effect for all
subsequent scheduling operations. For example, Figure 263 shows the default
state of the appointments dialog after the user has applied the settings in
Figure 262.
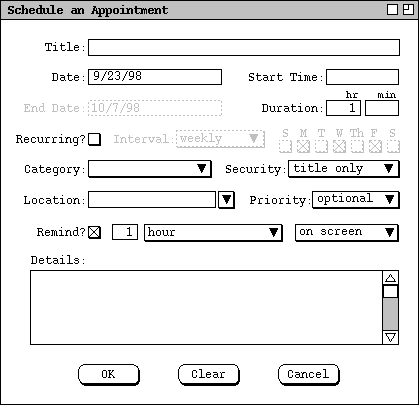
Figure 263: Appointments dialog with updated default settings.
The built-in default values for all scheduling dialogs are defined when the
calendar tool is configured for installation (see
Section
). Table 13 shows the initial default values for all fields in all four types
of scheduled item.
| Data field | Initial default value |
| Title | empty |
| All Date fields | empty |
| All Time fields | empty |
| Duration | empty |
| Recurring? | off, weekly, all days off |
| Category | empty (none) |
| Location | empty |
| Security | public |
| Priority | must for appointments and meetings; 0 for tasks |
| Remind? | off, 15 minutes before, on screen |
| Attendees | empty |
| Details | empty |
| Minutes | empty |
| Completed | off |
Table 13: Default field values for all four types of
scheduled item.
Figures 5, 83, 123, and 127 illustrate the initial default settings for each type of scheduled item.
The two radio buttons in the scheduling defaults tab (
Figure 260
) are used to select the values that appear in scheduling dialogs when they are
reopened after having been opened one or more times previously. The first
selection specifies that values in reopened dialogs are those that were entered
by the user the last time the dialog was open. The second radio button
selection specifies that values in reopened dialogs are the dialog defaults,
independent of the most-recently entered values. A scheduling dialog is
considered to be "re"opened when the user re-executes a scheduling command
after having executed `Cancel' or `Close' in the previously-
open dialog. Deiconifying or moving an already open dialog to the front on the
screen does not constitute reopening in this context.
2.7.3.2. Scheduling Overlaps Options
When the user selects the `Overlaps' tab, the system updates the
options dialog as shown in Figure 264.
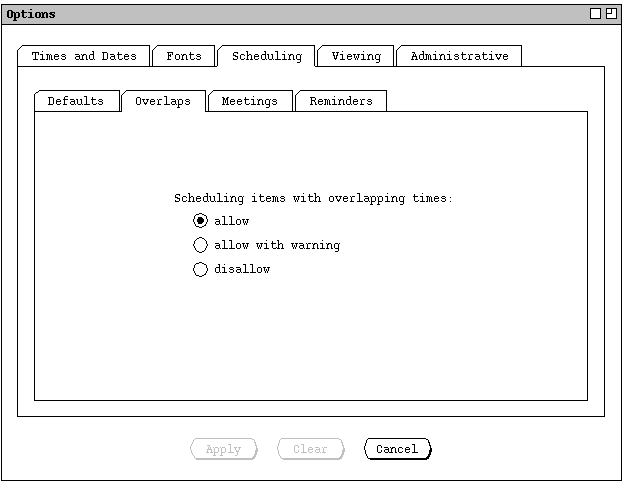
Figure 264: Scheduling overlaps options tab.
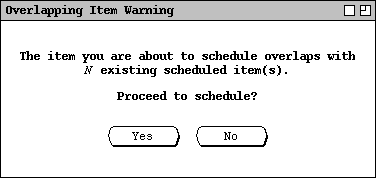
Figure 265: Overlapping item warning.
If `disallow' is selected for overlapping items, then the system treats the scheduling of such items as an error. The details of scheduling error messages are covered in Section Complete details on the effects of allowing overlapping items are covered in Sections 2.3.1. and
The overlap option applies only to items scheduled by the current user, not to
meetings scheduled by another user. Details of overlaps in meeting scheduling
are covered in Sections
2.4.1
and
Section 2.5.2.2.3.
2.7.3.3. Scheduling Meetings Options
When the user selects the `Meetings' tab, the system updates the
options dialog as shown in Figure 266.
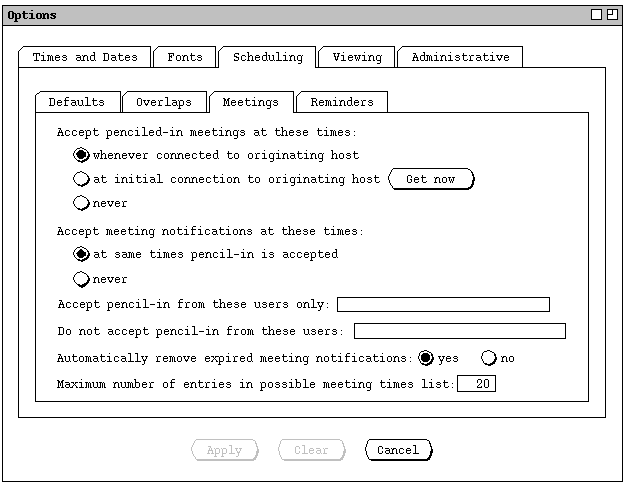
Figure 266: Scheduling meetings options tab.
The third and fourth meeting-scheduling options control from whom penciled-in meetings and notifications are accepted. Both fields contain comma-separated lists of user IDs, per the syntax described in Section . If both ID lists are empty, then penciled-in meetings, and the accompanying notifications, are accepted from all users, except as excluded by a `never' setting in the previous two meeting-scheduling options. If one or more user IDs are specified under `Accept pencil-in from these users only', then penciled-in meetings are accepted only from those listed users and from no others. If one or more user IDs are specified under `Do not accept pencil-in from these users', then meetings are not accepted from those listed users, but from all other users not otherwise excluded by the other option settings. The contents of the `Accept ... and `Do not accept ID lists must be mutually exclusive, that is the same ID may not appear in both lists. The effect of excluding a user with these settings means that any meetings scheduled by those users are automatically declined, without ever appearing on central host or local calendars.
These options apply only to notifications for scheduled meetings, not for the administrative notifications discussed in Section 2.6. Administrative notifications are sent unconditionally; the user cannot choose to decline administrative notifications.
The option to `Automatically remove expired meeting notifications'
controls whether meeting notifications are retained after the time for a
meeting has past, as explained in
Section 2.4.1.6.8.
The last meeting-scheduling option specifies the maximum number of entries in a
possible meeting times list, as described in
Section 2.4.1.1.
2.7.3.4. Scheduling Reminders Options
When the user selects the `Reminders' tab, the system updates the
options dialog as shown in Figure 267.
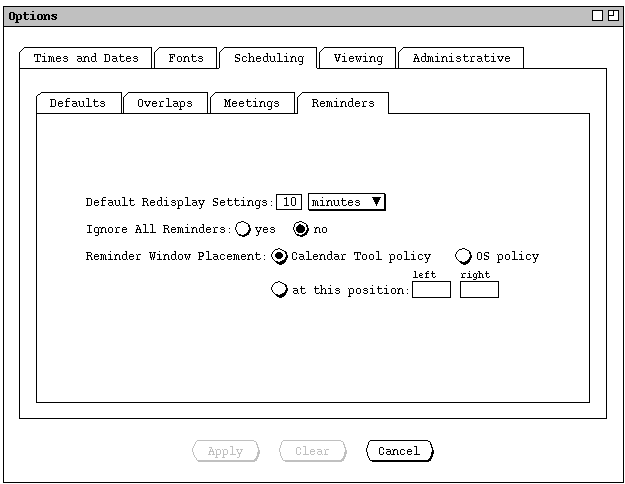
Figure 267: Scheduling reminders options tab.
The `Reminder Window Placement' option controls where on the screen
the reminder window appears. Details of screen positioning are covered in
Sections
2.7.4.2
and
The `Default Redisplay Settings' in this options tab apply to the pop-
up reminder dialog that appears when the time for the reminder has come.
Default settings for the time the reminder dialog appears initially are defined
in the scheduling defaults options, described in
Section 2.7.3.1.
2.7.4. Viewing Options
The viewing options provide control over the commands in the `View'
menu. When the user selects the `Viewing' tab in the options dialog,
the system updates the display as shown in Figure 268.
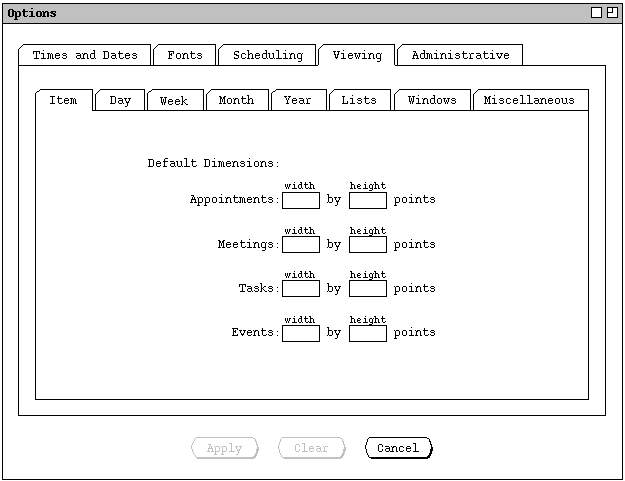
Figure 268: Viewing options tab.
The viewing options for the day through year levels are described and
illustrated fully in Sections
2.3.1.1
through
2.3.1.4,
respectively. Figures 269 through 272 show the presentation of these settings
in the the options dialog.
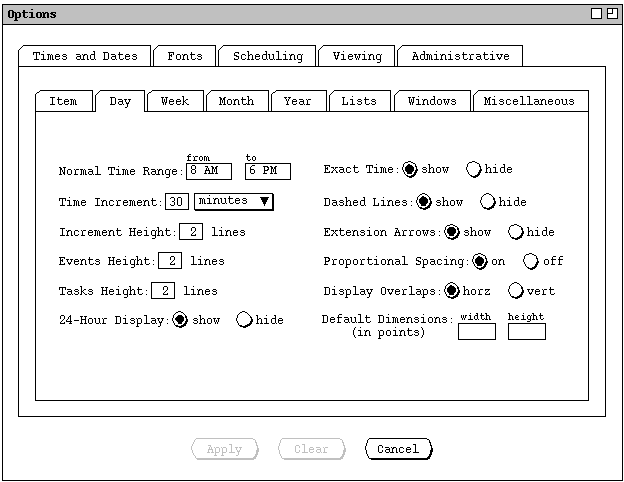
Figure 269: Viewing day options tab.
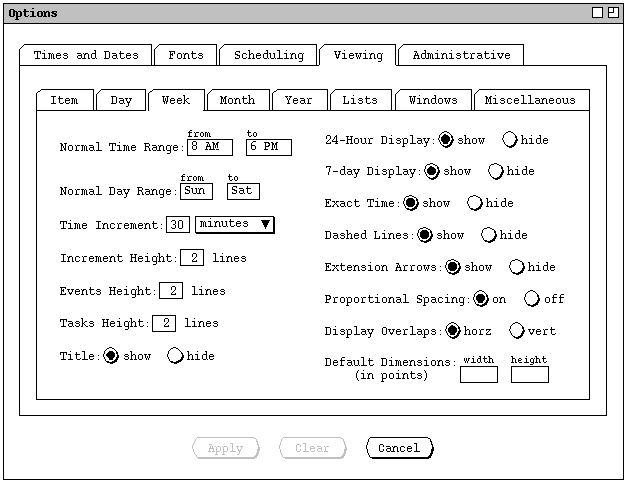
Figure 270: Viewing week options tab.
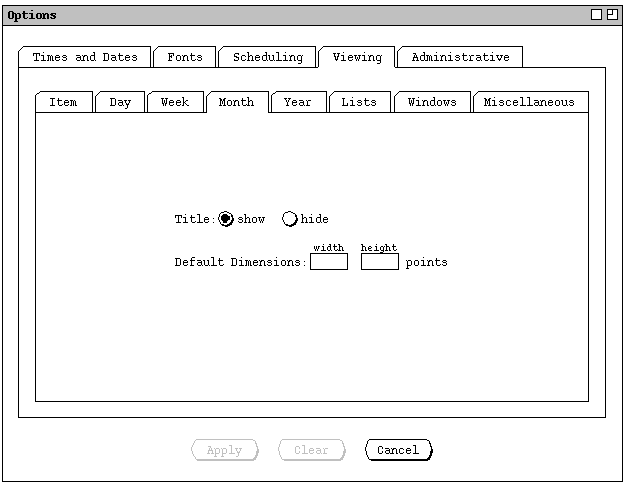
Figure 271: Viewing month options tab.
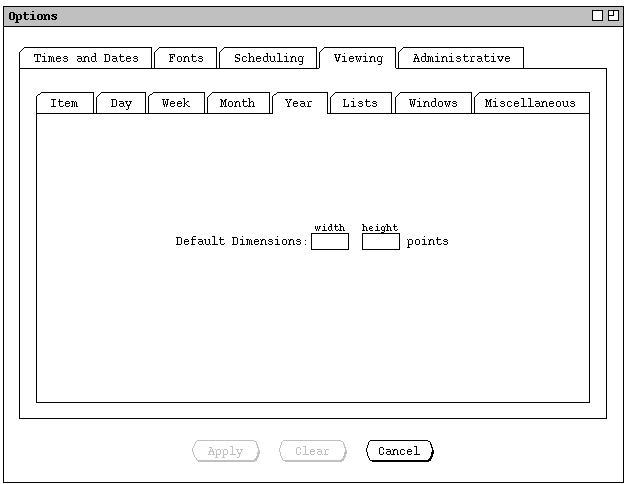
Figure 272: Viewing year options tab.
Details of list, window, and miscellaneous options follow in the next three
subsections.
2.7.4.1. Viewing Lists Options
Viewing lists options provide control over the commands in the `View
Lists' submenu. When the user selects the `lists' tab within the
`Viewing' tab, the system updates the display as shown in Figure 273.
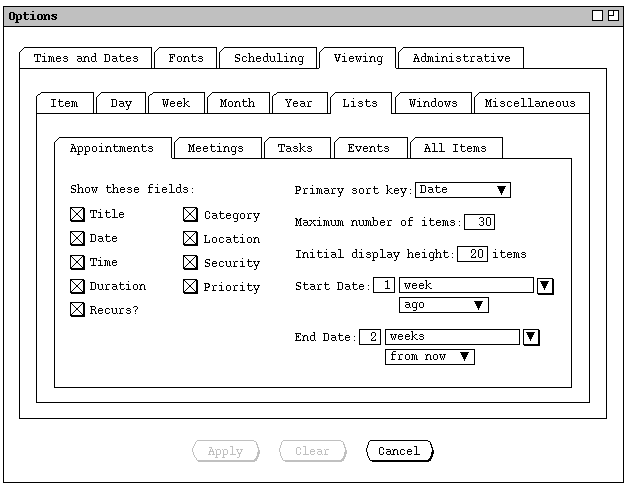
Figure 273: Viewing lists options tab.
Figures 274 through 277 show the other four subtabs for viewing lists options.
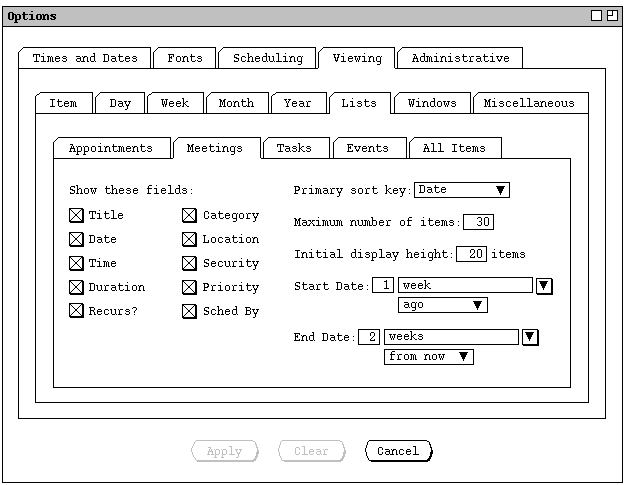
Figure 274: Viewing meetings lists options tab.
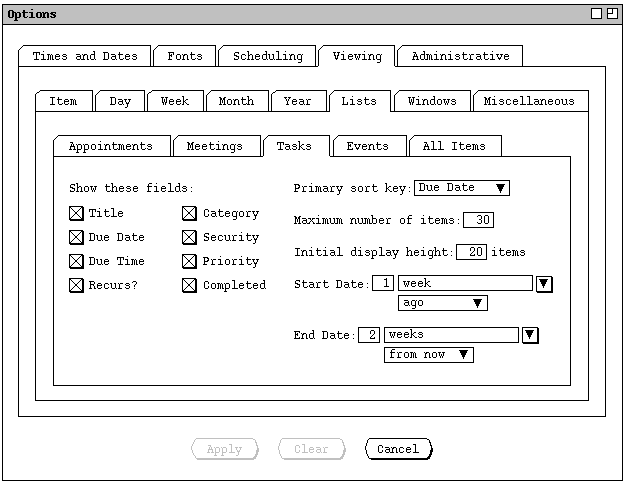
Figure 275: Viewing tasks lists options tab.
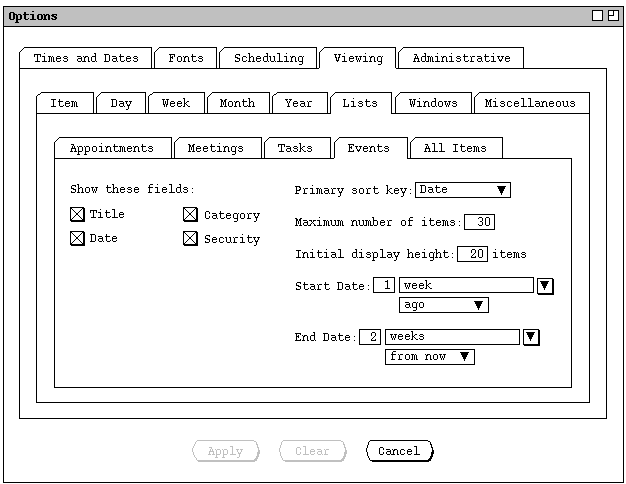
Figure 276: Viewing events lists options tab.
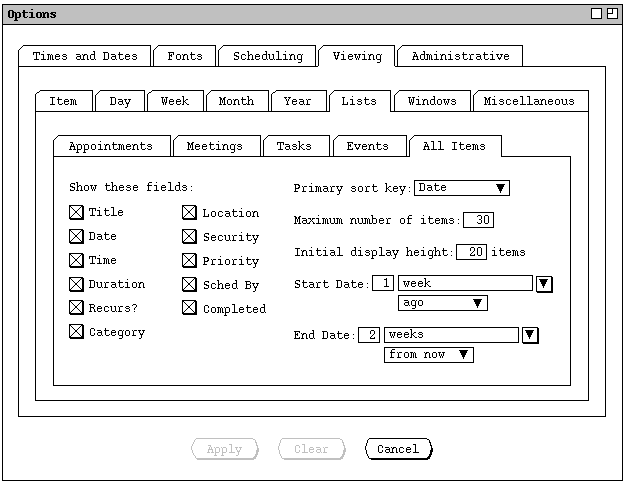
Figure 277: Viewing all-items lists options tab.
When the user selects the `Windows' tab within the `Viewing'
tab, the system updates the display as shown in Figure 278.
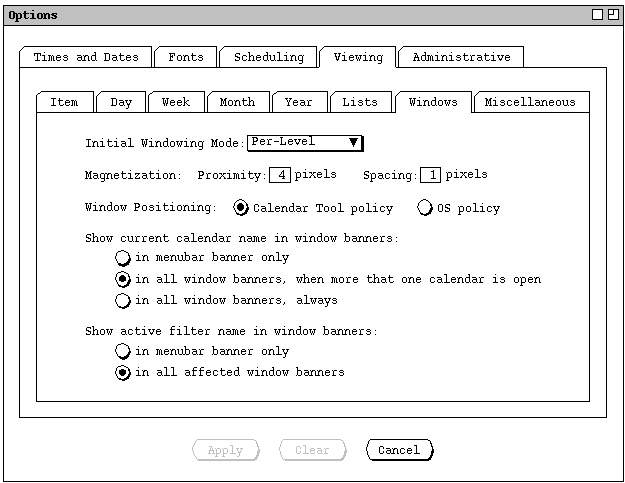
Figure 278: Viewing windows options tab.
The `Initial Windowing Mode' specifies the default setting for the window modes described in Section 2.3.6.2. The items in the windowing-mode option menu are the same as in the windowing- mode submenu shown in Figure 71 -- Two-Window, Per-Level, and Multi-Window. The default is Per-Level. The effect of each of these settings is described fully in Section 2.3.6.2.
The `Magnetization' option specifies the default proximity and spacing for the magnetization features described in Section 2.3.6.3.
The `Window Positioning' radio buttons specify the way successive display windows appear on the screen. When the `Calendar Tool policy' is on, the window placement is as follows:
When the `OS Policy' radio button is on, successive display windows are placed per the placement policy of the window manager of the underlying operating system. Specific control options for this placement policy must be set at the operating system level, if possible.
The three radio buttons under `Show current calendar name in window banners' specify when the name of the current calendar appears in display window banners. Placement of the calendar name within the banner is described in Section 2.3.6.5. The `in menubar banner only' setting does not apply to view windows for other-user and group calendars, since the banners of these windows unconditionally contain the user or group name.
The two radio buttons under `Show active filter name in window
banners' specify in which display window banners the currently active
filter name appears, if a filter is active. Placement of the filter name
within the banner is described in
Section 2.3.6.5.
2.7.4.3. Viewing Miscellaneous Options
When the user selects the `Miscellaneous' tab within the
`Viewing' tab, the system updates the display as shown in Figure 279.
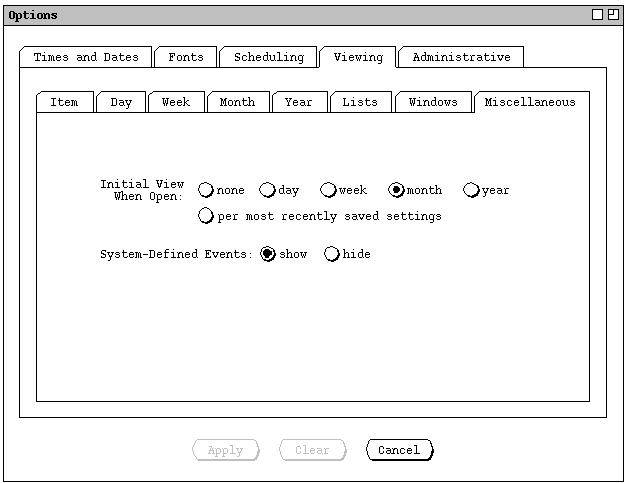
Figure 279: Viewing miscellaneous options tab.
Typically, when the user selects `per most recently saved settings', the initial view for the calendar is the same as when the user last closed the calendar or last exited the Calendar Tool. This is the case because it is presumably typical that the user saves the calendar before closing it or exiting.
When the user invokes the Calendar Tool with one or more calendar files as
arguments, the effects of the initial view settings at start-up time are as
shown in Table 14.
| Initial View Setting | Effect with respect to calendar file arguments |
| none | the presence of arguments overrides the none setting; all argument files are opened at the month view level, with today's date highlighted; windows are placed on the screen per the current window placement option setting |
| day, week, month, or year | each argument file is opened at the selected view level |
| per most recently saved settings | all argument files are first opened at the month view level, with today's date highlighted, per current window placement option; then the settings are used to further populate the initial display, except that if the settings include the month view for any already-opened argument calendar, that month-view setting is ignored |
| view status as of most recent close | same effect as `per most recently saved settings' |
Table 14: Effects of initial view settings when tool is
invoked with file arguments.
Section covers details of invoking the Calendar Tool with calendar file arguments.
The radio buttons for `System-Defined Events' specify whether to show
or hide such events in all calendar and list views. System-defined events are
holidays and other pre-defined calendar dates, as defined in
Section .
2.7.5. Administrative Options, for the Regular User
When the user selects the `Administrative' tab in the options dialog,
the system updates the display as shown in Figure 280.
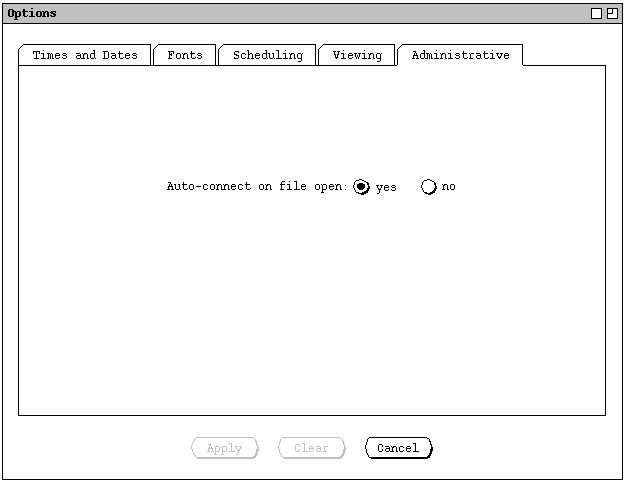
Figure 280: Administrative options tab.
For a regular user running the Calendar Tool, there are no options for the
administrative database commands, since these commands operate in read-only
mode in the regular-user Calendar Tool. For administrative users running the
Calendar Tool Administration program, there are additional administrative
options, as described in
Section 2.7.7.
2.7.6. Global Session-Wide Options
When the regular user selects the `Global' command in the
`Options' menu, the system displays the dialog shown in Figure 281.
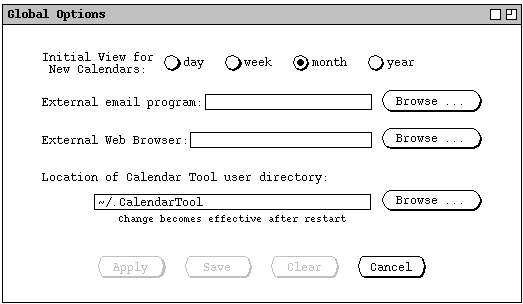
Figure 281: Global options dialog.
`Initial View for New Calendars' specifies the initial view when the user creates a calendar with the `File->New' command, or when the system creates a new calendar after having been invoked from the operating environment with no file argument(s). If `Day' is selected, a new calendar is opened with the daily view of today's date. If any of the other three radio buttons is selected, the new calendar is opened at that level, with today's date highlighted.
The option for `External email program' allows the user to select the application program to be used by the Calendar Tool for the purposes of electronic mail communication. The only circumstance in which an external email program is launched from the Calendar Tool is when the user executes the `Contact Admin' command, as described in Section 2.6.6.5. When possible, the Calendar Tool queries the underlying operating environment to determine the identity of the user's preferred email program. When such determination is made, the system inserts the name of the program as the default value in the `External Email Program' field. If the user's preferred email program cannot be determined, the field is blank.
The option for `External Web Browser' allows the user to select the application program to be used by the Calendar Tool for the purposes of web browsing. The only circumstance in which an external web browser is launched from the Calendar Tool is when the user chooses to view the minutes associated with a meeting, as described in Section 2.5.1.2. When possible, the Calendar Tool queries the underlying operating environment to determine the identity of the user's preferred web browser. When such determination is made, the system inserts the name of the web browser as the default value in the `External Web Browser' field. If the user's preferred web browser cannot be determined, the field is blank.
The option for `Location of Calendar Tool user directory' allows the user to change the location of that directory. As explained in Section 2.8.1, the default location is ".CalendarTool" under the user's home directory. This default location appears as the initial setting in the options dialog. Once applied, a change in directory location takes effect after the user exits and restarts the Calendar Tool. This is the only option that requires a restart.
A change of directory location does does not change the location of files in the original user directory. The files must be moved or copied as desired, using the normal file management commands of the underlying operating environment. The system does not validate the directory until the restart is performed. If the changed-to directory is invalid or contains invalid files, the system responds as described Section 2.8.12.
The `Apply', `Clear', and `Cancel' buttons in the
global options dialog behave the same as in the multi-tab option dialog
described in the preceding sections. The `Save' button becomes
enabled when the user edits one or more dialog fields. For example, Figure 282
shows the user having entered values for the email program, web browser, and
location of the user directory.
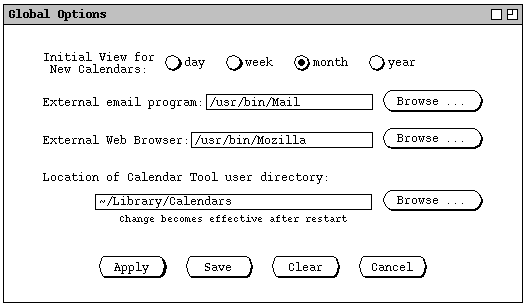
Figure 282: Changes to global options.
When the user presses the enabled `Save' button, the system saves the contents of the dialog into the Calendar Tool Settings file. Only the global settings portion of `Settings' is affected by this save, with all other portions of the settings file left unchanged. Details of Settings file contents and related commands are covered in Sections 2.8.1 and 2.8.5. Unsaved changes can also be saved using the `Save Settings' command in the `File' menu, also described in Section 2.8.5. The `Save' button is disabled when the user has made no edits, or changed edited fields back to their most recently-saved values.
When the user applies or saves the global options, the system validates that
the `Location of Calendar Tool user directory' is an existing
directory that is readable and writable by the user. If this validation fails,
the system displays an appropriate error message, as described in
Section .
The system performs no validation of the email program or external web browser
when options are applied or saved. If these are not valid executable programs,
the error condition will arise when the user attempts to invoke the programs in
the contexts of their use, which are, respectively, contacting a Calendar Tool
administrator (
Section 2.6.6.5
) and viewing the minutes for a meeting (
Section 2.4.1.1
). If an execution error arises in those contexts, the system displays an
appropriate error, as described in Sections
and
2.7.7. Options in the Calendar Tool Administration Program
When the administrative user of Calendar Tool Administration selects the
`Times and Dates' item in the administrative `Options' menu,
the system displays the dialog shown in Figure 283.
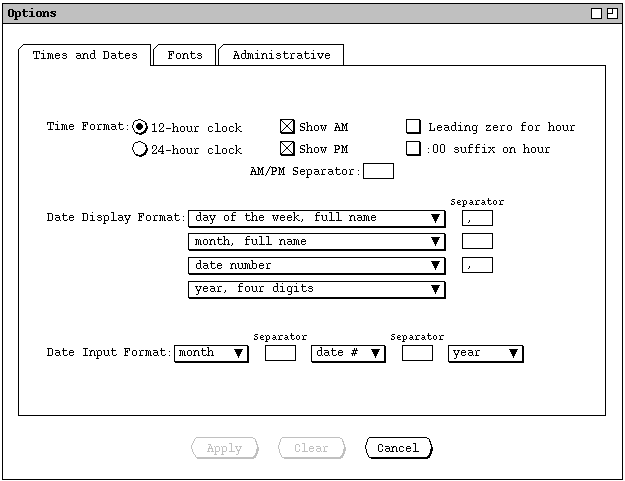
Figure 283: Options dialog for Calendar Tool Administration.
The content of the `Times and Dates' tab in the administrative options is identical with that tab in the regular-user options. These options also have exactly the same functional effect as in the regular-user interface. The appearance of times and dates in the Calendar Tool Administration program is more limited than in the regular-user Calendar Tool. In particular, the only place that times and dates appear in the administrative interface is in the location bookings, described in Section 2.6.4. This means that the time and date option settings are less significant for the administrative user, though again, their effect where visible is the same as for the regular user.
When the administrator selects the `Fonts' tab in the administrative
options dialog, the system updates the display as shown in Figure 284.
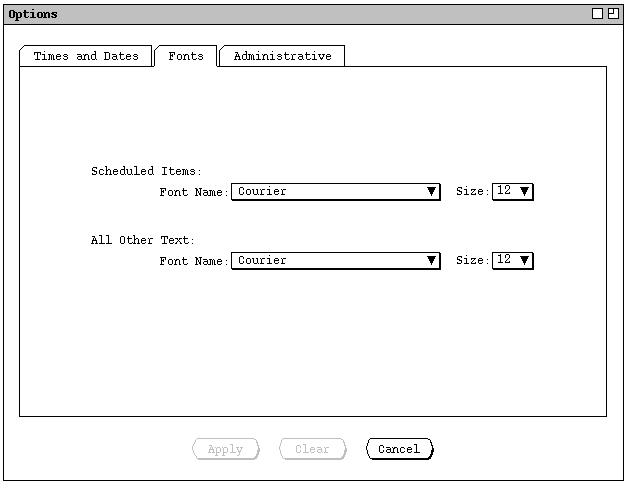
Figure 284: Fonts options tab in the administrative options.
When the administrator selects the `Administrative' tab in the options
dialog, the system updates the display as shown in Figure 285.
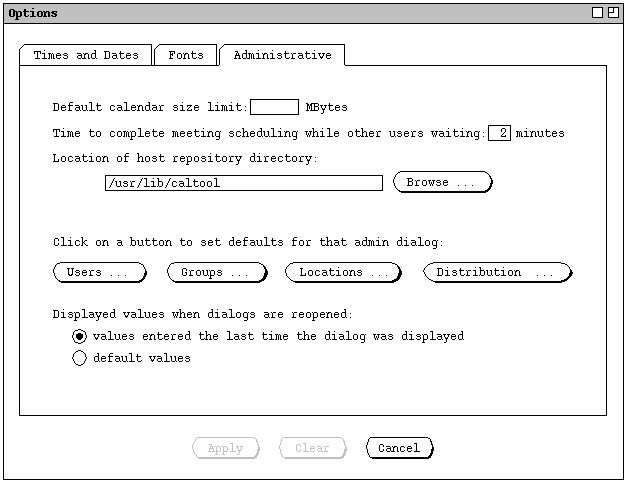
Figure 285: Administrator version of the Administrative options Tab.
The `Default calendar size limit' specifies the default maximum size of all user and group calendars on the central host. The default can be overridden for individual users or groups by changing the size limit for those individuals, as explained in Section 2.6.5.5.
The option for `Time to complete meeting scheduling while other users waiting' is explained in Section 2.4.1.6.9. The administrator can change the time from the default of 2 minutes, if desired. The value must be between 1 and 15 minutes, inclusive.
The option for `Location of host repository directory' allows the administrator to change the repository location. Details of the central host repository and its location are covered in Sections 2.6 2.8.8. Figure 285 show a typical default value for the repository location.
Once applied, a change in directory location takes effect after the administrator exits and restarts the Calendar Tool Administration program. This is the only administrative option that requires a restart.
Changing the location of the repository does not change the location of the repository files and subdirectories. The files and subdirectories must be moved or copied as desired, using the normal file-management commands of the underlying operating environment. The system does not validate the directory until the restart is performed. If the changed-to directory is invalid or contains invalid files, the system responds as described Section 2.8.12.
The default setting buttons under `Click on a button to set defaults for that admin dialog' operate in the same manner as the default-setting dialogs described in Section 2.7.3.1. That is, when the administrator selects one of the default-dialog buttons, the system displays a normal administrative dialog that is augmented for the purposes of setting default values, as described in Section 2.7.3.1. The two radio buttons under `Displayed values when dialogs are reopened' have the same function as for regular-users, explained after Figure 260.
The built-in default values for all administrative dialogs are defined when the
calendar tool is configured for installation (see
Section
). These values are illustrated in the figures of Sections
2.6.2
through
2.6.5
that show the initial state of each administrative dialog.
2.7.8. Restoring Built-In Default Settings
When the Calendar Tool and Calendar Tool Administration program are initially installed, they have built-in default settings for all options. The values for these built-in defaults are those that appear in each of the preceding figures that show the initial state of the option tabs, and the global options dialog.
The built-in settings are overridden by any applied changes in the options dialogs. The user (regular or administrator) can restore the built-in defaults with the `Restore Defaults' command at the bottom of the `Options' menu (both regular-user and administrative). When the user executes this command, the system restores all options to their built-in settings and applies the changes. In the case of the global options, the system both applies and saves the changes. The result is that all tabs are restored to their default states.
If the user wants to retain changed option settings before restoring defaults,
the user must execute a `Save' or `Save Settings' command in
the `File' menu. These commands save applied option settings in the
current calendar or a settings file, as described in Sections
2.8.4
,
2.8.5
, and
2.8.9.
Restored defaults are not automatically saved. To do so, the user must execute
a save command.
2.7.9. Operating Environment Conventions
Some operating environments may have specific conventions for the organization
of the functionality described in this Section (2.7) of the requirements. For
example, this functionality is classified as "Preferences" in some
environments, with conventions for the placement and layout of the Preferences
user interface. Implementors of the Calendar Tool may follow such conventions,
as long as the hierarchical organization and content of the options
functionality is maintained as described here.