The Grader tool has three primary interfaces: Instructor, Student, and TA. The instructor
view provides access to all functionality and data. The TA view is restricted in
functionality in that TAs are not allowed access to the student menu. TAs
can enter and modify grades, but cannot modify the roster or post grades. Students
have an even more restricted view that does not include identification for grades
other than their own. Instead, students see anonymized grades for their peers so that
they can see how their grades compare with the rest of the class without viewing
a specific individual's grades.
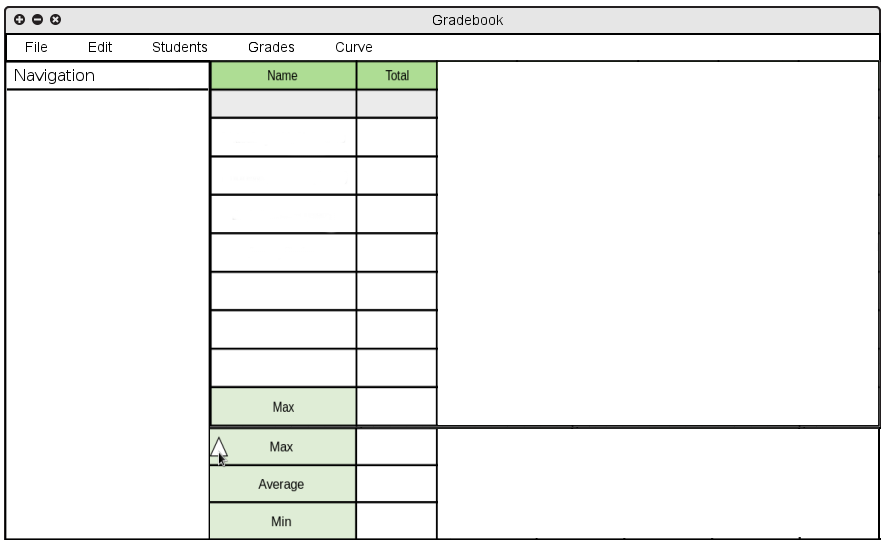
Figure 2.1.1a shows the main screen for instructors.
Figure 2.1.1a
The main screen consists of three main components: the grade spreadsheet,
navigational sidebar, and statistics panels.
The grade spreadsheet contains rows of students and columns of assignments,
and is the main interface for entering grades and provides convenient access
to auxiliary functions such as modifying students and assignments.
The navigational sidebar allows for convenient navigation between classes,
sections, and groups of students. These filters are presented in a hierarchical
fashion, where each class is expandable to show its sections, and each section
is expandable to show any groups of students that exist. Clicking on a class,
section, or group updates the grade spreadsheet to reflect only the relevant
students.
The statistics panel shows statistics about the grades shown in the grade
spreadsheet, such as averages and standard deviations of the grades for each
assignment and the final grades. More details to come.
While the TA interface is nearly identical to that of the instructor, the student
interface has a significant difference: a student does not see personal
information about his or her peers. In addition to the missing student
tab in the menubar (as in the TA interface), the student interface's
grade spreadsheet has anonymized grades for all students except for the student
who is logged in. This ensures that students cannot view each others' grades in
a non-anonymous manner. Figure 2.1.1b shows the student's grade spreadsheet view.
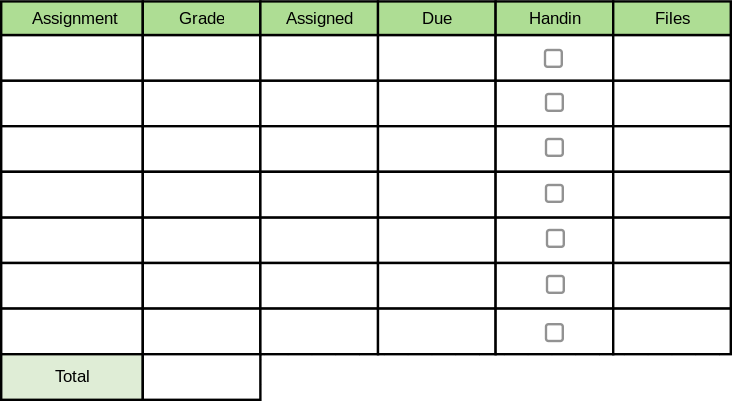
Figure 2.1.1b
Figure 2.1.1c shows an exploded view of the instructor interface menubar.
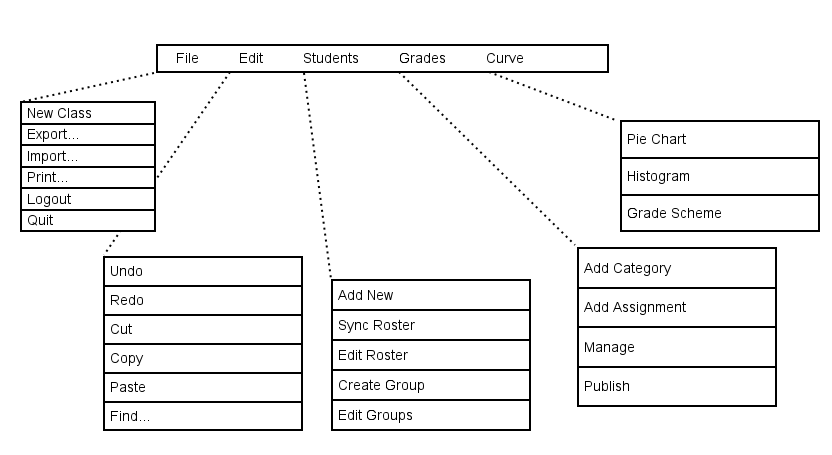
Figure 2.1.1c
Because files are stored remotely on the department server, the File menu consists of a limited set of file functions. 'File -> New Class' creates a new class in the current gradebook. 'File -> Export' exports the current gradebook as a .csv file, and 'File -> Import' imports a gradebook from a .csv file. 'File -> Print' allows the user to print a printer friendly version of the current gradebook (NOTE: Export, Import, and Print are planned features that will not be included in these requirements specifications). 'File -> Logout', intuitively, allows the user to logout and terminate their authenticated session. Finally, 'File -> Quit' exits the program, asking the user if they would like to save any unsaved changes.
The Edit menu consists of standard editing commands. 'Edit -> Undo' undoes the most recent change, and 'Edit -> Redo' steps forward in history, redoing the most recently undone change. 'Edit -> Cut', 'Edit -> Copy', and 'Edit -> Paste' function as expected, cutting, copying, and pasting cells in the grade spreadsheet. 'Edit -> Find' displays a find dialog that allows the user to search for a student or assignment. Lastly, 'Edit -> Preferences' displays the preferences dialog, allowing the user to change personal preferences.
The Student menu contains functions for adding, removing, and modifying the student roster. 'Student -> Add New' opens a dialog for adding a new student to the roster in which instructors can manually enter the new student's information (see section 2.3.1: Adding a Student). 'Student -> Sync Roster' automatically synchronizes the roster with the remote roster (see section 2.8: Server Communication). 'Student -> Edit Roster' opens a dialog allowing the instructor to edit students in the section roster. 'Student -> Create Group' opens a dialog allowing an instructor to organize the class roster into multiple groups (see section 2.3.3: Adding a Group). Lastly, 'Student -> Edit Groups' opens a dialog allowing an instructor to modify the current groups.
The Grades menu contains functions for modifying assignments and adjusting the grading curve. 'Grades -> Add Group' allows for creation of assignment categories. This setup is necessary for creation of assignments, since assignments need to be placed into categories.'Grades -> Add Assignment' opens a dialog for adding a new assignment. Assignments can be added for specific classes and sections, and can be customized in a number of ways (see section 2.4.3: Adding an Assignment to a Course). 'Grades -> Manage' opens a dialog for managing categories and assignments, and allows for modification of individual assignments (see section 2.4.5: Editing Categories and Assignments). 'Grades -> Publish allows instructors to publish final grades at the end of the term to the university servers.
The Curve menu consists of three graphical representations of grading curve data.
'Curve -> Pie Chart' shows a pie chart of student grades (see section 2.6.1:
Pie Chart). 'Curve -> Histogram' shows a histogram
of student grades along with a visual representation of the grading curve (see section 2.6.2:
Histogram). Finally, 'Curve -> Grade Scheme' allows
an instructor to adjust the grading curve for the current section (see section 2.6.3:
Modifying the Grade Scheme).