![]()
This introductory scenario shows an individual user how to create a quiz in their selected tutorial. When authoring a tutorial, the user has the ability to either create a basic tutorial page, an interactive tutorial page, or a quiz.
Once the user selects to create a quiz, a page like that in Figure 2.3.4.a appears. This page allows the user to toggle all the quiz options, and add/edit/delete questions and branches.
![]()
Figure 2.3.4.a: Quiz Creation Page
Figure 2.3.4.a shows an empty quiz creation page. The first text box, labeled 'Quiz Name' allows the user to name the quiz. The next text box, labeled 'Time Alloted (min)', allows the user to set a time limit for this quiz in minutes. Leaving the box blank results in a quiz with no time limit. The last text box is labeled 'Number of Questions Displayed'. This text box allows the user to set the number of questions that make up a quiz. This is useful because it allows the user to have multiple instances of the quiz for the quiz taker. As an example, if the user requests 5 questions to be displayed, but creates 10 questions, the tool selects 5 of those questions and makes a quiz out of them. Then, if the user is forced to or is interested in retaking the quiz, the tool uses the remaining 5 questions to make up the quiz. If there are not enough extra questions to make an entirely new quiz, the tool uses all remaining questions and fill in the rest of the spots with already displayed questions. The first check box, labeled 'Lock Quiz', allows the user to toggle whether the quiz taker is able to browse away using the table of contents while taking the quiz. Checking this box does not allow for browsing, while leaving it unchecked does. Directly to the right of that, is another check box, labeled 'Display Answers On Failure'. Checking this box ensures that the answers to questions are displayed to a quiz taker even if they fail the quiz. The default is to not allow the answers to be seen for a failed quiz. The next two check boxes, labeled 'Randomize Question Order' and 'Randomize Answer Order', give the user the option to have the tool randomize the question and answer order everytime the quiz is displayed. More specifically, checking these boxes means that the questions and answers are not be displayed to the quiz taker in the order that the user created them in. Instead, they are displayed in a random order, which is different everytime the quiz is brought up for taking. The next section of the page is dedicated to question creation. A question has the fields 'Type', 'Weight', 'Corresponding Section', and 'Question'. These fields are explained more fully in Section 2.3.4.1 and Section 2.3.4.2. The user can 'Add', 'Edit', 'Delete', and reorder a question. The next section of the page is dedicated to branch creation. A branch has the fields 'Page to Branch to', 'Below', 'Corresponding Section', and 'Fail Dialogue'. These will be explained more fully in Section 2.3.4.3. The user can 'Add', 'Edit', and 'Delete', a branch. An ellipsis in these fields signifies that there is actually more text than visible. The user can also choose to add a question. Once the user clicks 'Add' under questions, they see a dialogue like that in Figure 2.3.4.b.
![]()
Figure 2.3.4.b: Question Type Choice
From here they can select the type of question they would like to add. For more information on 'Add a Multiple Choice Question', see Section 2.3.4.1. For more information on 'Add an Interactive Question', see Section 2.3.4.2. The user may also click 'Add' under branches. For more information on adding a branch, see Section 2.3.4.3. The user may also edit, delete, and reorder questions and branches, for more information see Section 2.3.4.4. Figure 2.3.4.c shows a quiz creation page that has been filled in, with questions and branches added.
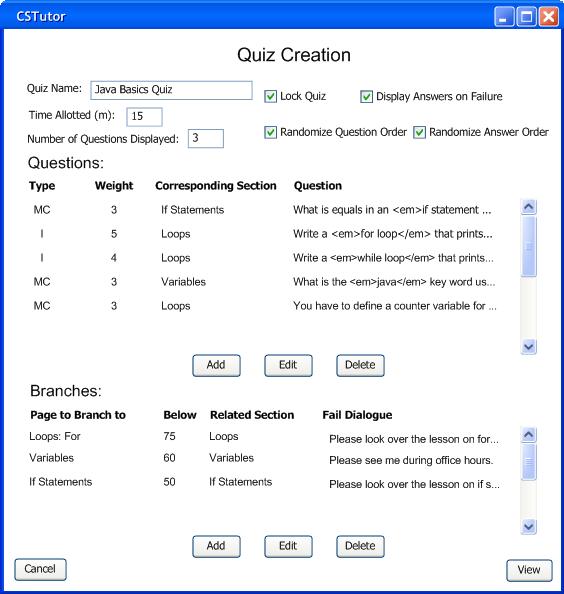
Figure 2.3.4.c: Quiz Creation Page Example
As shown, all check boxes have been filled in, this quiz allows 15 minutes for completion, and is made up of 5 questions and 3 branches. At this point, the user has many options. They can add, edit, and delete questions and branches, reorder questions, toggle options, or view the final quiz. See all subsections at the bottom of this page for more information on these actions. Once done, the user selects 'View', and is taken to Figure 2.3.4.d.
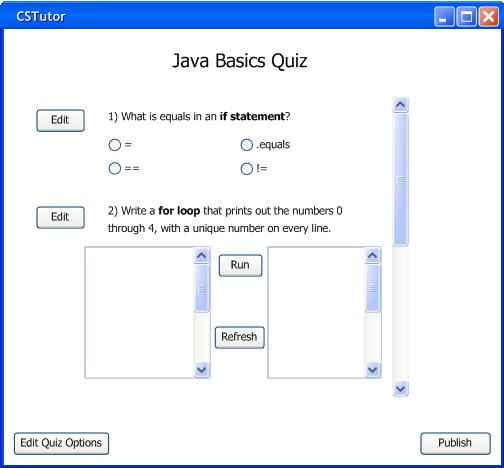
Figure 2.3.4.d: Quiz Overview
Here the user can see the questions as the quiz taker sees them. To change an existing question, the user can click the 'Edit' button next to every question. This takes the user back to that question's creation page, for more information on editing quesitons see Section 2.3.4.4. The user can also select 'Edit Quiz Options' and be taken back to the quiz creation page shown in Figure 2.3.4.c. Finally, when the user has finished viewing their quiz, they can click the 'Publish' button to publish the quiz.
Further information about quiz creation is in the following subsections: