2.7 Student/Professor Interaction
The program provides a simple chat facility and student groups
to allow students to communicate with their professor and their peers.
2.7.1 Student Question Asking
The program allows the students to ask a question to the professor
using the chat function. The student simply double clicks on the
professor's name on th roster list, then enter the question into
the chat. The program displays the question in the queue until
either the professor or the student have closed the chat. Unlike
a 'normal' chat window, the queued questions does not automatically
pop up a chat window for the professor.
To ask a question, the student does the following:
- Double-Click on a professor's name in the
roster display
- Enter the question into the chat window that the program displays
- The program then adds the student to the current queue of students
with questions in the roster display
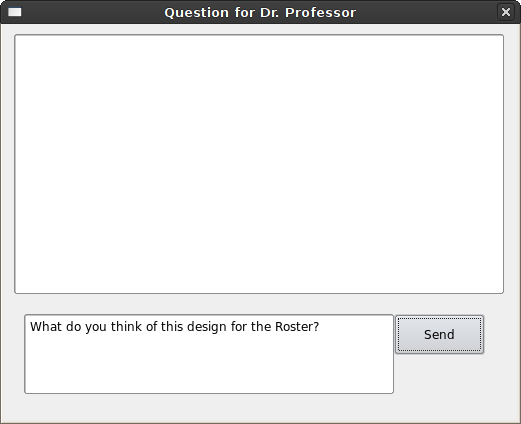
Figure 2.7.1 - Question Chat Window Example
This is a screenshot of a user asking a question to the professor. As soon
as the user clicks 'send' he or she will appear in the
roster's question queue.
To respond to a question, the professor does the following:
- Double-Click on the student's name in the
roster display
- Read the student's question in the chat window the program opens
- Type any response to the student's question into the chat window
- The program displays the text in the chat window on the student's
computer
- When the question has been answered, the professor simply closes the
chat window. This removes the student from the question queue.
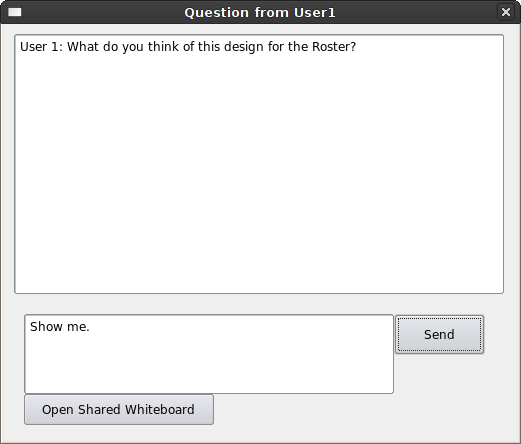
Figure 2.7.2 - Answer Chat Window Example
Once the professor double-clicks on the student's username in the
roster the program displays this chat window
with the user's question. The professor may elect to either answer back in
text, or they may pop-open a 'shared whiteboard' which allows both the student
and the professor to use the drawing tools in a shared
space.
To create a 'shared whiteboard' between a professor and a student while
in a chat, the professor does the following:
- Click on the 'Open Shared Whiteboard
- The program adds a tab to the
slide viewer that is the 'shared whiteboard'. Both the professor
and the student can use the drawing tools on
this shared whitespace. The chat window displays a message ever time
that activity occurs in the drawing window
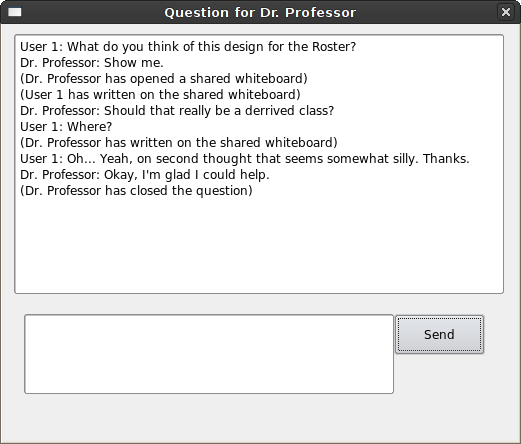
Figure 2.7.3 - Completed Question and Answer Chat
Once the professor has answered the question and closes the chat window
the program removes the user from the roster's
question queue. The program also displays a message in the chat window.
2.7.2 Student Groups and Chat
The program has a groups feature that allows a subset
of the class to interact among themselves.
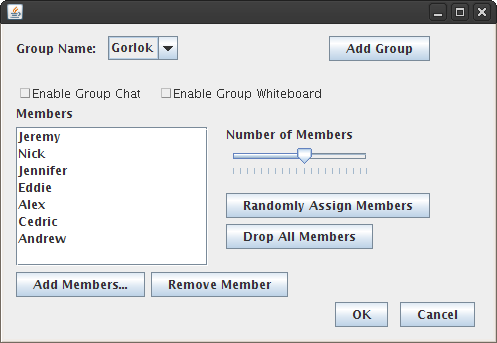
Figure 2.7.1 - Manage Groups Dialog
The Manage groups dialog. From there the user can add users, remove users, and
randomly assign group members to a group. The User can also access the 'Add
Group' dialog from the 'Add Group' button.
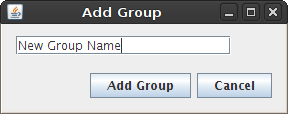
Figure 2.7.2 - Add User Dialog
The add user dialog. The user can add a new group using this dialog.
To add a new group the user does the following do the following:
- Right-click on the 'Groups' header and select "Manage Groups" from
the drop down menu, -or- Select 'Manage Groups' from roster menu.
- Click the add group button.
- Enter the desired group name in the dialog
- The program will add an empty group with the entered name to the list
of current groups.
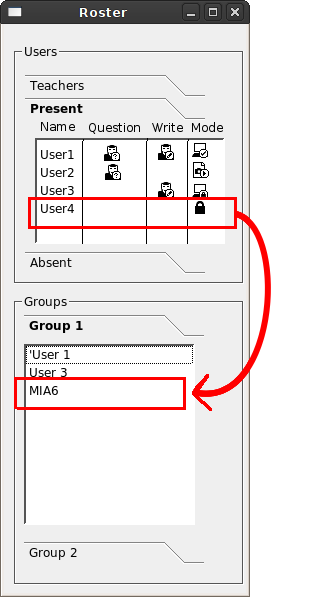
Figure 2.7.3 - Assigning a Member to a Group
To add members to a group, the teacher can click and drag names into a group.
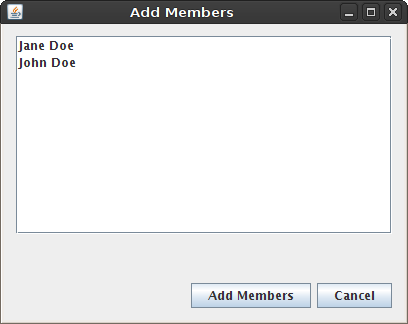
Figure 2.7.4 - Assigning Members to a Group
To add members to a group, a teacher can also use the 'Add Members' Dialog box.
To add users to a group the user does the following:
-
- Select any number of users from the current roster
- Click-and-drag the users from the roster to the desired group
heading or that group's 'Group Management' Dialog
- -Or
-
- Open the desired group's 'Group Management' Dialog by selecting
'Manage Groups' from the Roster Menu or right-clicking on the group
- Clicking the Add Members Button
- The program then displays the add members dialog
- The user selects the desired users and click "Add members"
- The Program adds the desired members to the desired group
To remove users from a group, the user does the following:
- Select the desired users from the desired group in the group
listing
- Click and drag the users away from the group listing -or-
right-click and select 'remove users from group' from the
right-click menu
- -Or-
- Open the mange group dialog by using either the group's right-click
menu or the Roster menu's "Manage Group" option.
- Select the names the user wishes to remove.
- Click the "Remove Member" Button
The program will remove the members from the group.
To join a group chat, the user does the following:
- Double-Click on a group name on the roster list.
- If the user has permission to join the chat, the program displays
a chat window
The program also provides users the ability to chat to each other
individually, although the teacher has the option to turn this off.
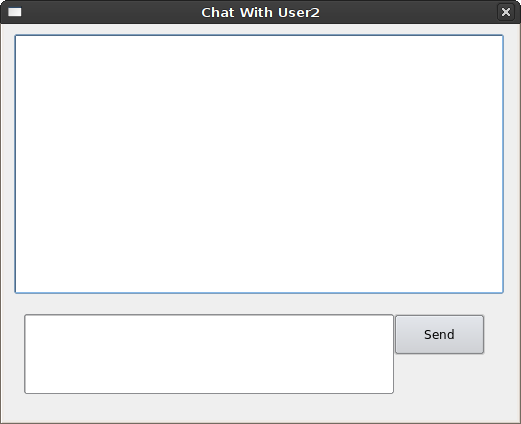 Figure 2.7.4 - Chat Window Example
User-to-user chats, students asking questions of professors and group chats
all use a window like this.
To chat with another user, the user does the following:
- Double-click the user they wish to chat with.
- The program does opens a new window with the chat functions
2.7.3 Multi-Participant Interaction
These group tools can be combined with the drawing tools and the layer controls, allowing the
professor to make lecture much more interactive.
Consider the following scenarios:
- During a lecture, the professor asks a question of the students. The
students answer the question using their own public layer. Then the professor
chooses a student and shows his or her answer on the main screen, using
drawing tools to annotate the student's answer.
- Or, the professor could choose a student publish his or her public
layer immediately. The student would use the drawing tools to work out the
problem or question. As the student works, the program would automatically
show drawing the student has made so far.
- During a lecture, a student could ask a question to the professor.
To clarify the student and the professor can use chat and then write the
answer on the main screen by publishing the student's public layer
- The professor may ask the students to work together in groups.
Each group would use the chat and that group's private layer to come up with a
response, then one of the group members could publish it to the main screen.
- Alternatively, the professor could give all the members of one group access
to the main screen, allowing the rest of the class to observe the group's drawing
as it happens.
- If the professor wished, he could allow all the members of the class to
write on the main screen at once. This would be useful for a virtual
'show of hands'
Prev: Roster
| Top: functional requirements


 Figure 2.7.4 - Chat Window Example