2.5.1. Instructor Database
There are two instructor databases. One is a permanent database that all of the projects draw from. When a project is created, it makes its own local database based upon the information from the permanent database. Either database can be modified at any time, and the local database can be used to make updates to the permanent one via the command 'Project->Reconcile Databases'.
2.5.1.1. Permanent Instructor Database
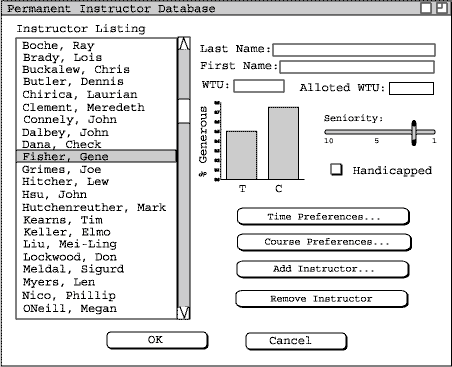
An administrator can add and remove instructors to the database, as well as change their preferences and settings. To access the entire database, select 'Instructors' in the Database menu. The following dialog will appear:

Figure 1
All of the instructors in the database are on the left, and their information will show up in the fields on the right when highlighted. The fields on the right show their first and last name and their work time units (referred to as WTU). A slide bar shows their seniority level, where a 10 represents the highest seniority and a 0 is the lowest. Two bar graphs will appear, showing their "generosity" levels for time and courses. Equations for this information can be found in Section 2.3.4..
2.5.1.1.1. Adding and Removing Instructors
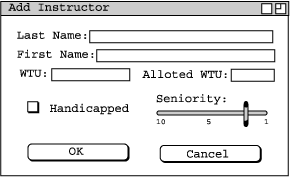
To add an instructor, click the "Add" button. The following dialog will appear:

Figure 2
Enter in the instructors first and last name in the correct boxes. Enter in their WTU, and move the slider bar over to select this instructor's seniority level. Click "OK" to accept this instrctor.
To remove an instructor, highlight the intructor you wish to remove and click "Remove". A dialog will confirm that you do want to remove this instructor. Click "OK" to proceed with their removal from this project.
2.5.1.1.2. Time and Course Preferences
To change time and course preferences for an instructor, click on the buttons labeled "Time Preferences" and "Course Preference". When "Time Preference" is clicked, a dialog like the one in Section 2.3.2 is shown. When "Course Preferences" is clicked, a dialog like the one in Section 2.3.3 is shown. Refer back to these secitons to see how to use the dialogs.
2.5.1.2. Local Instructor Database
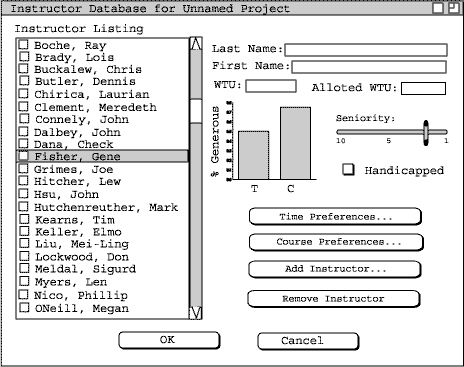
To modify the local instructor database, choose the command 'Project->Instructor Database'. A dialog very similar to the one for the permanent database is shown below.

Figure 3
The only difference is the presence of checkboxes. The checkboxes signify which Instructors will actually be used when creating the schedule. All instructors, regardless of whether they are currently being used, may have their preferences changed. This is done in the same manner as the permanent database. You may also add and remove instructors permanently from this database. Note the difference between an instructor's removal from the local database and not being used in the local database. If an instructor is simply not being used, but may be used later, the checkbox should be used to not include the instructor in the schedule. I the instructor is to be removed permanently, the "Remove" button should be used. When the "Add" button is clicked, an instructor is added in the same manner as for a permanent datbase. The instructor will also be considered "used" as a default setting.
Prev: None
| Next: Course Database
| Up: Database Management
| Top: Index


