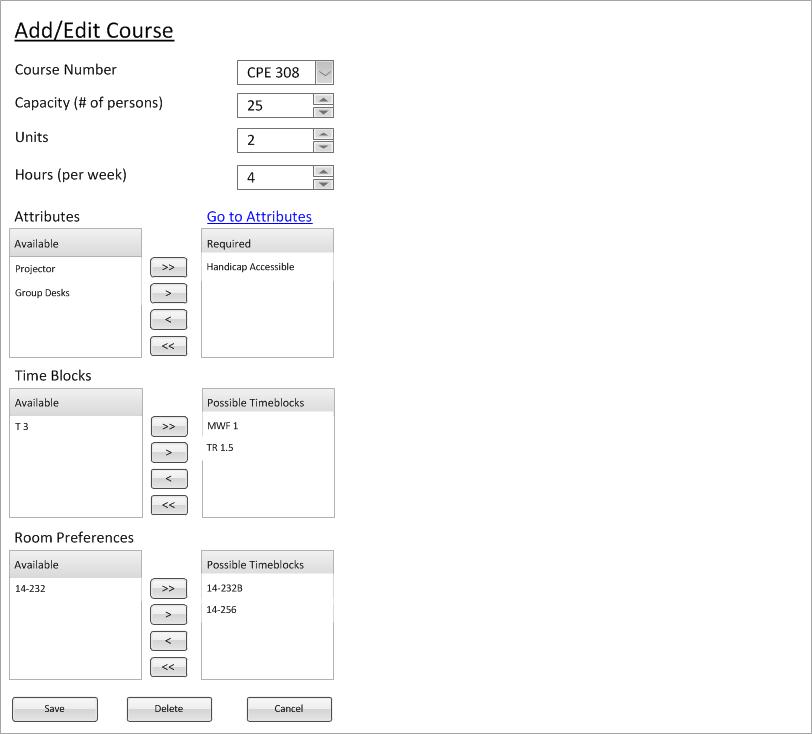
The user holds ctrl or shift on the keyboard and selects two or more courses. This scenario shows what happens with only two courses selected but can be easily extended for more than two courses. In this example, the user selects two courses, CPE 308 and 309. After the user selects these courses the following context window is displayed (figure 1).
Figure 1: Initial Course Management Screen for Muliple Courses
This multiple selection allows for the user to modify many courses at once, say if you have a building number change or have just added a new piece of technology to several courses. The following will briefly explain the interactions with this screen but will leave the extended details to the modify and delete scenarios.
When the user does anything within the context menu, it is preparing to be done to all the currently selected courses. Note that the course number box is greyed out; the user is unable to modify the number[and optional name] of a single course while multiple courses are selected. Also note that there is no dot on the map for these courses. All the other fields and buttons are enabled and interact on all courses selected. Note: exactly like the single selected scenarios, the database is unaffected until the Save button is pressed.
The user wishes to change all of the selected courses to a different unit count and clicks spinner next to the unit input and changes the value.
This value is not changed until save is pressed (explained later in the document).
The user wishes to change all of the selected courses to a different hour count and clicks spinner next to the hour input and changes the value.
This value is not changed until save is pressed (explained later in the document).
The user wishes to change all of the selected courses' capacity and simply clicks the capacity box and modifies it to the value for all the courses.
Figure 2: Capacity Boxes Based on Previous Values
This figure shows the two possibilities for the current example with courses 301 and 302 selected. Since both courses have the capacity of "30", the capacity value is their joint value "30" (left figure). However if all the courses do not have the same capacity, a "?" will take the place of the value, (right figure). The "?" symbolizes that the values of the capacities of the courses are different.
If the user wants to change all of the currently selected courses to the same value, they simply update the value in this box. This value is not changed until save is pressed (explained later in the document). If the value is a "?" when validation checks are happening, the value is not updated in any of the courses (ie they maintain their previous value).
This functionality operates almost identically to as room management. For more thorough explanation of how you add and remove attributes from a course look at the modify multiple rooms page.
The Save, Cancel, and Delete buttons work the same as the single selection buttons except that they commit the changes to all the currently selected courses (with a couple exceptions) instead of just a single course.
When Save is pressed, a dialog pops up asking the user if they are ready to commit the changes. The current state of the course (all the fields) is first validated and then the database is updated accordingly:
If the user presses Cancel, a dialog pops up asking the user if they are ready to throw away the changes (if any have been made). The window closes and returns to the workspace from which course management was called. No updates to the database are made.
If the user presses Delete, a dialog pops up asking the user if they are sure they want to delete the selected courses. This is a very dangerous operation and should be used very sparingly because many other values in the database depend on the courses being in the database. If the user confirms, each course goes through the same delete operation that is more clearly defined in delete.

