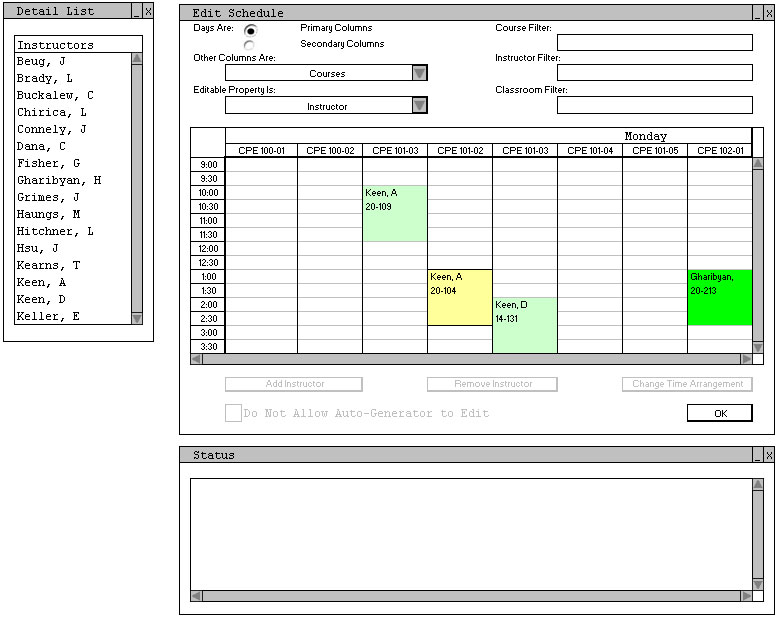
The schedule edit mode is accessed by clicking the 'Edit the Schedule' on the bottom of the View Schedule window. When in edit mode, three windows are always present: the Detail List window, the Edit Schedule window, and the Status window, all of which are shown in Figure 2.6.2-1. The windows shown in Figure 2.6.2-1 are filled with instructor information which was inputted through the Instructors category and with schedule information generated by the application after clicking 'Generate the Schedule'.
Figure 2.6.2-1: Windows present when first entering Edit Mode.
This interface is highly customizable, and the user rearranges it to best fit the operation which he or she is performing. The configuration shown in Figure 2.6.2-1 has the days selected as the primary columns (by the radio buttons at the top of the Edit Schedule window), meaning that the largest columns will be days and the smaller columns will be whatever is selected in the 'Other Columns Are:' dropdown box, which in this case is Courses. The options for the 'Other Columns Are:' dropdown box correspond to the three other categories used in the schedule: courses, instructors, and classrooms. The 'Editable Property Is:' dropdown box specifies what is listed in the Detail List window, and the options for this dropdown are also courses, instructors, and classrooms, however only two of these options will be available at any one time, with the missing option being the one selected in the 'Other Columns Are:' dropdown box.
This interface is based on dragging and dropping, and many items are moved by using the mouse. In the configuration used in Figure 2.6.2-1 if the user wants to edit the time at which D. Keen is teaching CPE 101-03, he or she selects the currently scheduled configuration by clicking once in the first half hour of the course (here this is the 2:00 - 2:30 PM cell) in the 'CPE 101-03' column, or by double-clicking anywhere in the time period which is currently scheduled for the course (here this is between 2:00 and 4:00 PM). A selection is denoted by a bold border around the cells. Single clicking in a cell which is not the first cell of the course will be discussed later. After selecting the course as it is currently scheduled, it may be dragged up or down the column to change the time at which it is scheduled. Figure 2.6.2-2 illustrates selected cells and dragging a course to change its scheduled time. Normally, attempting to drag a course to another column would display the invalid operation cursor. The only time when dragging from one column to another is valid is when the drag is from columns within the same course and section. For example, if the user would like to move CPE 101-03 from a Monday, Wednesday, and Friday schedule to a Tuesday, Thursday schedule, he or she could drag the course from Monday, Wednesday, or Friday to either Tuesday or Thursday (this assumes that a Tuesday, Thursday time arrangement was also specified for the course under the Edit Course screen, otherwise the drop would not be allowed).
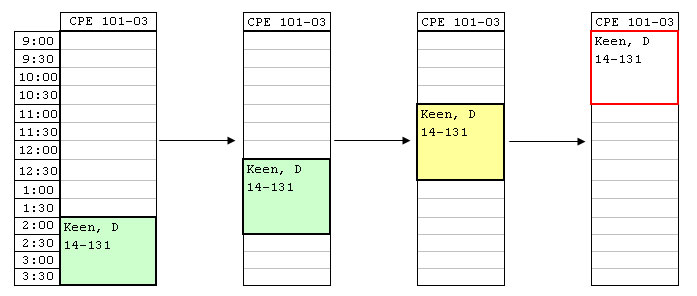
Figure 2.6.2-2: How visual queues change when changing a course's scheduled time.
As shown in Figure 2.6.2-2, a course's background color changes as its scheduled time is changed. This color represents an overall rating on how well this course is scheduled. The color is determined by a number of criteria. All levels of the rating system are illustrated in Figure 2.6.2-3. Note that in Figure 2.6.2-2 when the course was moved to start at 9:00 AM a critical conflict occurred; this particular conflict occurred because D. Keen was teaching another course sometime between 9:00 AM and 11:00 AM. The criteria of the rating system and critical conflicts are discussed further in the how the schedule is generated section.
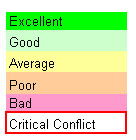
Figure 2.6.2-3: Schedule rating system.
The exact reasons behind why the rating of the course's scheduling is going up or down can be determined by checking the Status window, which is visible at all times. For the move shown in Figure 2.6.2-2 the Status window would change as displayed in Figure 2.6.2-4. The bar along the left side of the Status window changes to the same color of the cell background on the schedule. Note that for the final Status window it has been scrolled down to show more detail.
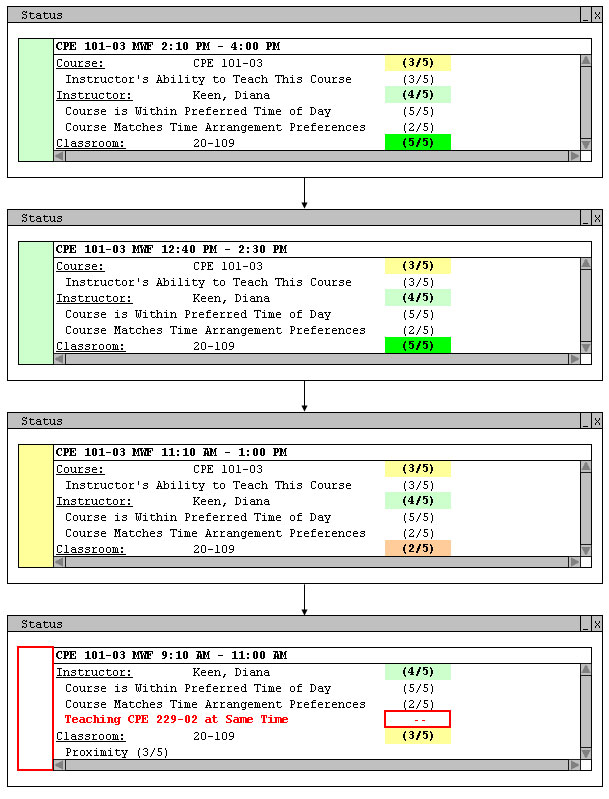
Figure 2.6.2-4: Status window changes while changing a course's scheduled time.
The Detail List window gives the user the ability to add information to the schedule, not just to edit existing data. To change which instructor is teaching a course, the user needs to drag the new instructor into the Edit Schedule window and release the mouse over the cells associated with a given course. If no time is set for a course, the instructor may be dropped anywhere in the column and a schedule block is created with a time length equal to that given in the first specified time arrangement under the Edit Course window which includes the day where the instructor is being dropped. If no time arrangement includes the day where the drop is being attempted, an invalid operation cursor is displayed and the drop is be allowed. If two time arrangements include the day where the drop is being attempted, the second one may be used by first dropping the instructor and then using the 'Change Time Arrangement' button on the Edit Schedule Window, which will cycle through the time arrangements available for that course and that day. As the instructor is dragged over different cells in the grid, the Status window changes to display details about how well the instructor will fit if he or she is dropped there. The background color of the cell also changes as if the drop had already been made, allowing the user to quickly see where the instructor should go.
For a more efficient way of placing information on the schedule, the user first selects where the information will be placed in the Edit Schedule window. When a selection is made by clicking a cell in the schedule grid, the selection size automatically expands to the size of the first time arrangement for the course to which the column of the clicked cell corresponds, and which includes the day to which the column of the clicked cell corresponds. Making this selection will also highlight the items in the Detail List window as to how well they will fit into the given spot. Highlighting is done using the same rating system shown above. An example Edit Schedule and Detail List are shown with a selection made in Figure 2.6.2-5, with the selection denoted by the bold border.
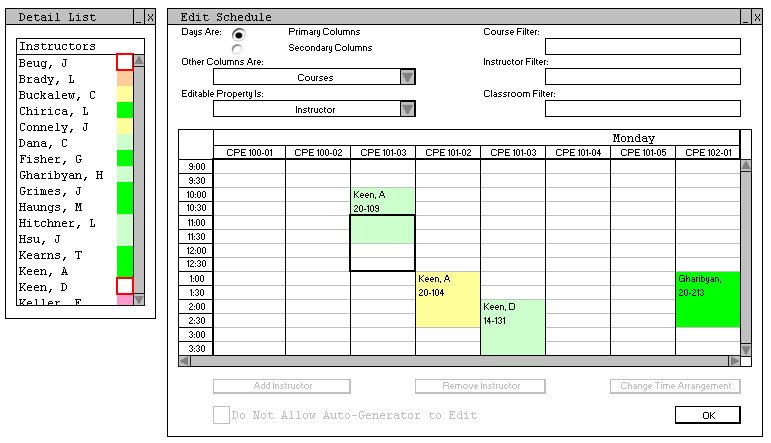
Figure 2.6.2-5: Edit schedule and detail list windows when a selection is made
Note how a time period from 11:00 AM to 1:00 PM may be selected because a single-click did not select the already scheduled time. By selecting a time period different than the one already set for the course and section, the user is changing both the scheduled time and instructor. Since a classroom is already associated with this course, the highlighting done in the Detail List window takes into account the availability of the room at the desired new time. The highlighting of the Detail List window is the same as the cell in the schedule would be if that instructor were placed in the selected area. Once an instructor has been chosen, he or she may be assigned to the selected area by dragging his or her name from the Detail List window to the selected area, or by clicking his or her name in the Detail List window, and then clicking 'Add Instructor' (which becomes active) on the Edit Schedule window. A confirmation dialog such as that shown in Figure 2.6.2-6 is shown. Classrooms could be added in a way very similar to instructors simply by changing the dropdown box labeled 'Editable Property Is:' to 'Classroom', in which case the Detail List window would then list classrooms to be placed in the schedule.
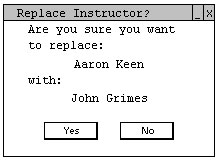
Figure 2.6.2-6: Confirm dialog for the replacement of an instructor for a scheduled course.
The filtering textboxes at the top right of the Edit Schedule window are used to narrow down the amount of information which is viewed by the user. In our examples, if the user only wanted to see sections of CPE 101, he or she types 'CPE 101' in the 'Course Filter' textbox and all columns which are not for CPE 101 sections are immediately removed. The filters work in real time, and the number of displayed courses changes instantaneously as the user types. The instructors in the Detail List window can be narrowed down in a similar way using the 'Instructor Filter' textbox. For our examples the 'Classroom Filter' has no visible effects until the 'Editable Property Is:' dropdown is changed to 'Classroom'. Figure 2.6.2-7 shows the example windows filtered to show only CPE 101 sections and only instructors whose last name starts with "H".
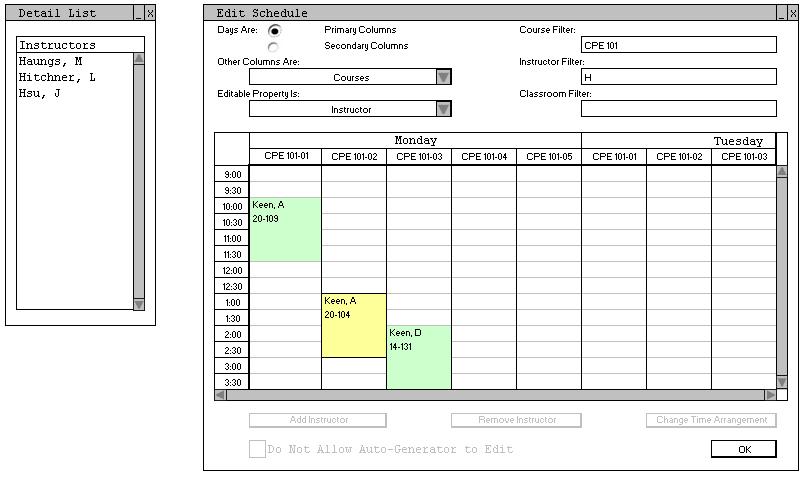
Figure 2.6.2-7: Edit Schedule and Detail List windows while using filtering.
Sections one through three are not held on Tuesday or Thursday, and so no schedule blocks appear in the Tuesday columns. Sections four and five of CPE 101 are held Tuesday and Thursday, and so schedule blocks appear under these columns for Tuesday when the grid is scrolled right.
Any changes made using this manual edit mode are retained even when doing a schedule update. Scheduled blocks which are locked to the auto-generator are denoted with a solid black outline (this may be seen in Figure 2.6.2-7 for CPE 101-02). To unlock one of these blocks, the block should be selected as described above, which will make active the checkbox at the bottom of the Edit Schedule window labeled 'Do Not Allow Auto-Generator to Edit', and this box should be cleared. Conversely, if the auto-generator schedules a block which the user does not think should be changed later, this option may be set to checked to hold it in place through subsequent re-generations. If all manual changes are to be discarded the user should erase the schedule.