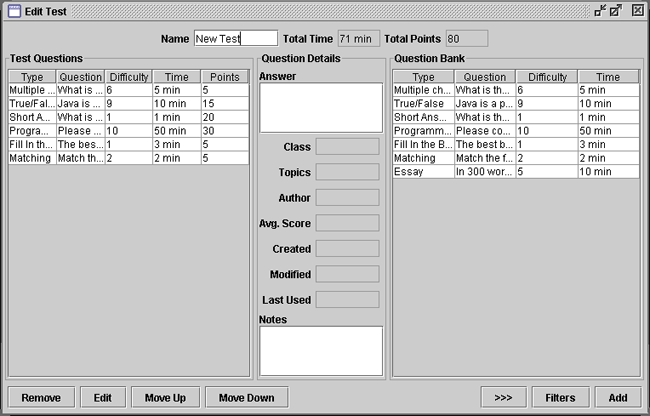
After invoking the Edit Test function, the instructor faces the main Edit Test screen as illustrated in Figure 2.2.3.i1.
Figure 2.2.3.i1: The Edit Test Interface
Located immediately beneath the window title bar is an information panel which shows information about the test. In this panel are several text fields containing the test Name, Total Time, and Total Points. The test Name is editable, meaning the instructor can change the test name from this screen. The Total Time field consists of a running tally of the estimated time attribute taken from each question. The field will change whenever the instructor adds or removes questions from the current test. The Total Points is a sum of the total points taken from each question. This is also updated whenever the instructor adds or removes questions from the test.
Located below the information panel is the main area of the window. It contains two side by side spreadsheet style interfaces displaying lists of questions. In the middle of these two windows is a Question Details panel. The left spreadsheet panel labeled Test Questions displays all of the questions located in the current test. The questions in this window are listed in the order they will appear in the finished test. The right spreadsheet panel labeled Question Bank displays all of the questions located in the currently selected Question Bank. Each of these spreadsheet question windows contain up to five columns with headings. Common to both windows are Type (type of question), Question (the question text), Difficulty (difficulty of the question), and Time (estimated time to complete the question). The Test Question window is the only one that contains the Points column. This is so the instructor can change and adjust points for a given question in relation to the current test. When the instructor clicks a row of a particular question, that row becomes highlighted, meaning it has been selected. Conversely, the instructor can deselect that question by clicking it again. The purpose of this will become apparent when adding and removing a question, as discussed in 2.2.3.1 "Add Question" and 2.2.3.2 "Remove Question". In the Question Bank half of the window, each column heading can be clicked once in order to sort the questions by that column in descending order. The same heading can then be clicked again to sort by that column in ascending order. This action makes it easier for the instructor to manage and look through the question list.
The middle section, entitled Question Details, contains extended information about the currently selected question. Figure 1 shows these extra attributes. Once a question has been added to the test, it is listed under the Test Question side of the window and the instructor is able to modify the Answer and Notes categories until they are satisfied. These are not editable while browsing in the Question Bank side of the window.
At the bottom of each side of the window are toolbars containing buttons that the instructor can click to perform operations. Located under the Test Questions window is the Remove button, which will be discussed in 2.2.3.2. The Edit button allows the instructor to edit a particular question only after it has been added to the test. Clicking this button will open the edit question window, which is discussed in section 2.3.3.4 "Edit Question". The Move Up and Move Down buttons move the currently selected test question up or down in the list, respectively. Located under the Question Bank window is the Filters button, which is the same as the Filters button discussed in section 2.3.3.1.3 "Filters". This allows the instructor to filter out certain questions, so that managing and adding questions to the test is simplified. The Add button is discussed in section 2.2.3.1.
The user is also able to collapse the Question Bank window by clicking the >>> button. This will allow more room for the Test Question window. The button can be clicked again to expand the Question Bank window. The Filters and Add buttons will be greyed out when the Question Bank is collapsed. Figure 2.2.3.i2 below illustrates the collapsed view of the Question Bank.
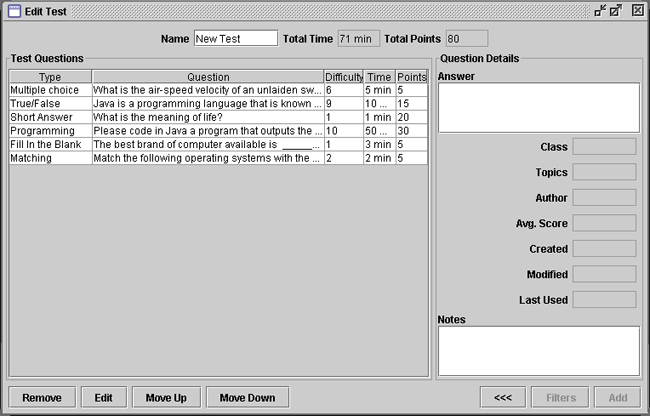
Figure 2.2.3.i2: Collapsed Question Bank View
If the instructor clicks the close button on the title bar, then a message pops up asking whether they would like to save or discard all changes since the last save. This process is illustrated in Figure 2.2.3.i3.
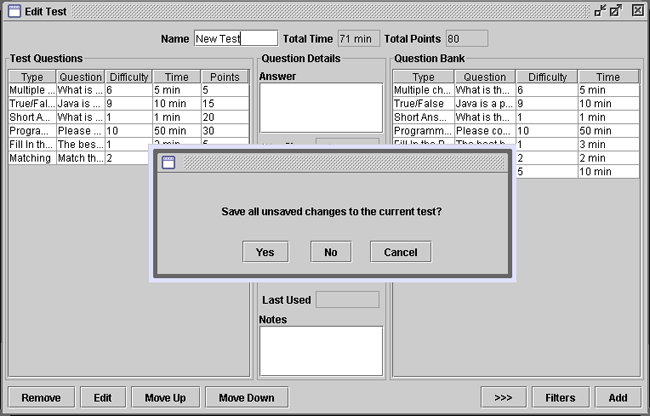
Figure 2.2.3.i3: Closing a Test
If the instructor clicks No then all changes are discarded and the test is closed. If the instructor clicks Yes then all changes are saved and the test is closed. If the instructor clicks Cancel then nothing happens and the test remains open for the instructor to interact with. The instructor can click File > Save from the main test tool window tool bar to save the current test.
This scenario illustrates the adding of one or more questions to an existing test.
Once the instructor has selected a question from the Question Bank section of the window, the instructor then clicks the Add button. When the instructor does this, a dialog box appears asking the instructor to specify how many points the question will be worth on the test it is being added to. This value must a valid numerical input. The instructor is not able to add a question that already exists in the test. This is illustrated in Figure 2.2.3.1.i1.
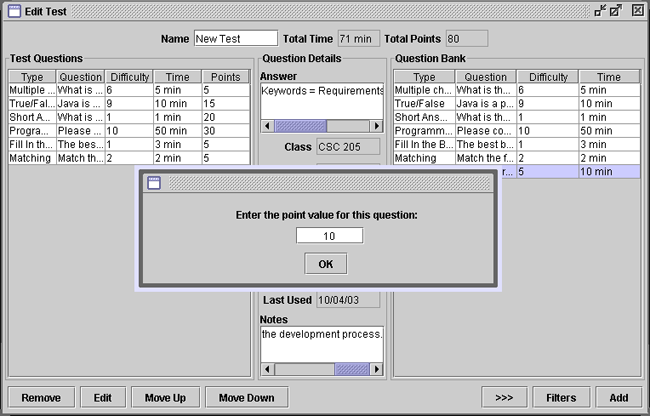
Figure 2.2.3.1.i1: Adding a Question
After the instructor enters the point value, the instructor clicks OK and the question is added to the end of the test. The instructor can then use the Move Up and Move Down buttons in the Test Questions part of the window to move the question(s) to the desired position in the test. Also, the instructor is now able to use the Edit button, discussed in section 2.3.3.4, to edit question attributes as well as use the center Question Details panel to modify Answer and Notes attributes. Figure 2.2.3.1.i2 shows the edit test interface after adding a question.
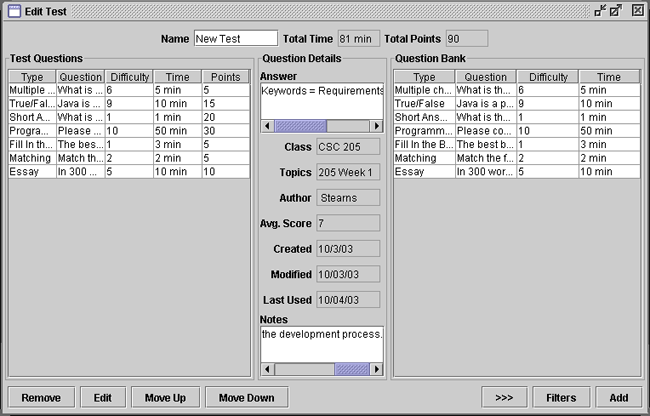
Figure 2.2.3.1.i2: After Adding a Question
This scenario illustrates how a instructor removes a question from the test.
At the Edit Test screen, the instructor selects one or more questions to be removed by clicking the row of the question in the Test Questions section of the window. Then by selecting the Remove button, a dialog box appears asking if the instructor wishes to really remove the question(s). This is illustrated in Figure 2.2.3.2.i1.
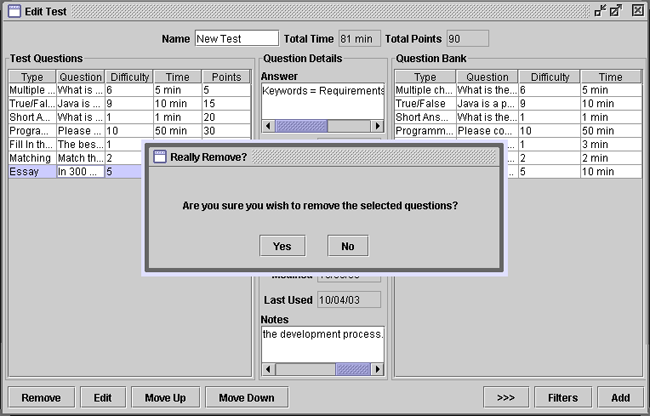
Figure 2.2.3.2.i1: Removing a Question from the Test
The instructor has the option of clicking the Yes or No buttons to the desired effect. The No button does nothing and returns the instructor to the main Edit Test screen. The Remove button will be greyed out until the instructor selects one or more questions on the current test.
| Prev: 2.2.2. Manual Generation |
Up: 2.2. Test Generation |