The scenario in this section shows a user creating a quiz and its elements so that it can be included in a lesson. Topics include:
Assume the user has added a few nodes to a new Lesson and now wants to
include a quiz. The user wants to have a new node dedicated to this quiz so
they first select Add Quiz Node from the Authoring menu to
which the system responds by adding a new node to the roadmap and
by displaying a new node window that has no contents. Now the user can add
both node and quiz elements to the new node. For example, the user may use
the standard Node tools (line, curve, image, etc) and also the Quiz tools
(such as add question).
2.3.2. Adding a Question
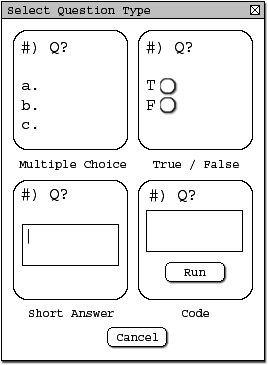
The first thing the user wants to add is a question. To do this, the user selects Add Question from the Quiz Tools submenu of the Authoring menu. The system responds by displaying a dialog titled Select Question Type shown in Figure 1.
Figure 1: Select Question Type dialog.
The Select Question Type dialog contains five buttons; a standard cancel button used to abort adding a question and four larger buttons for different question types. The question types available are Multiple Choice, True/False, Short Answer and Code. The first question that the user wants to add is a multiple choice question and so the user clicks the Multiple Choice button. The system responds by adding a template multiple choice question to the quiz node. This question is assigned the number 1 because it is the first question to be added to the quiz. There is dummy text to indicate where the user will type in the question. The multiple choice template has two choices for answers which also have dummy text filled in to indicate where the user will type in the answers that they want the user taking the quiz to choose from. Figure 2 shows the quiz node with the multiple choice template added.
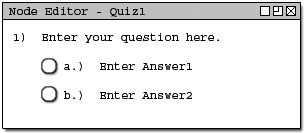
Figure 2: Quiz Node with a multiple choice template.
Now that the user has added the template for the first question, they want to fill in its content. In order to do this, the user first selects the Text Tool from the Node Tools toolbar. The user then moves the mouse over the area of dummy text corresponding to the actual question. They then click the left mouse button to drop the cursor into the text. They may now begin editing the text. See the Text Tool scenario for more information on text editing. The user then follows the same procedure to edit the answers a and b. The user decides they want a third option for their multiple choice question. To add a third choice, the user moves the text cursor to the end of the second choice and presses the Enter key. This advances the cursor to the next line and automatically generates template data for the new third choice. This template data is similar to what is seen above in Figure 2. The user then replaces the template data with the text they want. Now the user must tell the system which answer is the correct answer. In order to do this, all the user has to do is click on the radio button corresponding to the correct answer. A Filled in multiple choice template can be seen in Figure 3.
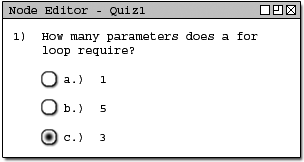
Figure 3: Quiz Node with a filled in multiple choice question.
The user has now completed adding a question to the quiz. The user may continue adding as many questions as they wish. Adding a True/False question has an identical process as adding a Multiple Choice question except that True/False questions can only have two possible answers and so these answer cannot be edited in any way. They simply say 'True' and 'False'. Similarly, a short answer question is added in the same manner, except when the user wants to enter the correct answer, they simply type the correct answer into the text entry box generated in the question template. Coding questions are slightly more complicated and are covered in detail in the next section of this scenario. Figure 4 shows the quiz node after the user has completed adding both a True/False and a Short answer question.
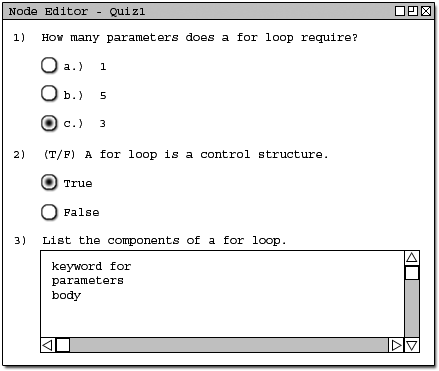
Figure 4: Quiz Node with three questions added.
Coding Questions are very much like the runnable code segments discussed in the Code Segments scenario. The difference here is that the user taking the quiz is presented with a question and they must fill in the given text box with appropriate code that satisfies the conditions given in the question. The user taking the quiz still has access to the run button so that they may check to see if their code is doing what they think it's doing.
To add a Coding question to a quiz, the user clicks the Code button in the Select Question Type dialog. The system repsonds by inserting a template coding question into the quiz node. See Figure 5 for an example of the coding question template
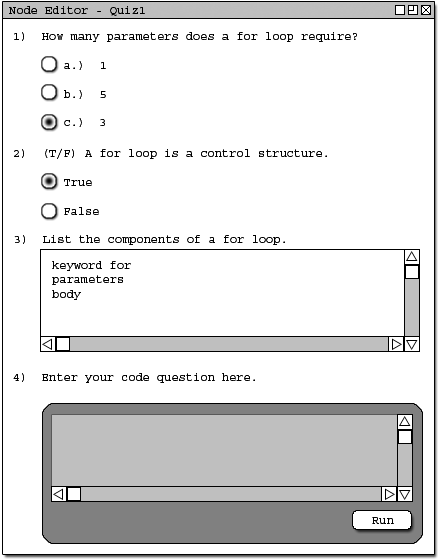
Figure 5: Quiz Node coding question template.
Now that the user has the coding question added, they need to fill in the template question text. This is done in the same manner as the other three types of questions.
Like the other questions, the user must supply the system with the correct answer to the question. Coding questions will be graded by comparing what is sent to standard output to a string defined by the author of the quiz. If the string sent to standard out matches the string specified by the author then the question has been asnwered correctly, otherwise, the question has been asnwered incorrectly. To specify the correct string for a coding question, the author types the correct string into the code segment box as seen in figure 6.
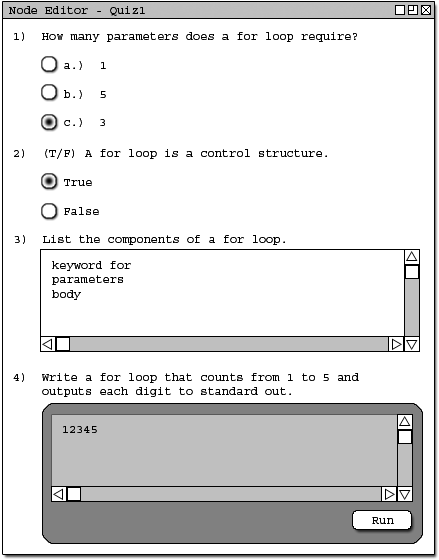
Figure 6: Quiz Node coding question filled in.
The user decides that they do not want any more questions on this particular quiz so there are no more questions to add. However, the user must now assign point values to each question and link the node so that when a student completes the quiz, they are directed to the next appropriate section. To do this, the user selects Scoring Table from the Quiz Tools submenu of the Authoring menu. The system repsonds by displaying a dialog titled Scoring Table. See Figure 7 for an example of an empty scoring table dialog.
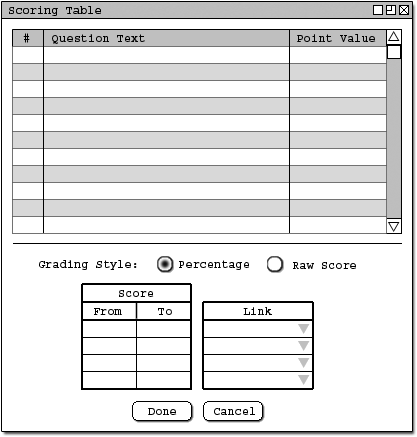
Figure 7: Scoring Table.
The Scoring Table dialog displays a table of point values, radio buttons used to select the desired grading style and a table for scores and links. The table of point values is populated with all the questions currently in the quiz. The user first assigns point values to each question in the quiz. The user clicks in the first Point Values box which corresponds to question 1. The user then enters an integer value that will be used for scoring. Once the user has entered a value, they can click in the next box or simply press the Enter key. Doing so will allow them to enter a value for question 2. The user continues to do this until all the Questions have been assigned a point value. See Figure 8 for an example of questions with point values.
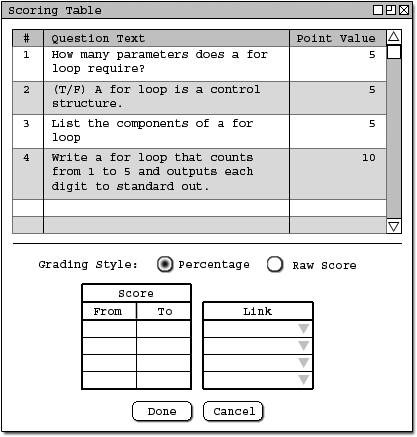
Figure 8: Scoring Table with point values.
Now that the user has completed filling in the point values for all the questions, they need to select a grading style. The Percentage style requires that values input in the Score table be valid percentages. (Valid percentages are integers from 0 to 100.) The Raw Score grading style requires that values input in the Score table be valid point values. (Valid point values are integers from 0 to how ever many total points the quiz is worth which is determined by summing up all the point values for each question.) For this scenario, lets assume that the user will use the default grading style which is Percentage
After selecting the grading style, the user must tell the system what actions to take when a student takes the quiz and gets a certain score. In order to do this, the user must fill in the Score and Link Tables in the Scoring Table dialog.
The user would like the student to go the first node of the lesson if they 'fail' (the user also decides that a 'failing' grade is in the range of 0% to 60%). The user enters 0 for the start of the range and 60 for the end of the range.
After the user enters a valid range, they can then pull down the corresponding link box. This box will contain the titles of all previously designed Nodes within the current Lesson. The user selects which node they want to link to from the box. For example, the user enters a range of 0 to 60 in the first row of the Score table. They then pull down the corresponding Link box and select the first node in this lesson (titled 'Intro').
Alternately, the user may click on the link cell they wish to work with and then select the target node by clicking on it's icon in the roadmap. For example, the user fills in the range 61 to 90 in the second row of the Score table and then clicks on the corresponding cell in the Link table. The user then goes to an open roadmap and clicks on the last node in the lesson (titled 'Summary').
Finally, the user may link to a node that exists within another Lesson entirely. The user simply clicks in the appropriate cell and then uses the Lesson Explorer window to locate the Node they want to link to. Once they have found the correct node the user double clicks on it to insert that node into the Link table. For example, the user fills in the range 91 to 100 in the third row of the Score table. Then the user clicks on the appropriate cell in the Link table. Then the user navigates through the Lesson Explorer to the first node of another lesson (titled 'While Loops'). Figure 9 shows the resulting Scoring Table dialog.
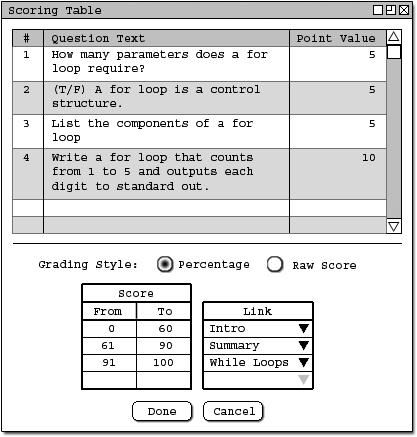
Figure 9: Scoring Table with point values and links.
The user decides that they don't want question number 2 to be in the quiz. They remove the quesiton by selecting Remove Question from the Quiz Tools submenu of the Authoring menu (Authoring -> Quiz Tools -> Remove Question). The system responds by displaying the Remove Question dialog. Figure 10 shows the Remove Question dialog.
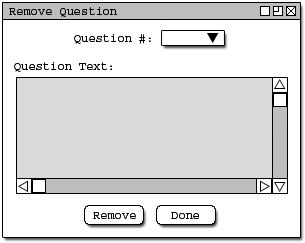
Figure 10: The Remove Question dialog.
To remove question number 2, the user selects "2" from the Select Question pull down box. The Question Text for question 2 is displayed in the Question Text area so that the user can visually confirm that the selected question is indeed the one they wish to remove. When the user has selected the correct question, they can click Remove to continue with the remove process or Done to abort. Figure 11 shows an example of the Remove Question dialog with a question selected.
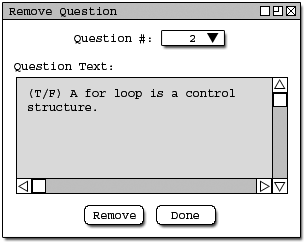
Figure 11: The Remove Question dialog with a question selected.
When the user clicks on the OK button, they are presented with a confirmation dialog as seen in Figure 12.
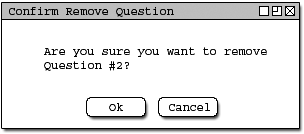
Figure 12: The Confirm Remove Question dialog.
The Conrifm Remove Question dialog asks the user whether or not they are sure they wish to remove the selected question. The user clicks OK if they are sure or Cancel if they wish to select a different question. If they user clicks ok, the system responds by removing the selected question from the quiz. Unless the question removed was the last question in the quiz, all other questions numbers are updated to take into account the missing question. For example, since the user removed question 2, questions 3 and 4 become questions 2 and 3 respectively. If the user clicks Cancel, the remove operation is aborted. In either case, the user is returned to the Remove Question dialog where they can continue removing questions, or return to the Node Editor by clicking the Done button.
This concludes the scenarios on creating a quiz.