This section will take the user through all aspects of editing a schedule, from adding and deleting a section to changing one particular field within a section. The user should be warned that manually change a field within a section can cause Conflicts to occur, in order to avoid this the user should utilize the pull down menu's whenever possible.
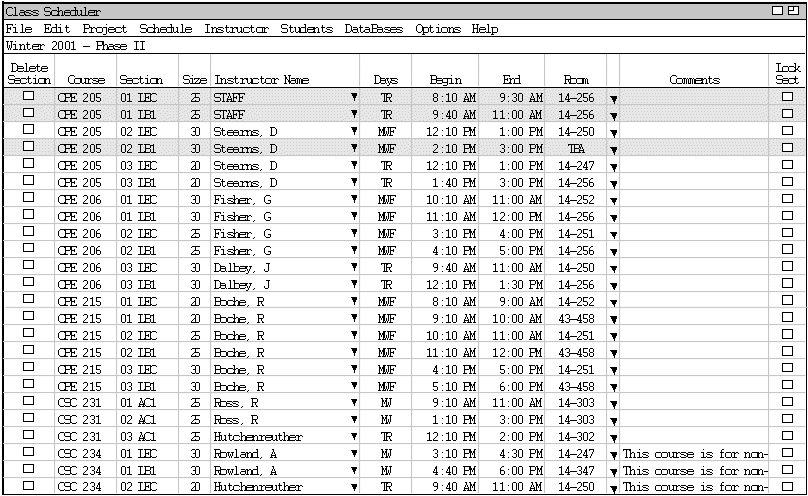
This scenario shows an individual user how to add and delete a section from an existing schedule. In this scenario, it is assumed the user has already created a schedule as discussed in Create and Edit a Basic Project. To edit a section, the user opens the schedule to be edited and selects the 'Edit' item in the 'Schedule' menu, whereupon the new fields appear in the Schedule on the screen and most of the fields become active as shown in the Figure 1 below. Some of the sections may show up in yellow; this is a warning about a possible scheduling conflict that the user must resolve. How to resolve conflicts will be discussed in a later section Resolving Conflicts. For now, ignore the pretty colors.

Figure 1 : Edit Spreadsheet View
Each row in the spreadsheet represents an individual section. The last row of the Edit View Spreadsheet is for adding a new section so all its fields are blank. The first column is the delete field for each section. Clicking the box will mark the section for deletion. The Course and Section fields are next they are immutable, the user may delete or add a section, but these two fields may not be changed. The course is represented by its full descriptor (three letters representing the department follow by the course number). The section is a two-digit number follow by the three-letter description of the section.
| LEC - Lecture | IND - Independent study |
| LB1 - Lower division laboratory | LB2 - Upper division laboratory |
| AC1 - Lower division activity | AC2 - Upper division activity |
| RCT - Recitation | SEM - Seminar |
The size represents the max number of students allowed in the section it is an integer between 0 and 999. The instructor field is next, the name of the instructor is in the following order Last name, Fist initial. The user can edit the Instructor in two ways. The user may click on the field and type the name of the new instructor or use the pull down menu to select for a list of instructor that are available to teach this course. The Days field lists the days of the week that the section is will be taught on using the following letters to corresponding to the days of the week. Begin is the starting time of the section and End is the ending time of the section shown in the following format hh:mm(AM/PM).
| M - Monday | F - Friday |
| T - Tuesday | S - Saturday |
| W - Wednesday | U - Sunday |
| R - Thursday |
The Room field shows the building and room number for the section, a two digit building number and a three-digit number for the room. The next field is the Comments field it takes a free form string. This field allows the user to indicate important information about the section. To view the entire comment the user clicks on the field and the entire message will appear in a dialog box an example is shown below. The final field is the Lock Section into the schedule. When this box is checked all other field in the section will be disabled. The Lock field used in creating new projects from past schedules which was discussed in Create A Project, and to assist the user in Resolving Conflicts.
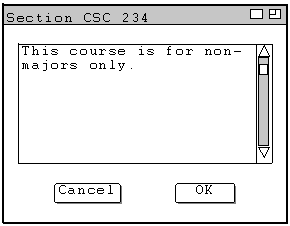
Figure 2 : Section Comments
After the Edit schedule appears, the user deletes a section by clicking the delete box and then selecting the 'Update item on the 'Schedule' menu. Update is responsible for the following things;
Once the user clicks 'Update' the section is removed from the schedule and the individual Instructor and Room are adjusted to reflect their new availability. A simple deletion would not create a conflict so no new conflicts arise.
The user now decides to add a new section. To do this the user selects "Add Section' item in the 'Schedule' menu, whereupon the system displays the dialog shown in Figure 3.
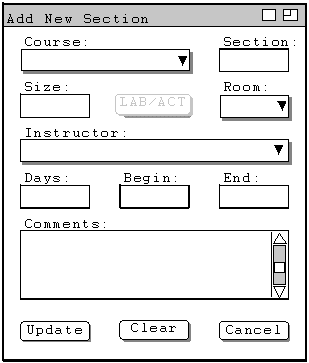
Figure 3 : Empty Add New Section Dialog
All the fields in the Add New Section Dialog correspond to the fields in the Edit View Spreadsheet. Course is the department followed by the course number (i.e. CPE 205). The section is a two-digit number follow by the three letter description of the section. Size is an integer between 0 - 999 representing how many students can enroll for the section. The rest of the fields are optional, any or all of them may be left blank and 'Update' will fill in the missing fields with available instructors, times and/or rooms. The "LAB/ACT" button is grayed out and will become active when the course selected has a lab or activity attached to it. The Room is for the location where the section will meet. The instructor field is for the name of the instructor. The Days field is the days of the week when the class meets. Begin is the when the class starts and End is when the class ends. The Comments field is an optional text field for special notes about the course.
The user now types in the course descriptor in the course field. The user clicks the pull down menu and selects a course from available courses in the course database. The section the user is adding has a mandatory lab attached to it so the "LEC/ACT" button becomes active. The section field immediately defaults the next available section number. The user then types in the size of this section. The user could, at the point click "Ok" and let Update automatically fill in the missing fields. The user continues on and fills in the Instructor and Room fields while leaving the Time field blank. Figure 4 shows the result of the user having filled in information for a new section for course CPE 205. It has an instructor and a Room but the Time and Comments fields have been left blank. The user has added a comment about why they are added the section at this time see Figure 4 below to view a completed dialog.
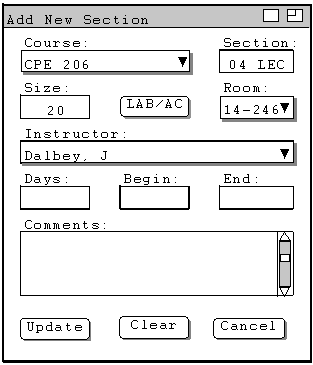
Figure 4 : Completed Add New Section Dialog
The user now clicks the "LAB/ACT" button and the system brings up the New LAB/ACT Section dialog. This is a scaled down version of an Add New Section dialog. The system automatically fills in the Course, Section, and Size fields to match the Lecture information. These may not be changed. The Room, Instructor and Time fields are similar to the corresponding field in the Add New Section dialog. The Instructor field defaults to instructor for the Lecture portion of the section, and the user enters the room for this section. The user leaves the Time fields’ blank see Figure 5 below.
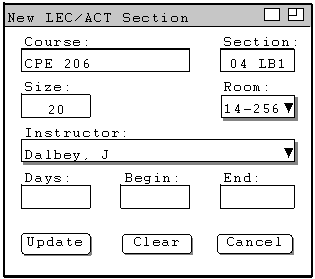
Figure 5 : Completed New LAB/ACT Section Dialog
The user clicks "Update" and is returned to the Edit Schedule spreadsheet, Update has filled in the missing information previously left blank by the user in the dialog boxes, as shown below in figure 6.
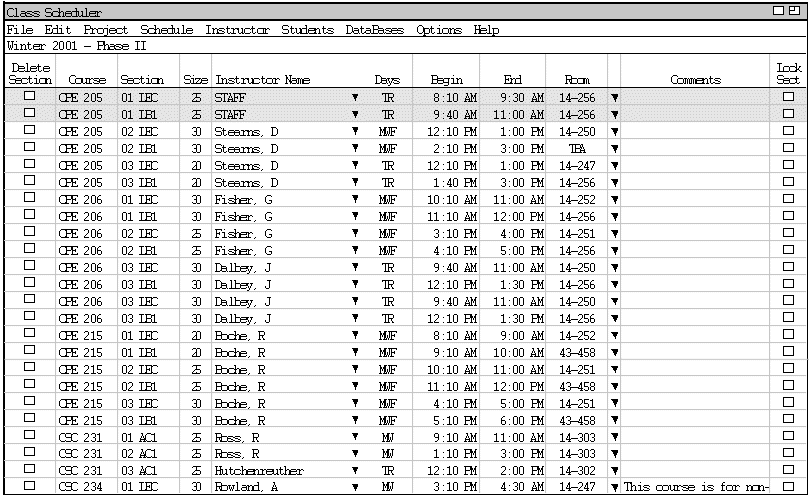
Figure 6 : Edit Schedule spreedsheet with new sections
Editing a schedule manually is very dangerous and more often then not will cause conflicts to arise. It is strongly recommended that whenever possible the user utilize the pull down menus, this will insure that a conflict doesn't arise. Refer to the next section Resolving Conflicts for more information on the causes of conflicts and how to resolve them.
The user will make a few other minor changes to the schedule. The user clicks on the Instructor field of CPE 205 - 01 LEC and types in the name of an Instructor to replace STAFF. He is a new instructor who is not in the local instructor database, so the following warning box appears asking if the user wishes to add the instructor, shown in Figure 7.
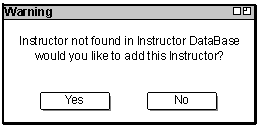
Figure 7 : Instructor Not Found Warning
Clicking "Yes" brings up the Add Instructor dialog box, adding an instructor is discussed in Adding and removing instructors. The user clicks "No" this allows the user to delay entering the instructor into the database, although this action does cause a "Warining Conflict" to arise and the row becomes highlighted in yellow.
Next, the user adds a new Room that CPE 205 - 02 LEC is taught in. The user clicks on the Room field and manually types in a room number then hits enter. Immediately at Warning box, shown in Figure 8, appears. Clicking "Yes" bring up the Add Room dialog box, adding an room is discussed in Room Listing. The user clicks "No" because this room will not be availible for any other section in this department.
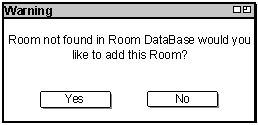
Figure 8 : Room Not Found Warning
The user now changes the Time for CSC 231 - 02 AC1 by manually typing in the new time. Warning, this is the operation most likely to raise conflicts, but please be aware when the user enters a bad time the conflicts that arise will refer to with the instructor or the room and never with the actual time itself. For more details on conflicts please refer to the next section Resolving Conflicts. After all the changes are made the user clicks on 'Schedule->Update' to insure there are no conflict and to update the instructor and room information. The final Edit Schedule spreadsheet is shown below in Figure 9.
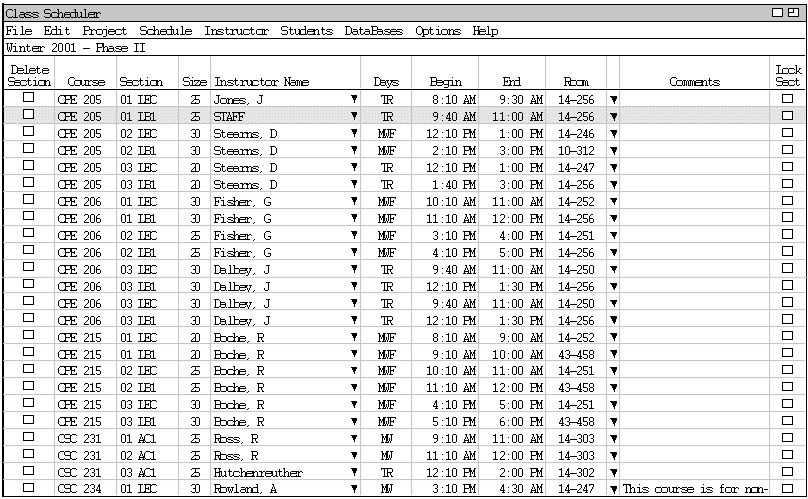
Figure 9 : Edit Schedule spreedsheet after changes.