2.1.1 Instructor Interface Overview
When an instructor initially invokes the Grader tool, the screen appears as shown in Figure 2.1.1.1.
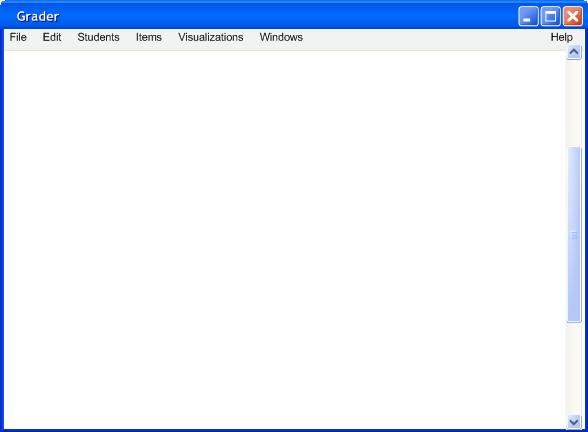
Figure 2.1.1.1. Initial Screen
The initial display consists of one empty window. To begin using the tool, the instructor must start by creating a new class using the command menus.
Figure 2.1.1.2 shows an expansion of the command menus.

Figure 2.1.1.2 Drop Down Menus
The ‘File’ menu contains most of the typical commands for manipulating data files such as save, print, and exit. ‘File>New Class’ gives the user the option to create a new class, this is discussed in detail in Section 2.2. To open an existing class select ‘Open’ from the ‘File’ menu, and a dialog box appears to guide the user through the rest of the opening. ‘File>Close’ closes the currently active class, and ‘File>Close all’ closes all open classes and it offers to save any that have been modified. ‘File>Submit’ allows the user to submit the current class’s grades to Student Information Services (SIS). ‘File>Post’ is the command that the instructor can use to allow the gradebook data to be accessed by the students using the Grade Viewer. ‘File>Log in’ allows the user to log in and change grades that are password protected, this is described in detail in Section 2.4.4. ‘File>Save’ allows the current class to the file from which it was opened, while ‘File>Save As’ allows the file to be saved on a file other than the one it was opened with. ‘File>Print’ will print the contents of the active display window and Print Preview allows the user to see what will be printed if the print command is selected. ‘File>Exit’ closes any open classes, offers to save if they have been modified and then exits the Grader tool.
The ‘Edit’ menu contains commands for manipulating grading data. ‘Edit>Undo’ undoes the most recently completed command. Repeated selections of ‘Undo’ will undo successively earlier commands. ‘Edit>Redo’ redoes the most recently undone command. Repeated selections of ‘Redo’ will redo the undone commands in reverse order. ‘Edit>Cut’ removes and copies what is currently selected and ‘Edit>Copy’ copies what is currently selected. ‘Edit>Paste’ inserts what was most recently cut or copied at the currently selected edit point in the current display. Selecting ‘Edit>Preferences’ opens the preferences dialog.
Under the Students menu, the user can Add, Edit and Delete a student. The Add and Edit commands open a dialog box that is discussed in Section 2.3. ‘Students>Synchronize’ synchronizes the currently open class roster with the one from SIS, and ‘Students>Preferences’ opens the preferences dialog for students.
The ‘Items’ menu contains commands that allow the user Edit items. The Edit commands open a dialog that is discussed in Section 2.4. ‘Items>Late Policy’ opens a dialog that allows the user to choose a late policy, this is discussed in Section 2.4.1. ‘Items>Access Levels’ allows the user to set and edit access levels that can password protect a gradebook. This is discussed in detail in Section 2.4.4. ‘Items>Grade Scale’ allows the user to alter the grading scale, this is discussed further in Section 2.4.2. The Expand, Collapse, and Sort commands all relate to viewing the gradebook. Expand and Collapse would either expand or collapse a parent item respectively. This would allow the user to see more or less details. The Sort command allows the user to select a column to sort by.
The ‘Visualizations’ menu contains commands that allow the user to create a visualization. Choosing Histogram, Pie Chart, or Trends brings the user to the Visualization tab. This is discussed further in Section 2.5
‘Window’ allows the user to browse through the set of currently open windows. The window menu also allows instructors to view class statistics.
The instructor can view statistics for a class in two ways: it can appear at the bottom of the gradebook for that class or it can be in its own window. In the gradebook, statistics including average, median, standard deviation, and range will be each of their own rows and their data will be calculated for each of the columns as seen in figure 2.1.1.3.

Figure 2.1.1.3
Statistics can be shown in the gradebook by selecting the Window > Show Statistics > In gradebook command. To show this information in a separate window select Window > Show Statistics > In Window, this dialog is shown in figure 2.1.1.4.
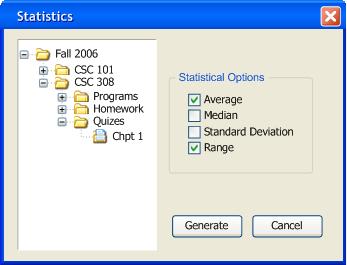
Figure 2.1.1.4
This dialog box allows the instructor to choose the data from which the statistics are calculated. He or she can select any folder or document in the hierarchy. Choosing a folder would include all of its subfolders and documents in the statistics. The instructor can also select multiple documents. In addition the user can choose which statistics he or she would like to see. Selecting the Generate Button would result in figure 2.1.1.5.
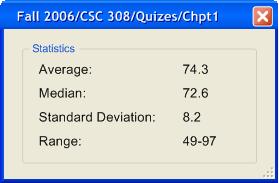
Figure 2.1.1.5
The statistics box will show the data it represents in its title. (This example shows what the user would see if he or she selected all the options.)
Prev: Functional | Next: Student User Interface | Up: functional | Top: index